User Guide
Introduction
LetsGetHired is a desktop application designed to assist you in efficiently tracking and managing your internship applications and their progress.
With LetsGetHired, you can benefit from:
- Swift Viewing: Swiftly view your internship applications and monitor their status.
- Status Updates: Stay updated on the progress of each application, from application sent to interview stages.
- Organization: Organize your internship applications according to your needs for better clarity.
- Notes: Add personalized notes to each internship application, ensuring you never forget key details.
- Deadlines: Set and track deadlines for your internship applications, so you never miss an opportunity.
In addition to these capabilities, we recognize the importance of speed and efficiency. Thus, LetsGetHired is optimized for use via a Command Line Interface (CLI), but you still enjoy the advantages of a Graphical User Interface (GUI). If you are a swift typist, LetsGetHired can streamline your internship tracking faster than many standard GUI-based tools available.
LetsGetHired is perfect for you if you are a Computer Science undergraduate student.
Purpose
This User Guide is designed to help you get started with LetsGetHired, a powerful tool for managing your internship applications. Whether you are seeking you first internship or have prior experience, this guide will be your trusty companion in using LetsGetHired to manage your internship applications.
Prerequisite Knowledge
While this guide is accessible to a broad audience, we assume that you have a basic understanding of the internship-finding process. If you are new to this journey, don't worry! We've got you covered. Feel free to check out these helpful resources or refer to the Glossary section of the User Guide for additional information to get you up to speed.
Our goal is to make your internship application experience as smooth and successful as possible, regardless of your level of experience. Let's embark on this journey together and make your internship goals a reality.
Navigating the User Guide
This section will explain the different elements used in this User Guide and what they mean.
Page Navigation
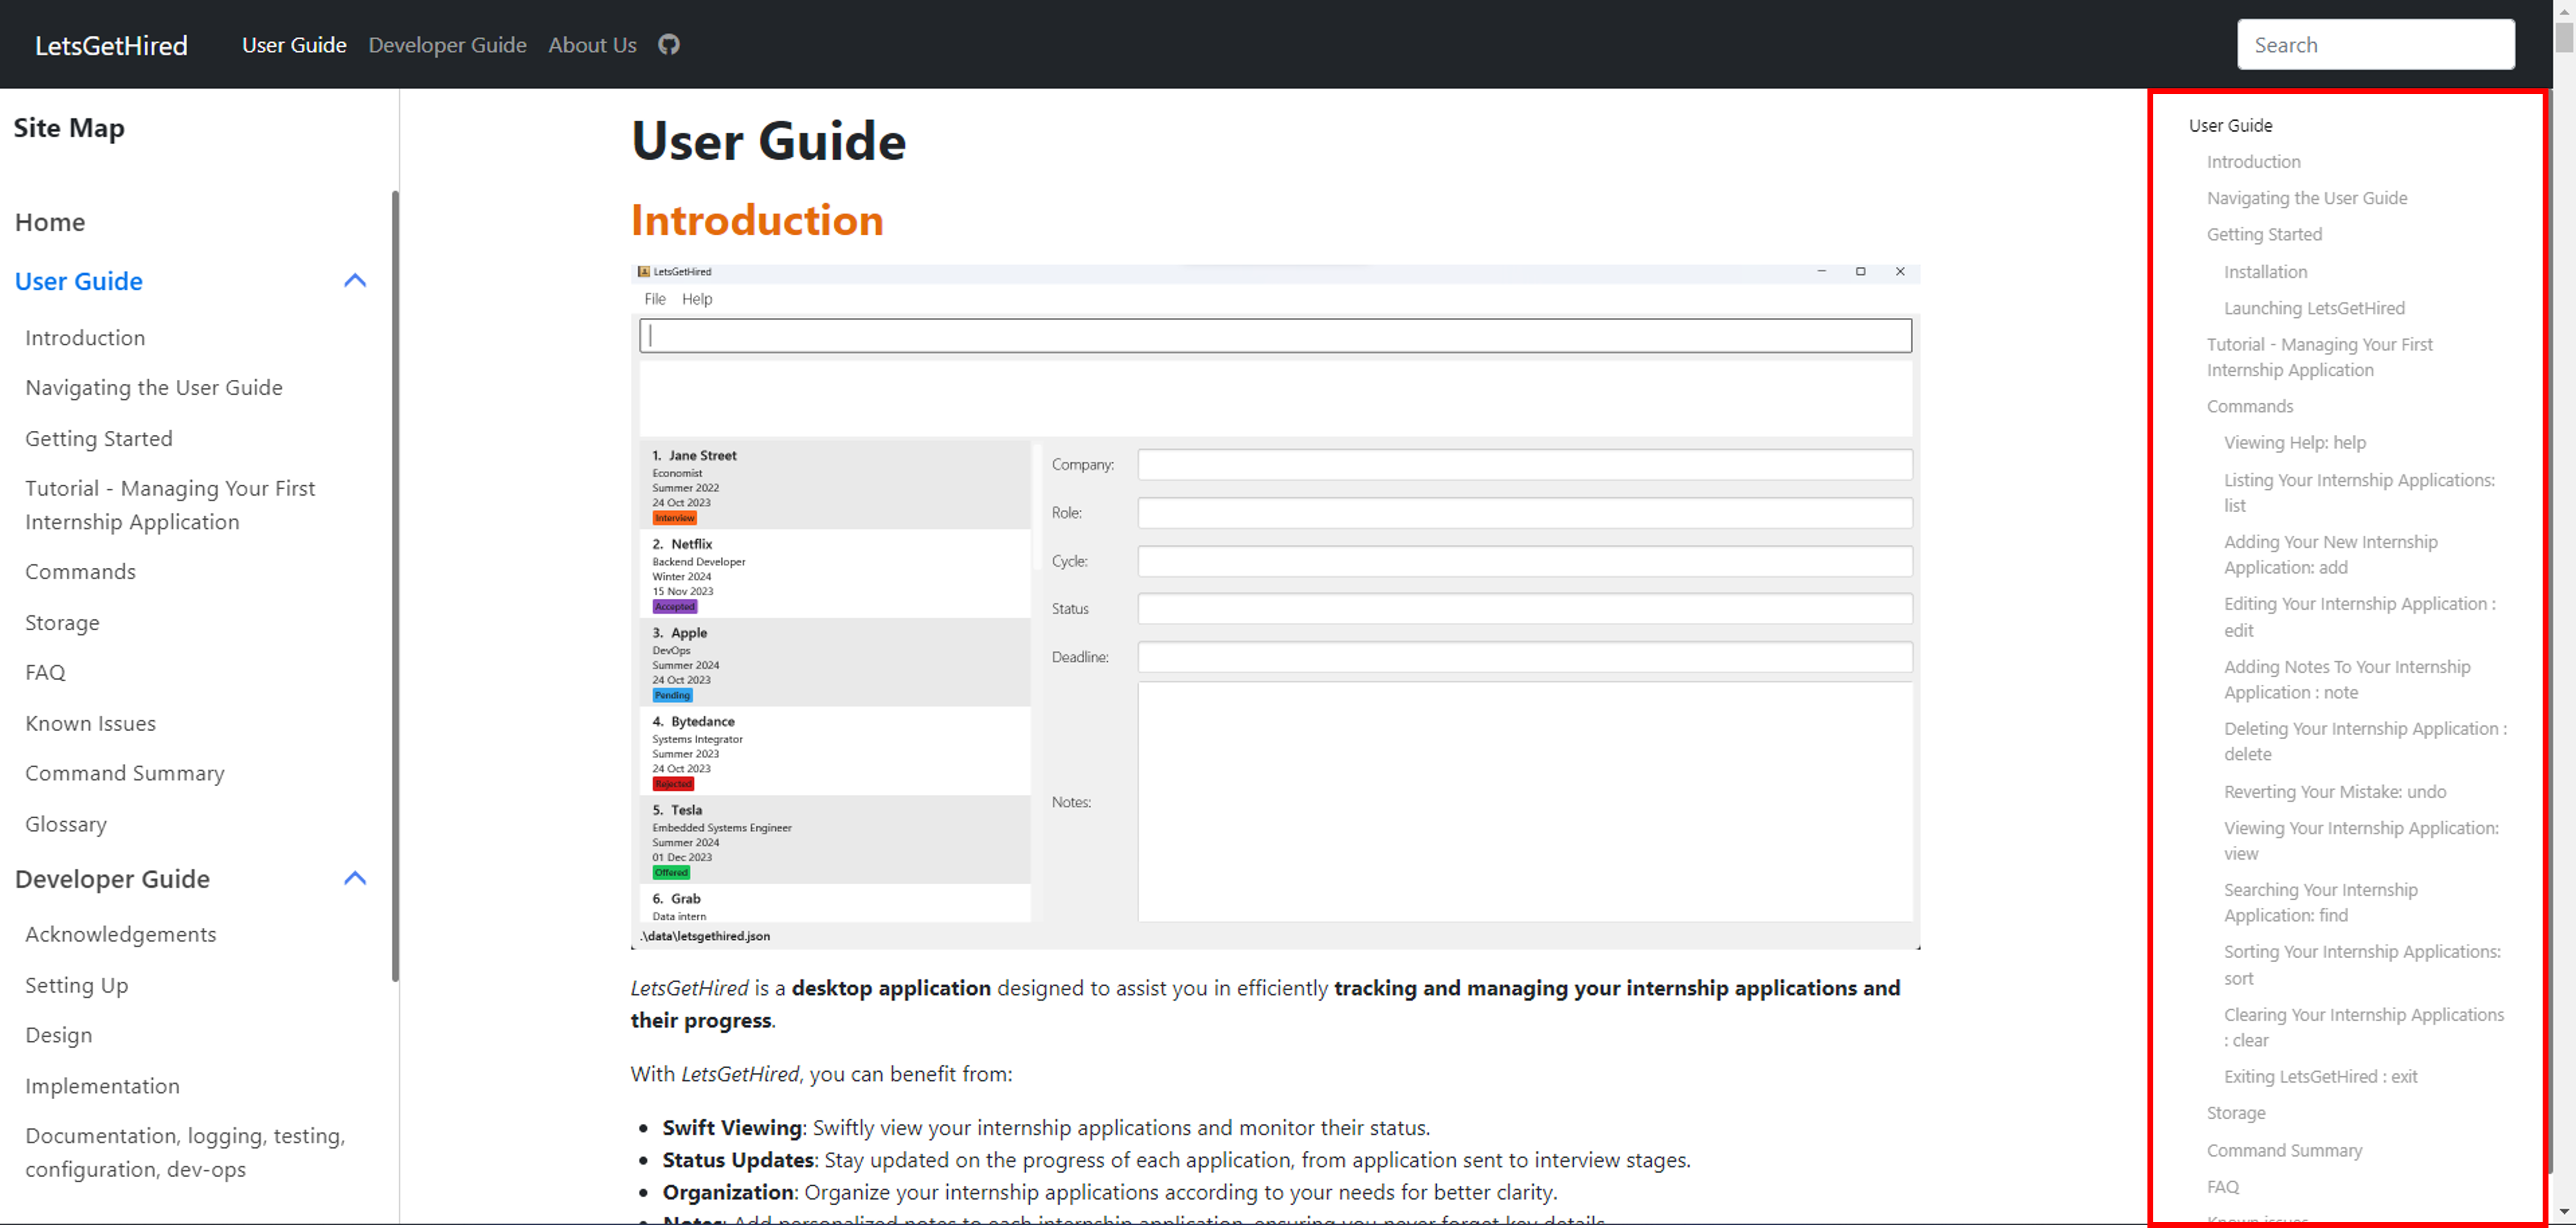
For quick navigation to the different sections in the User Guide, you could use the Page Navigation on the right side of the page.
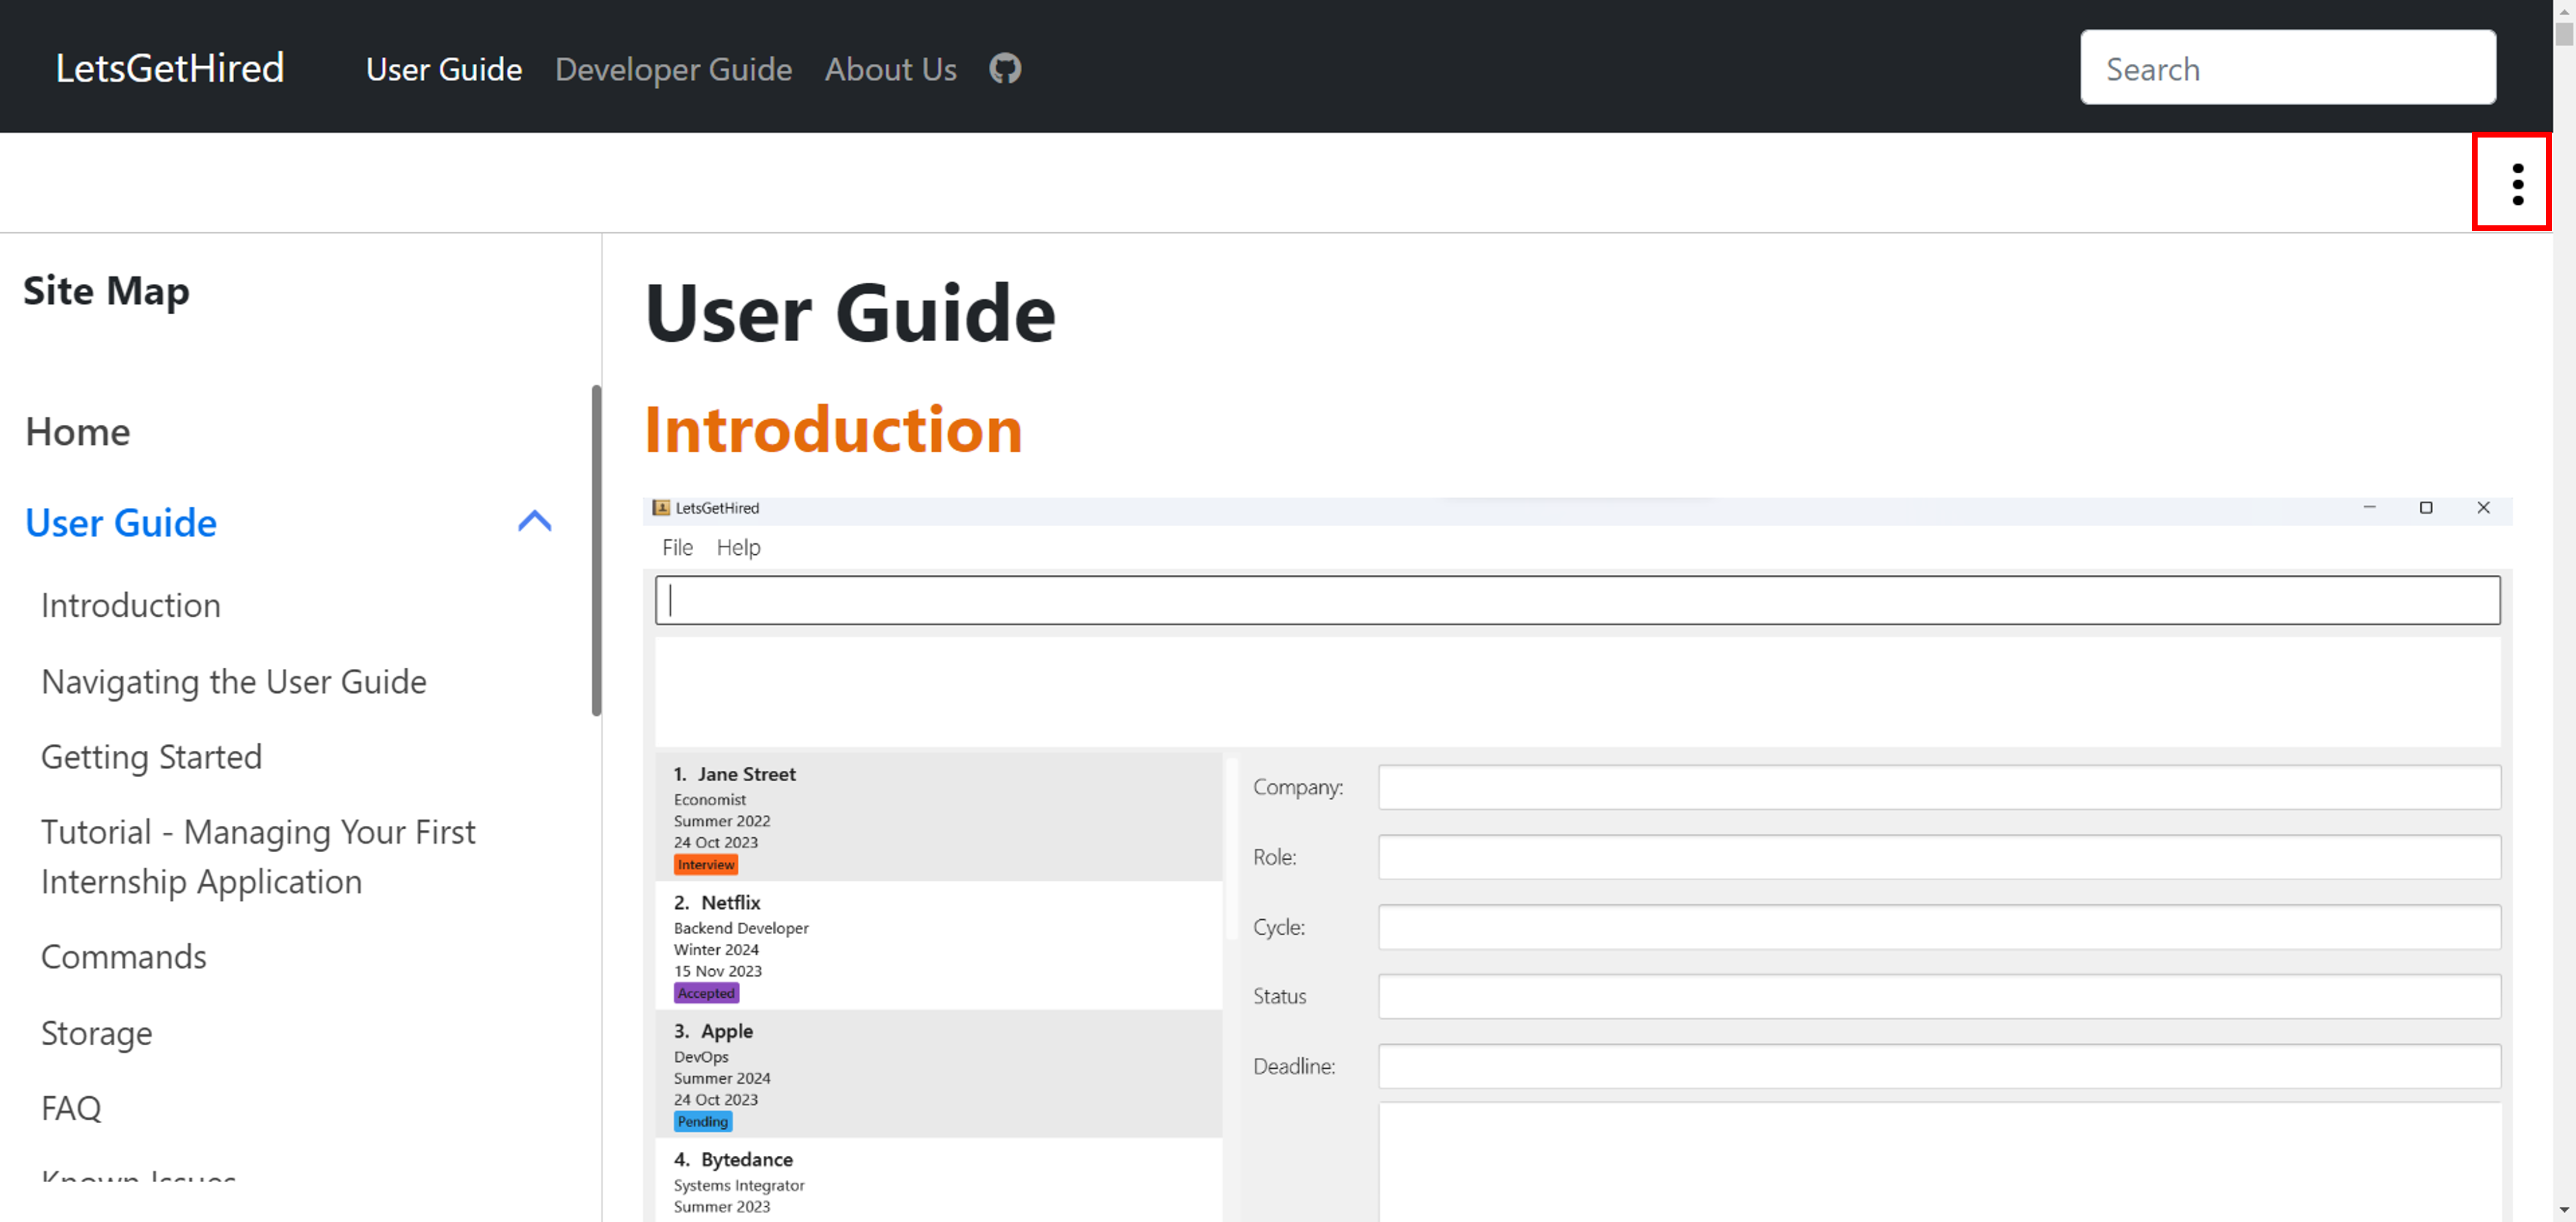
If you are using a smaller screen size, the Page Navigation will be hidden by default. To show it, click on the three-dot icon on the top right corner of the page.
Code
A code in the User Guide will be displayed in this format.
Code Blocks
Sometimes, larger blocks of
code can be displayed in this
way too!
Links
What are hyperlinks? Click here to find out!
Hyperlinks will be displayed in this format.
Sometimes it can also be bolded.
Boxes
This is a box. Some information may be put here.
There are three types of boxes used in this User Guide:
Additional Information
This is additional information.
This is also additional information.
This is also additional information.
Warning
This is a warning. Watch out for these!
This is also a warning. Watch out for these too!
This is also a warning. Watch out for these too!
Tips
These are some helpful tips. Skip these if you are in a hurry!
These are also some helpful tips. Skip these if you are in a hurry!
These are also some helpful tips. Skip these if you are in a hurry!
Now that you are familiar with the User Guide, let's get right into it!
Getting Started
Welcome to the LetsGetHired User Guide! This guide will walk you through the basics of setting up and using the application to manage your internship applications.
By the end of this section, you will learn:
- How to install LetsGetHired
- How to add your internship applications
- How to edit your internship applications
- How to add notes to your internship applications
If you are already an advanced user, feel free to jump to the Commands section of the User Guide
Installation
Ensure that you have Java 11 or above installed in your Computer
You can download it from Java SE 11 Downloads if you do not have it already.
Download the latest
letsgethired.jarfrom our GitHub Releases.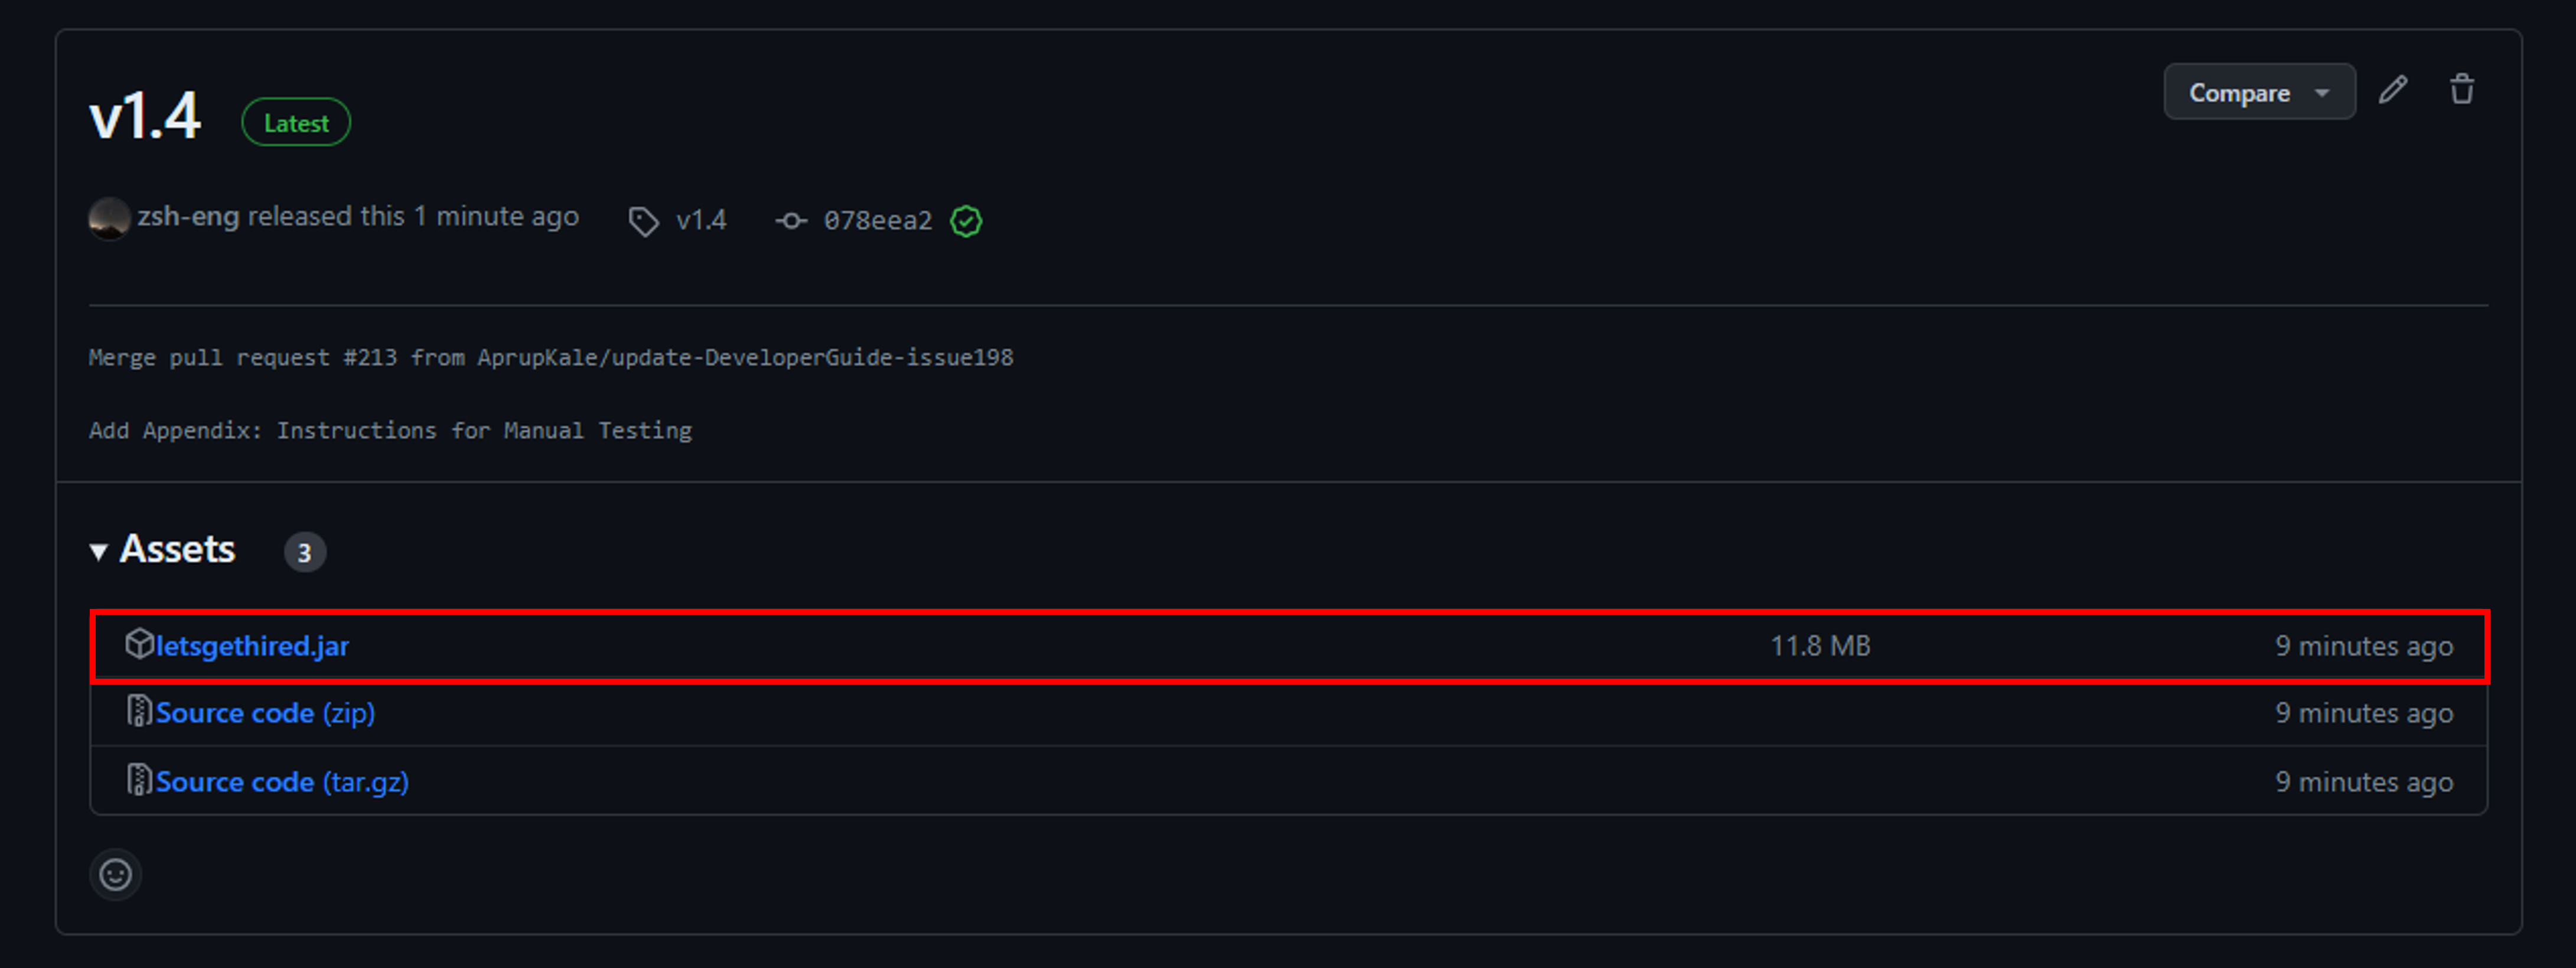
Locate the
letsgethired.jarfile- After downloading, find the
letsgethired.jarfile on your computer. It might be in yourDownloadsfolder or wherever you chose to save it.
- After downloading, find the
Choose Your Home Folder
- Decide on a folder where you want all your LetsGetHired data to reside. This can be an existing folder or you can create a new one specifically for LetsGetHired.
Copying the File:
- Right-click on the
letsgethired.jarfile and selectCopy. - Navigate to your chosen home folder.
- Right-click on an empty space inside the folder and select
Paste.
- Right-click on the
Verify the File Location:
- Ensure that the
letsgethired.jarfile is now present in your chosen home folder.
- Ensure that the
Bookmark or create a shortcut to this folder for easy access in the future!
Launching LetsGetHired
Open your Command Terminal.
- On Windows: Press
Windows + Rkeys simultaneously, typecmdand pressEnter.- Alternatively, press
Windowskey, typeTerminaland pressEnter.
- Alternatively, press
- On macOS: Press
Command + Spaceto open Spotlight search, typeTerminal, and pressEnter.
- On Windows: Press
cdinto your chosen home folder, and type in the following command:java -jar letsgethired.jarIf you are unfamiliar with the commands in the Command Terminal, we suggest reading this.
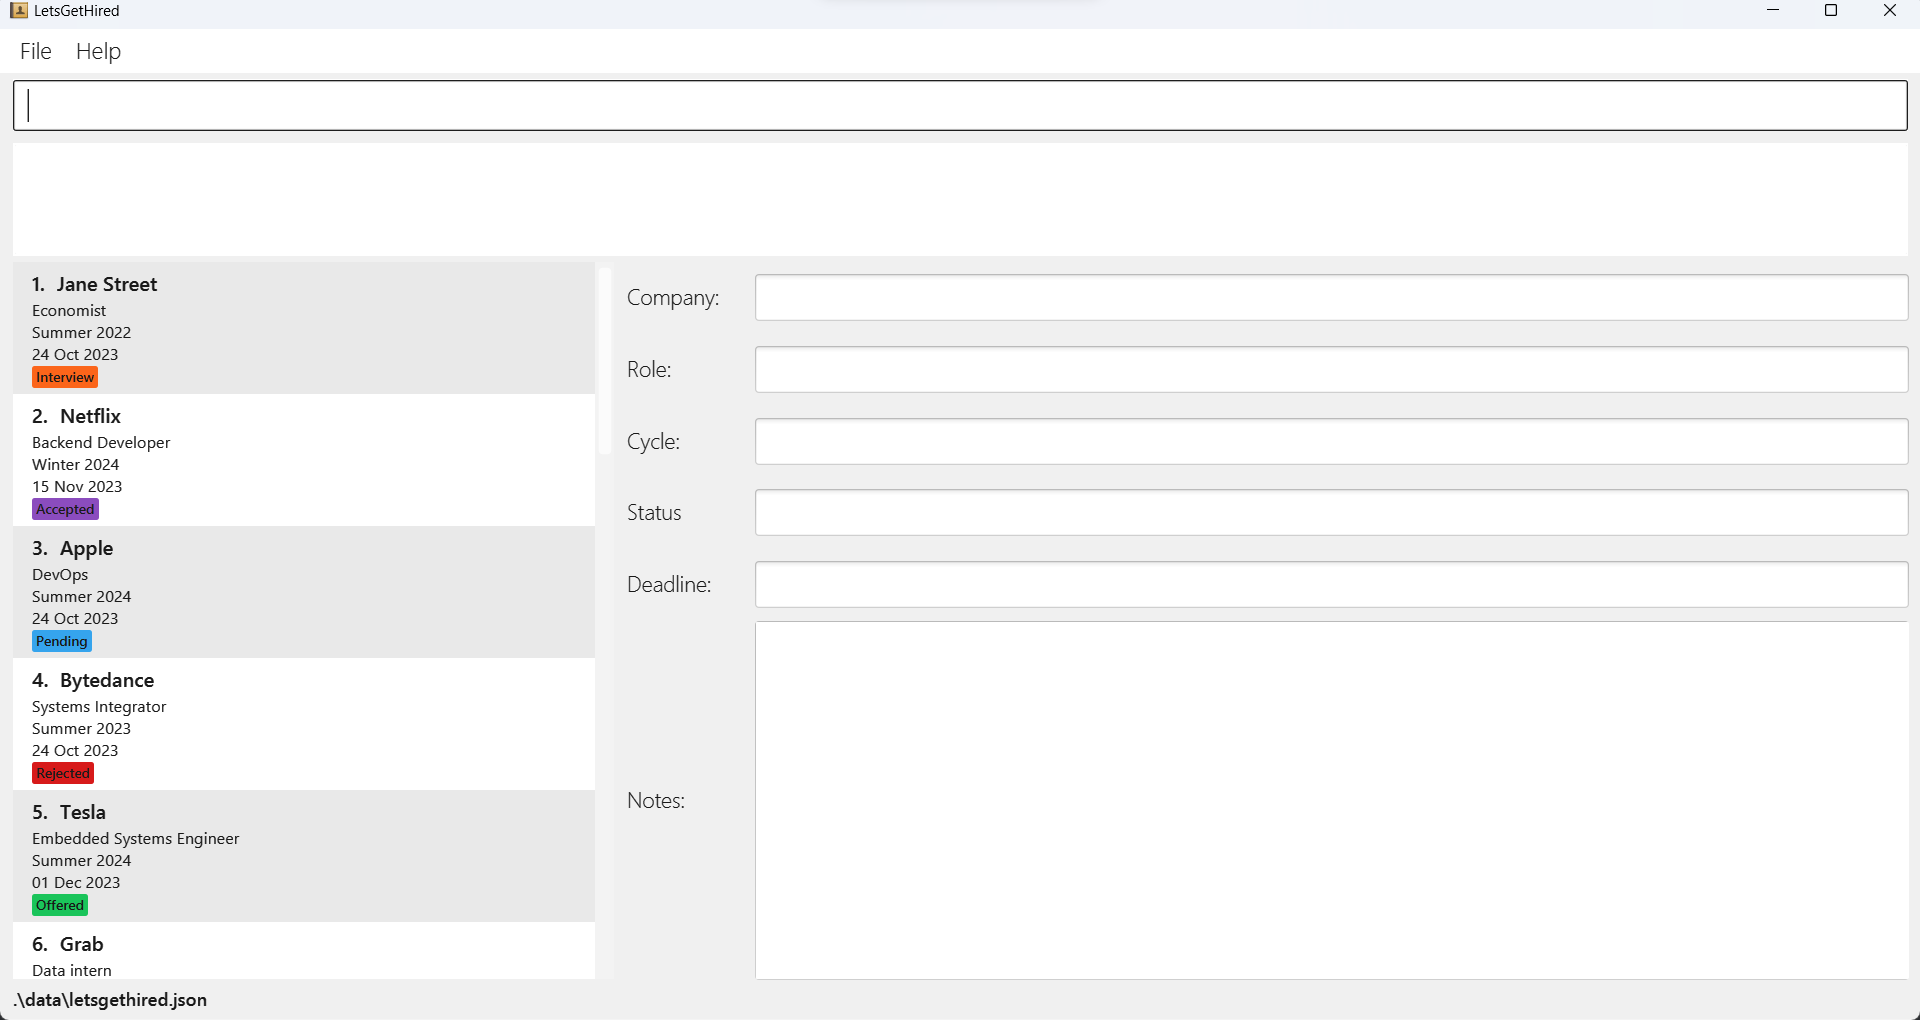
You should now see a graphical user interface (GUI) pop up on your screen (as shown in the picture below).
Please note that the app comes preloaded with some sample data.
This is to help you get a feel for how the app works and how your entries will appear.
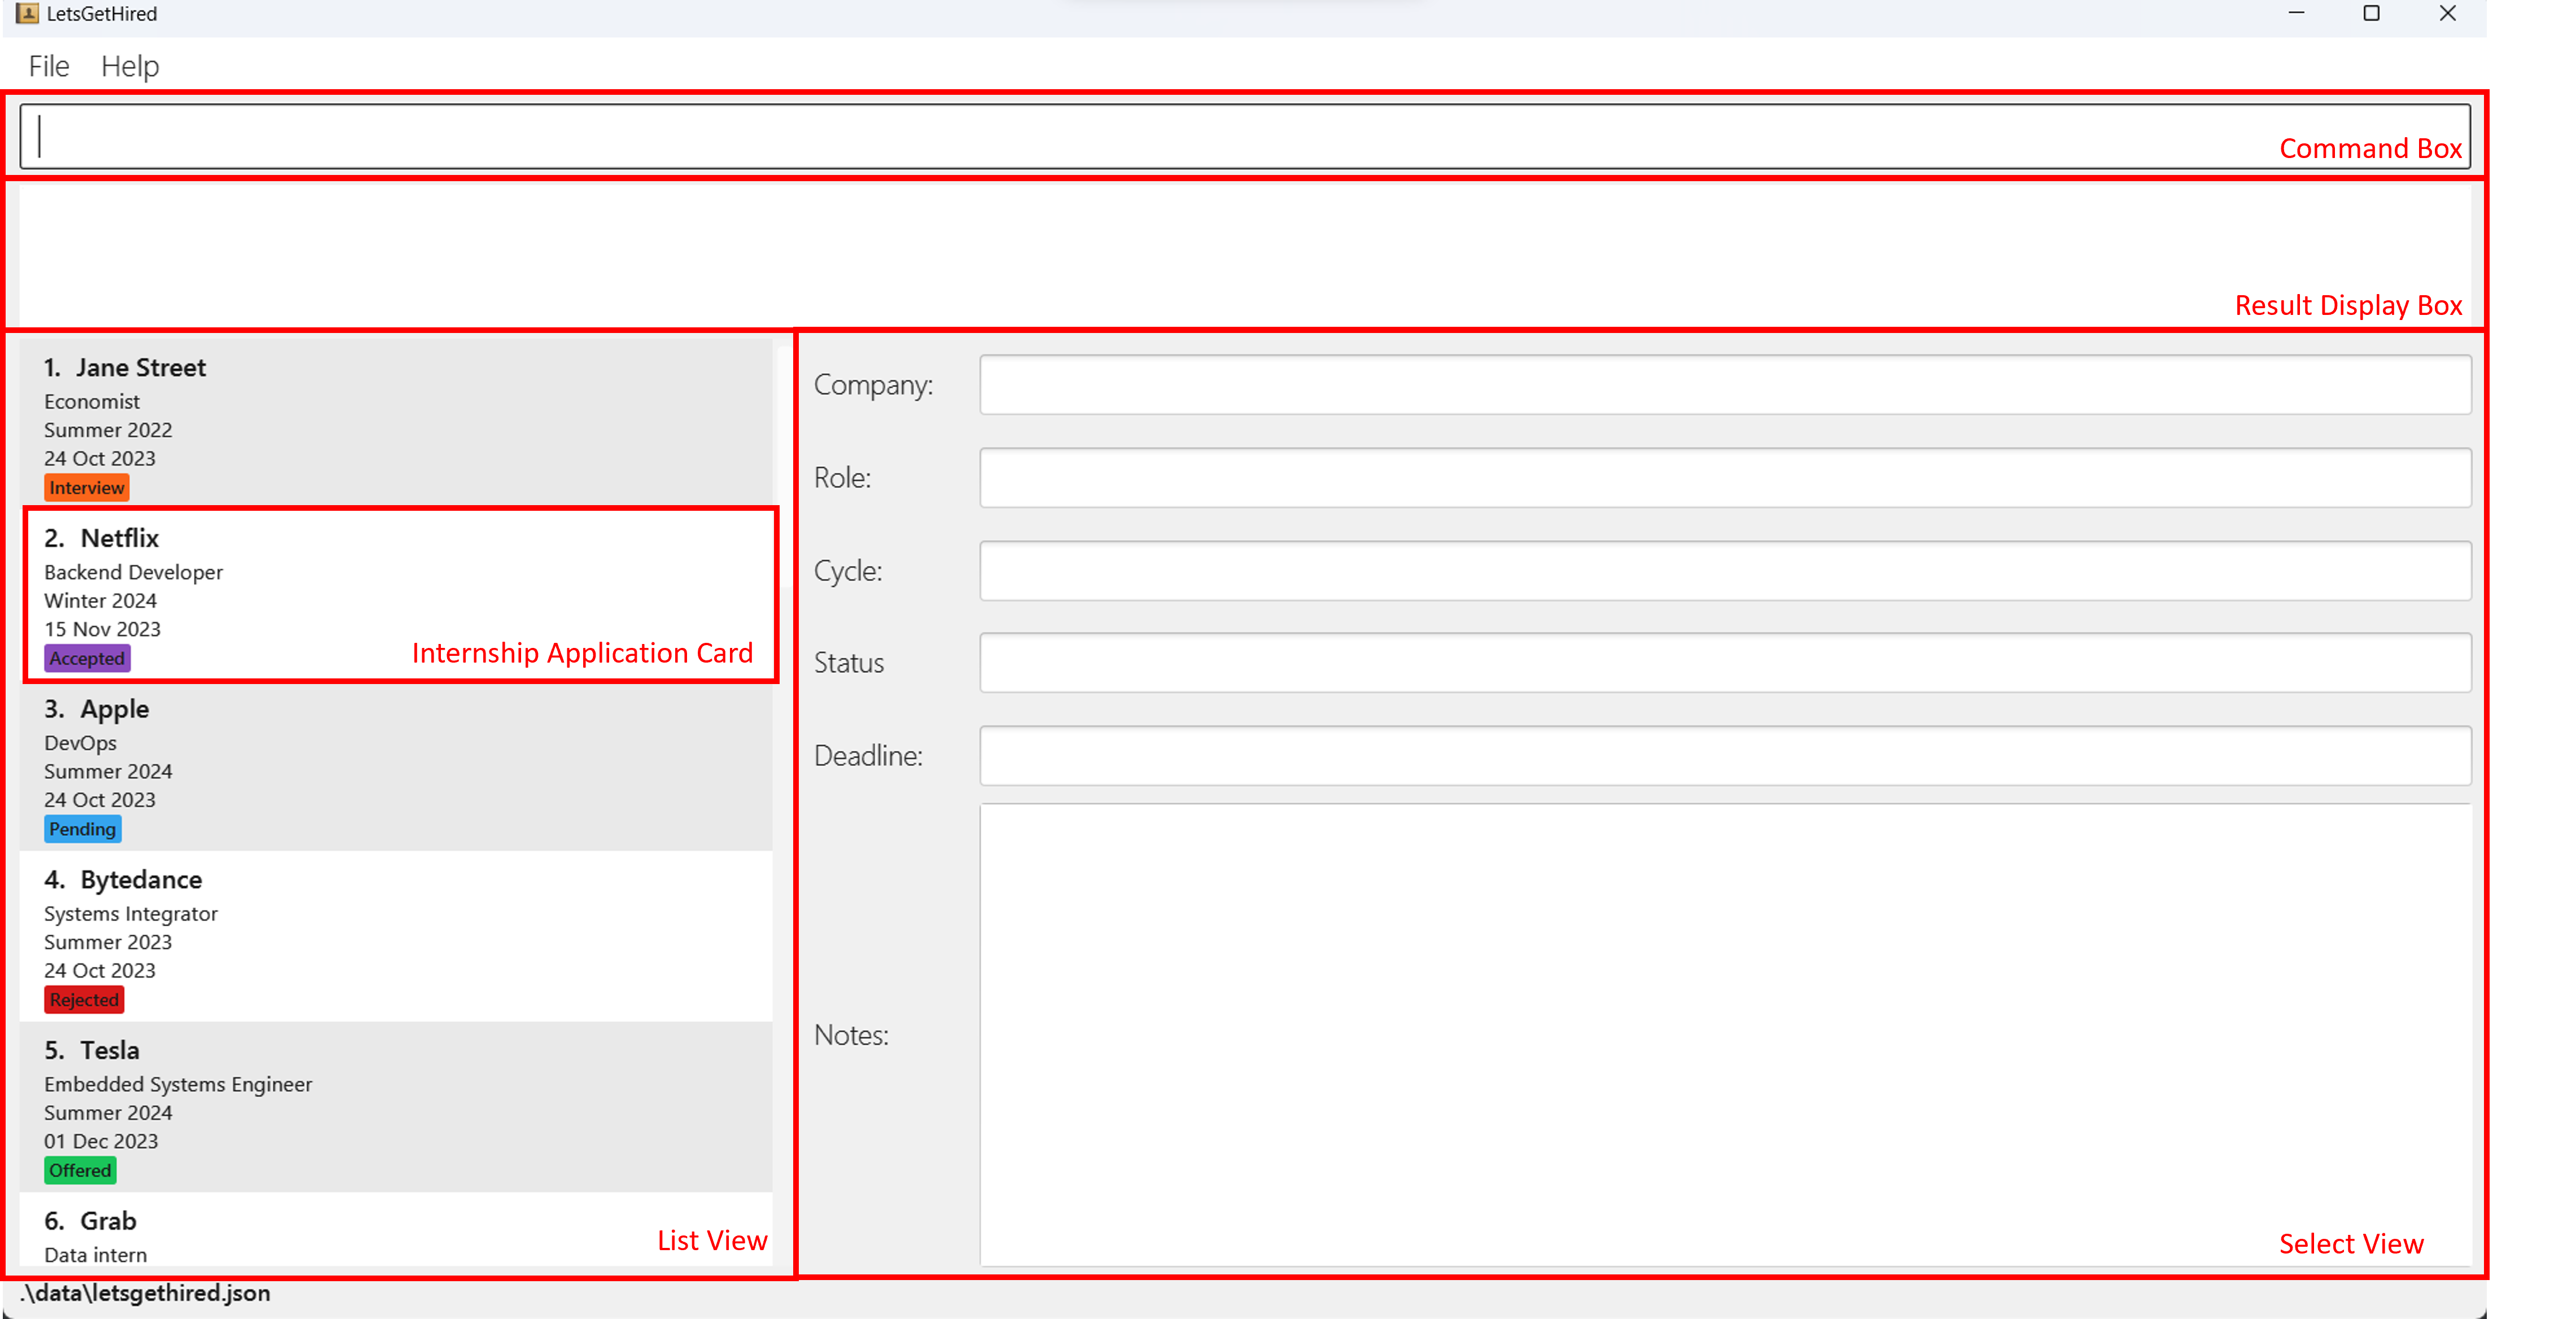
| Components | Description |
|---|---|
| Command Box | You can type commands here and press Enter to execute them. |
| Result Display Box | Displays the result of executing a command. |
| List View | Displays a list of your internship applications. |
| Internship Application Card | Displays the fields related to your internship application. |
| Select View | Displays more details related to your internship application. |
Now that you are familiar with the user interface of LetsGetHired, let's jump right into managing your internship applications in this Tutorial.
Tutorial - Managing Your First Internship Application
In this tutorial, we will walk you through a typical workflow for using LetsGetHired to manage your internship applications.
Step 1: Adding Your Internship Application
Context: You are starting your internship application journey, and you want to add a new internship application.
Imagine that you have applied for a Software Engineering Internship at Google for the Summer of 2024.
To add your internship application, go to the Command Box and type the following command:
add n/Google r/Software Engineering c/Summer 2024
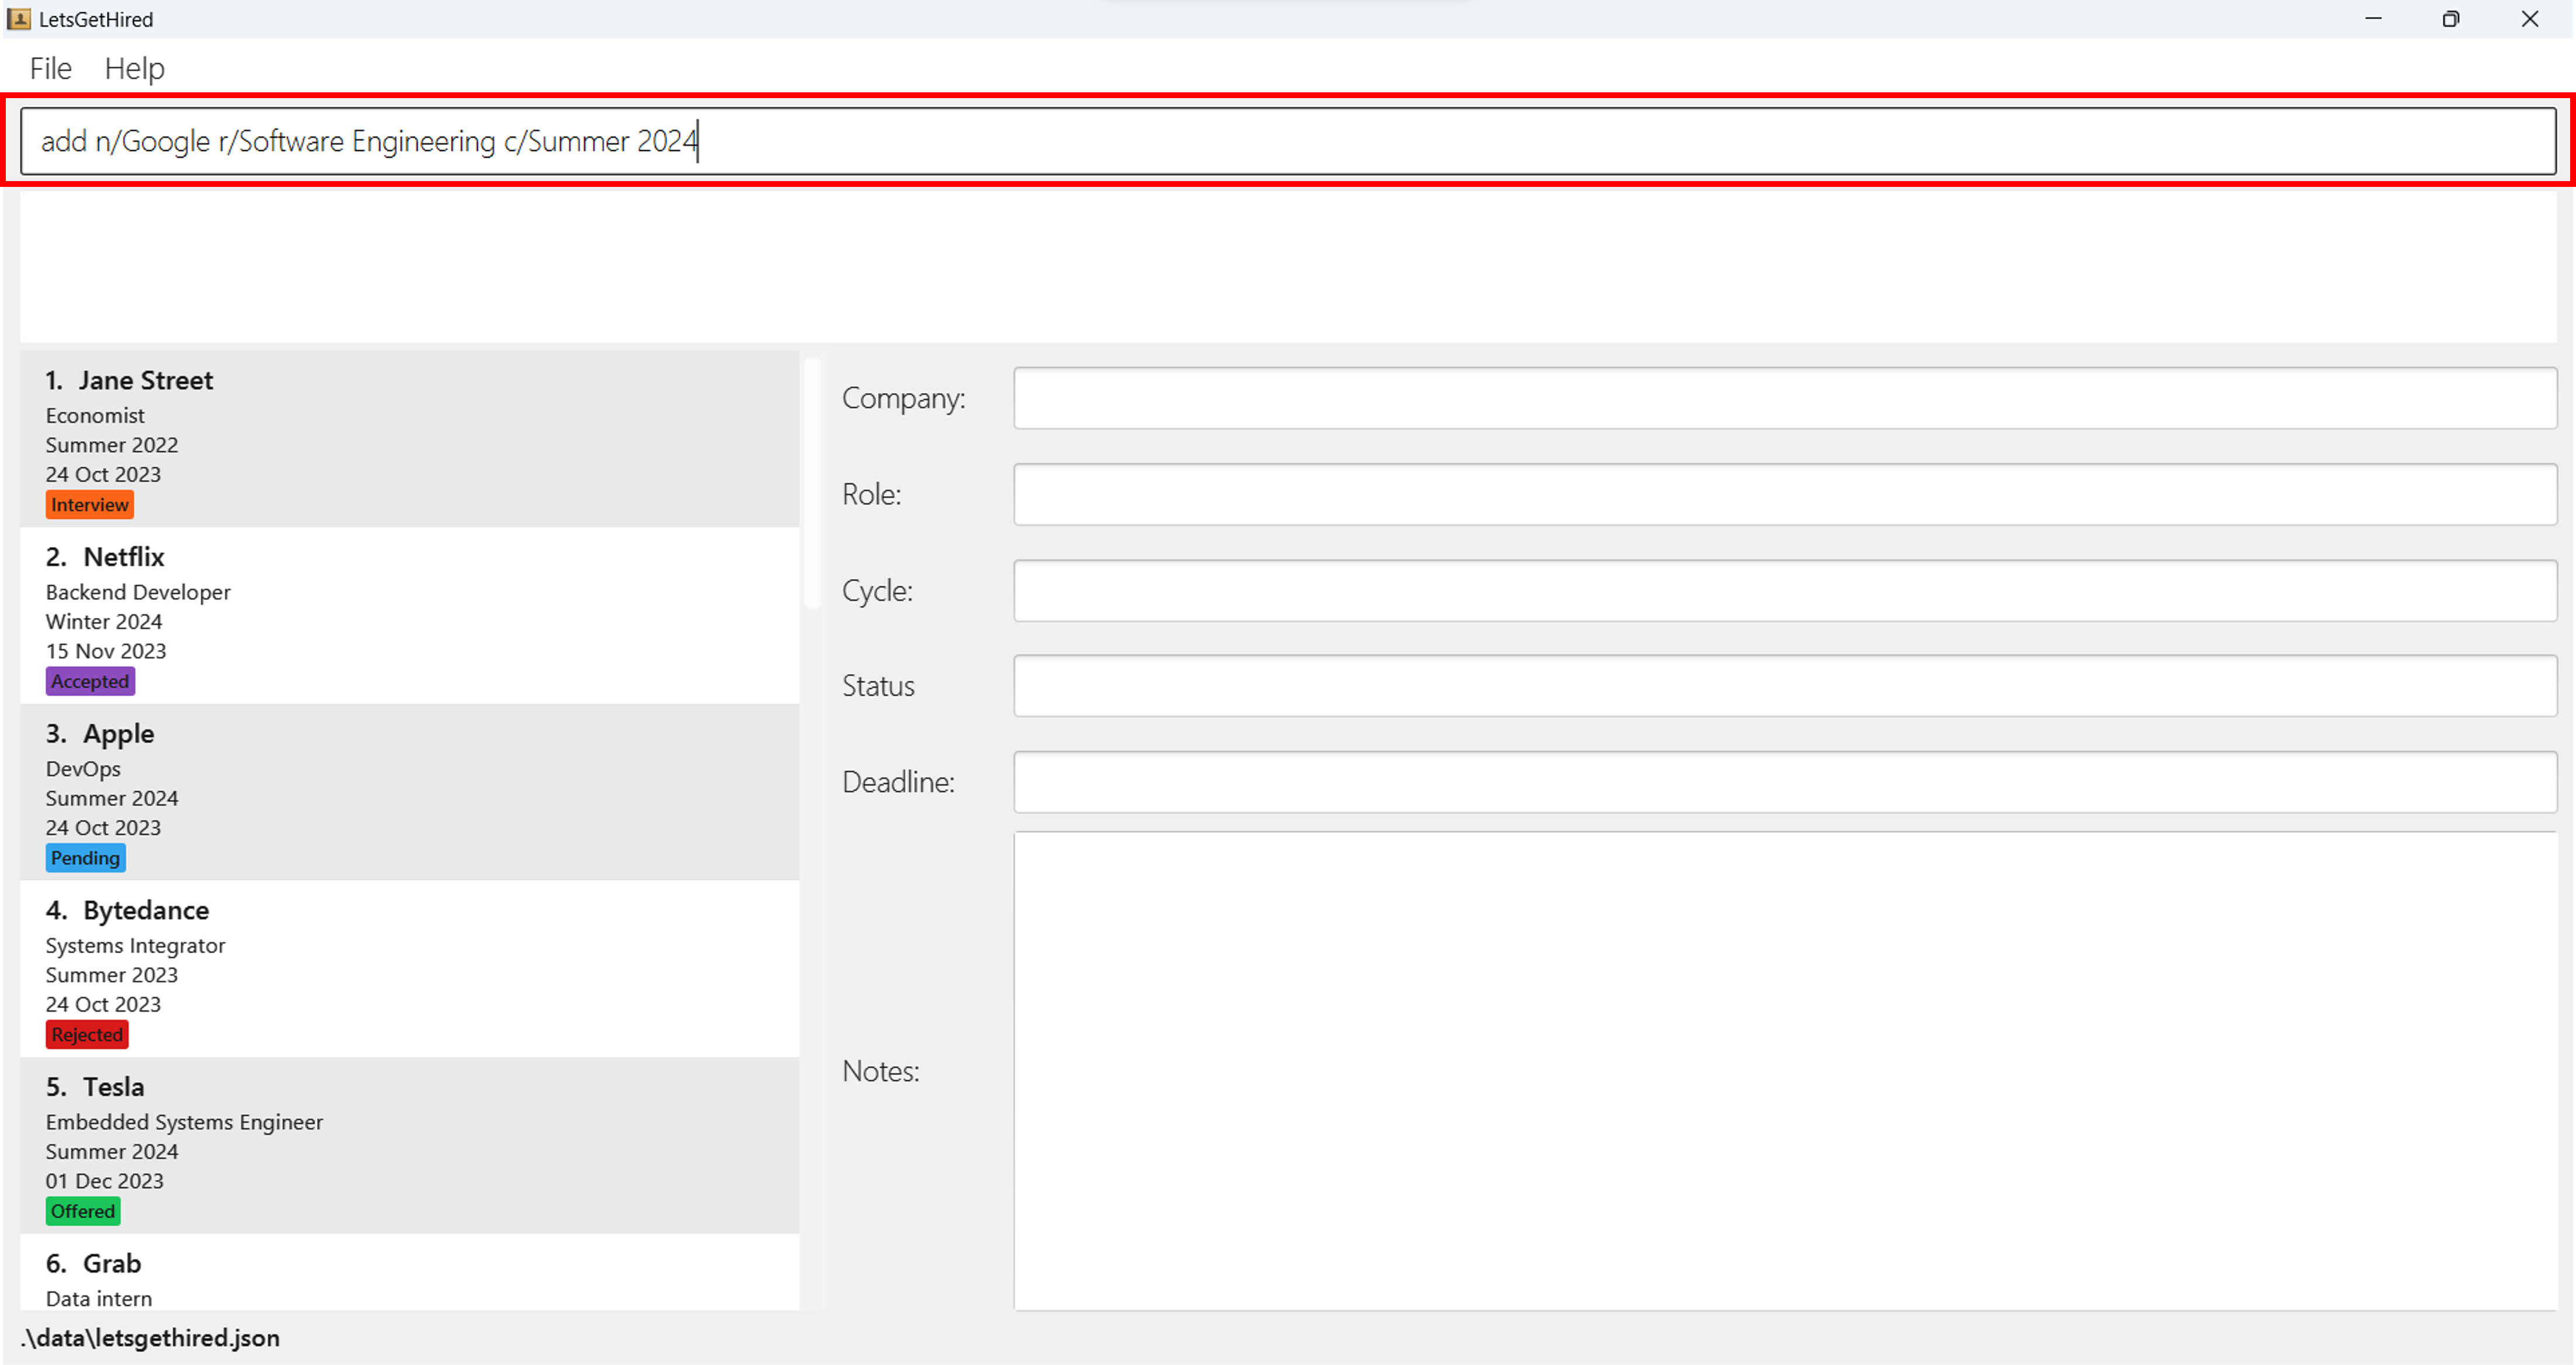
This command specifies the company (Google), the role (Software Engineering), and the cycle (Summer 2024) for the internship that you have applied for.
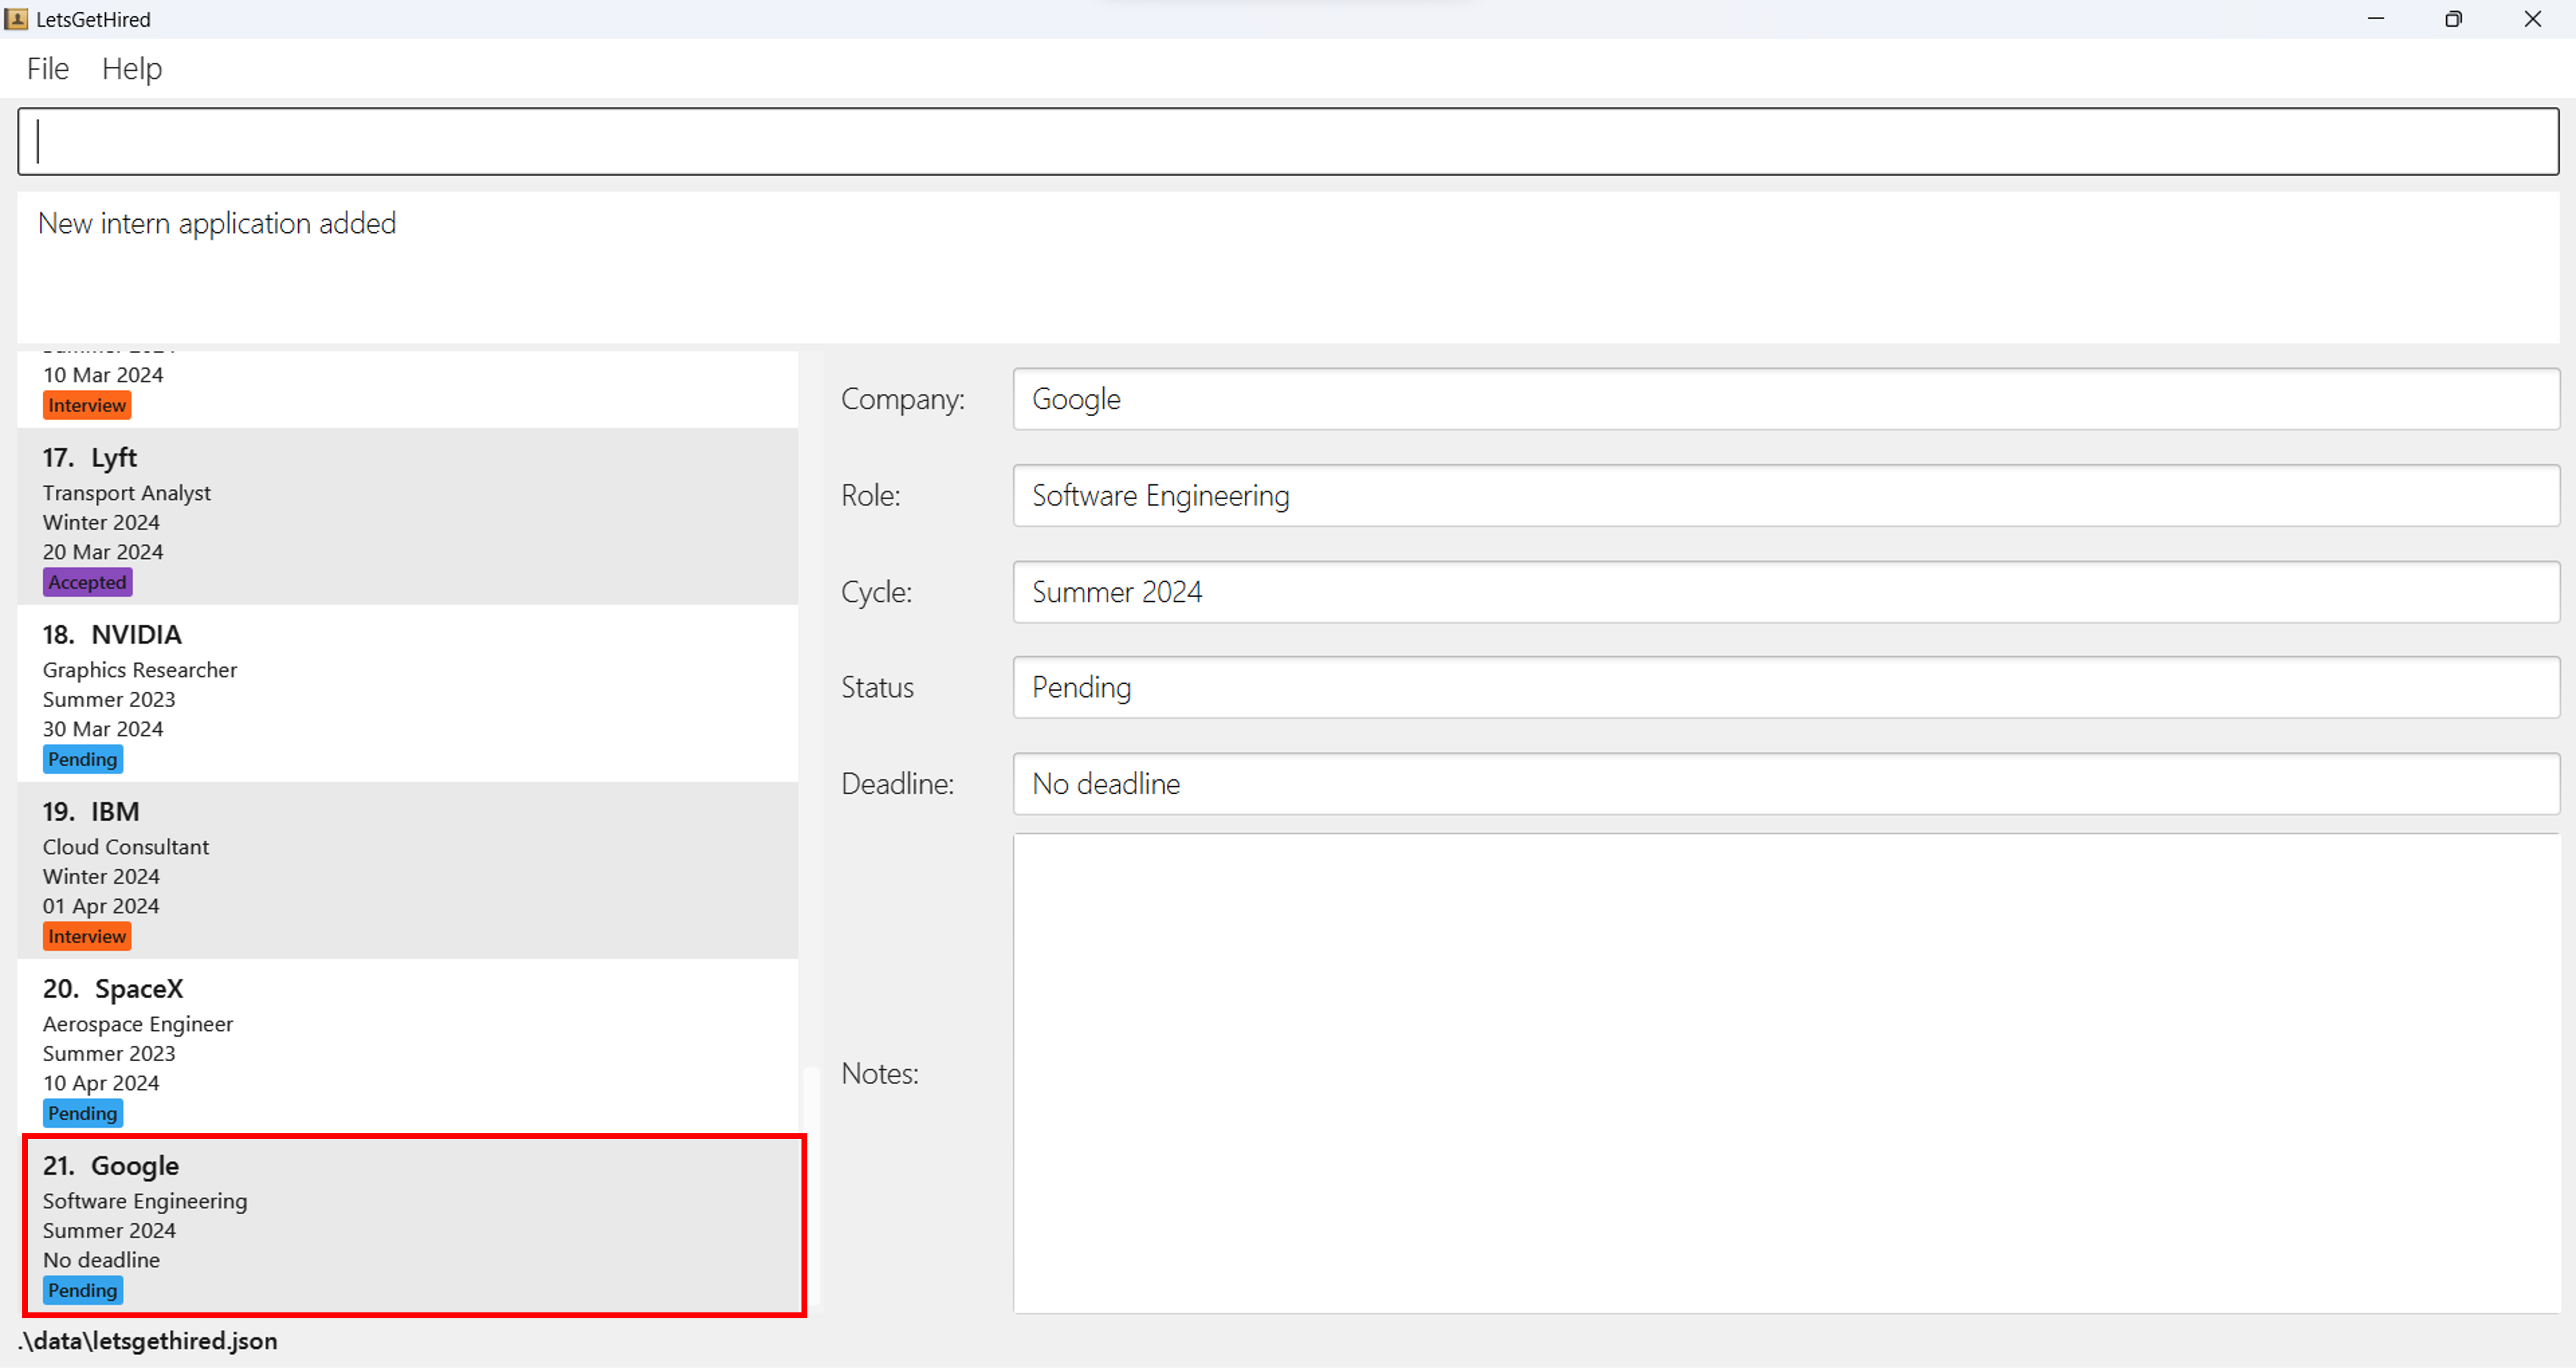
After hitting Enter, your new internship application will appear in the List
View of LetsGetHired,
allowing you to keep track of your application details effortlessly. Details of
your internship application will appear
in the Select View of LetsGetHired.
Step 2: Editing Your Internship Application
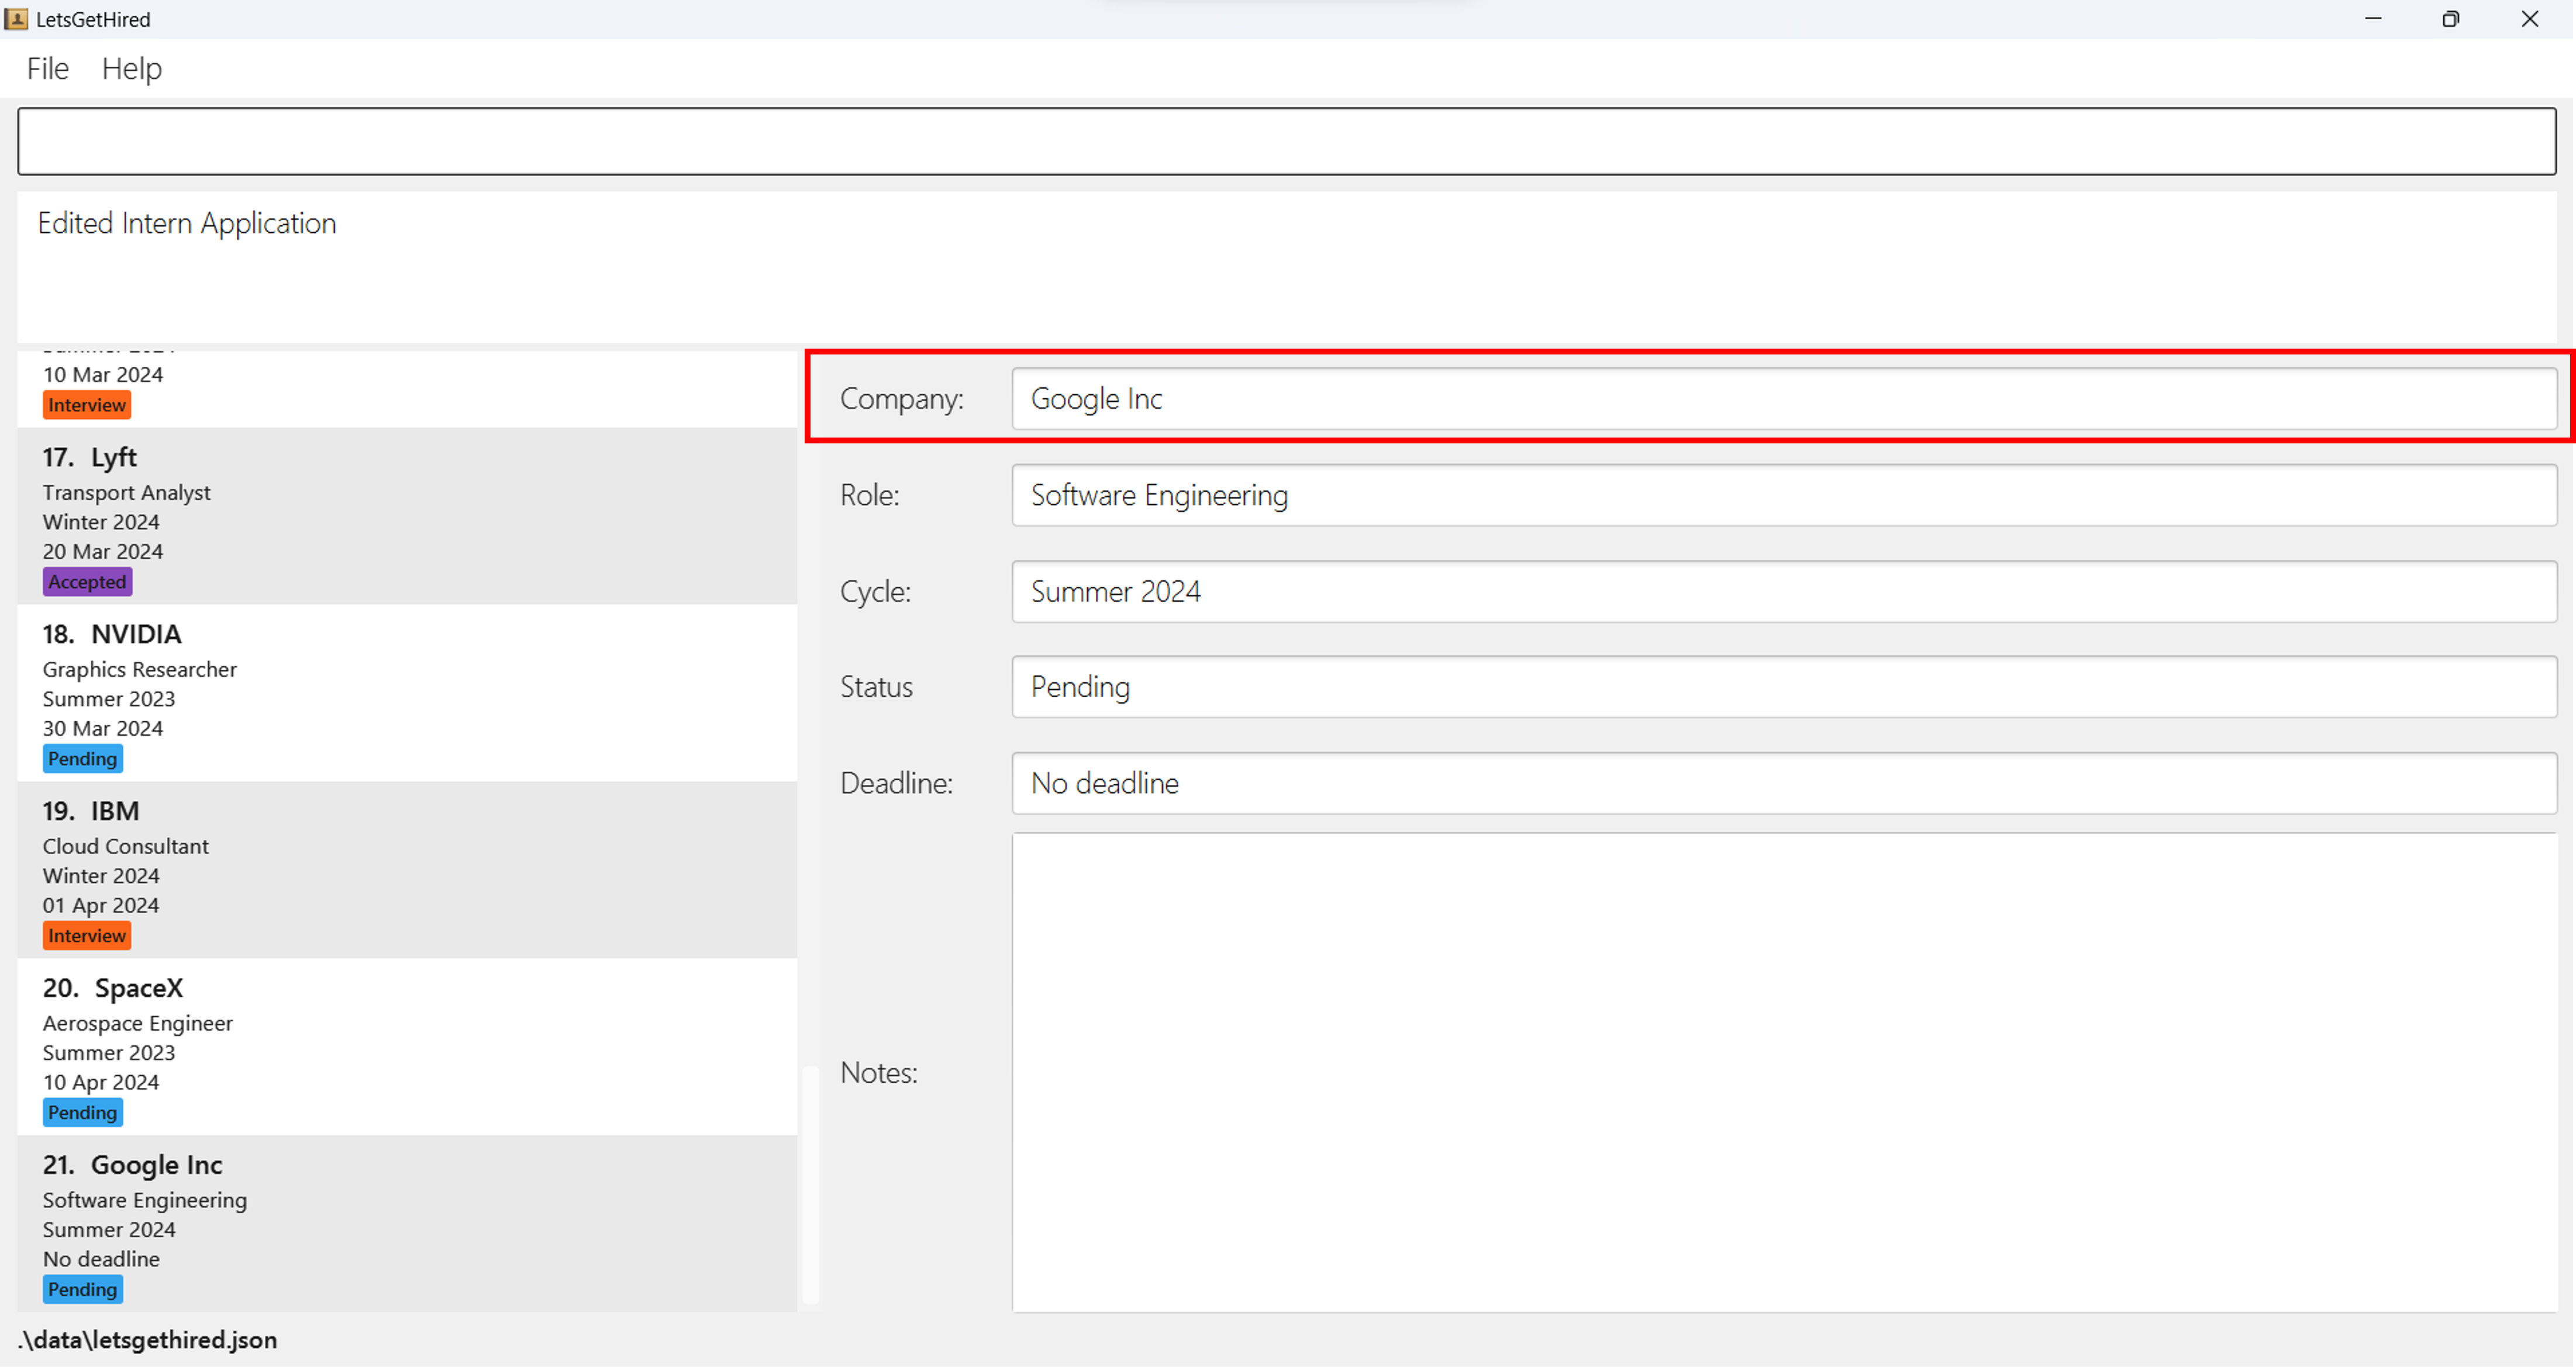
Context: You realize that you made a mistake in your internship application and need to correct it.
Imagine that you want to change the company name to "Google Inc" instead.
To edit your internship application, go to the Command Box and type
the edit command,
followed by the index of the internship application to be edited (in this case,
it's 21) and the corrected company name:
edit 21 n/Google Inc
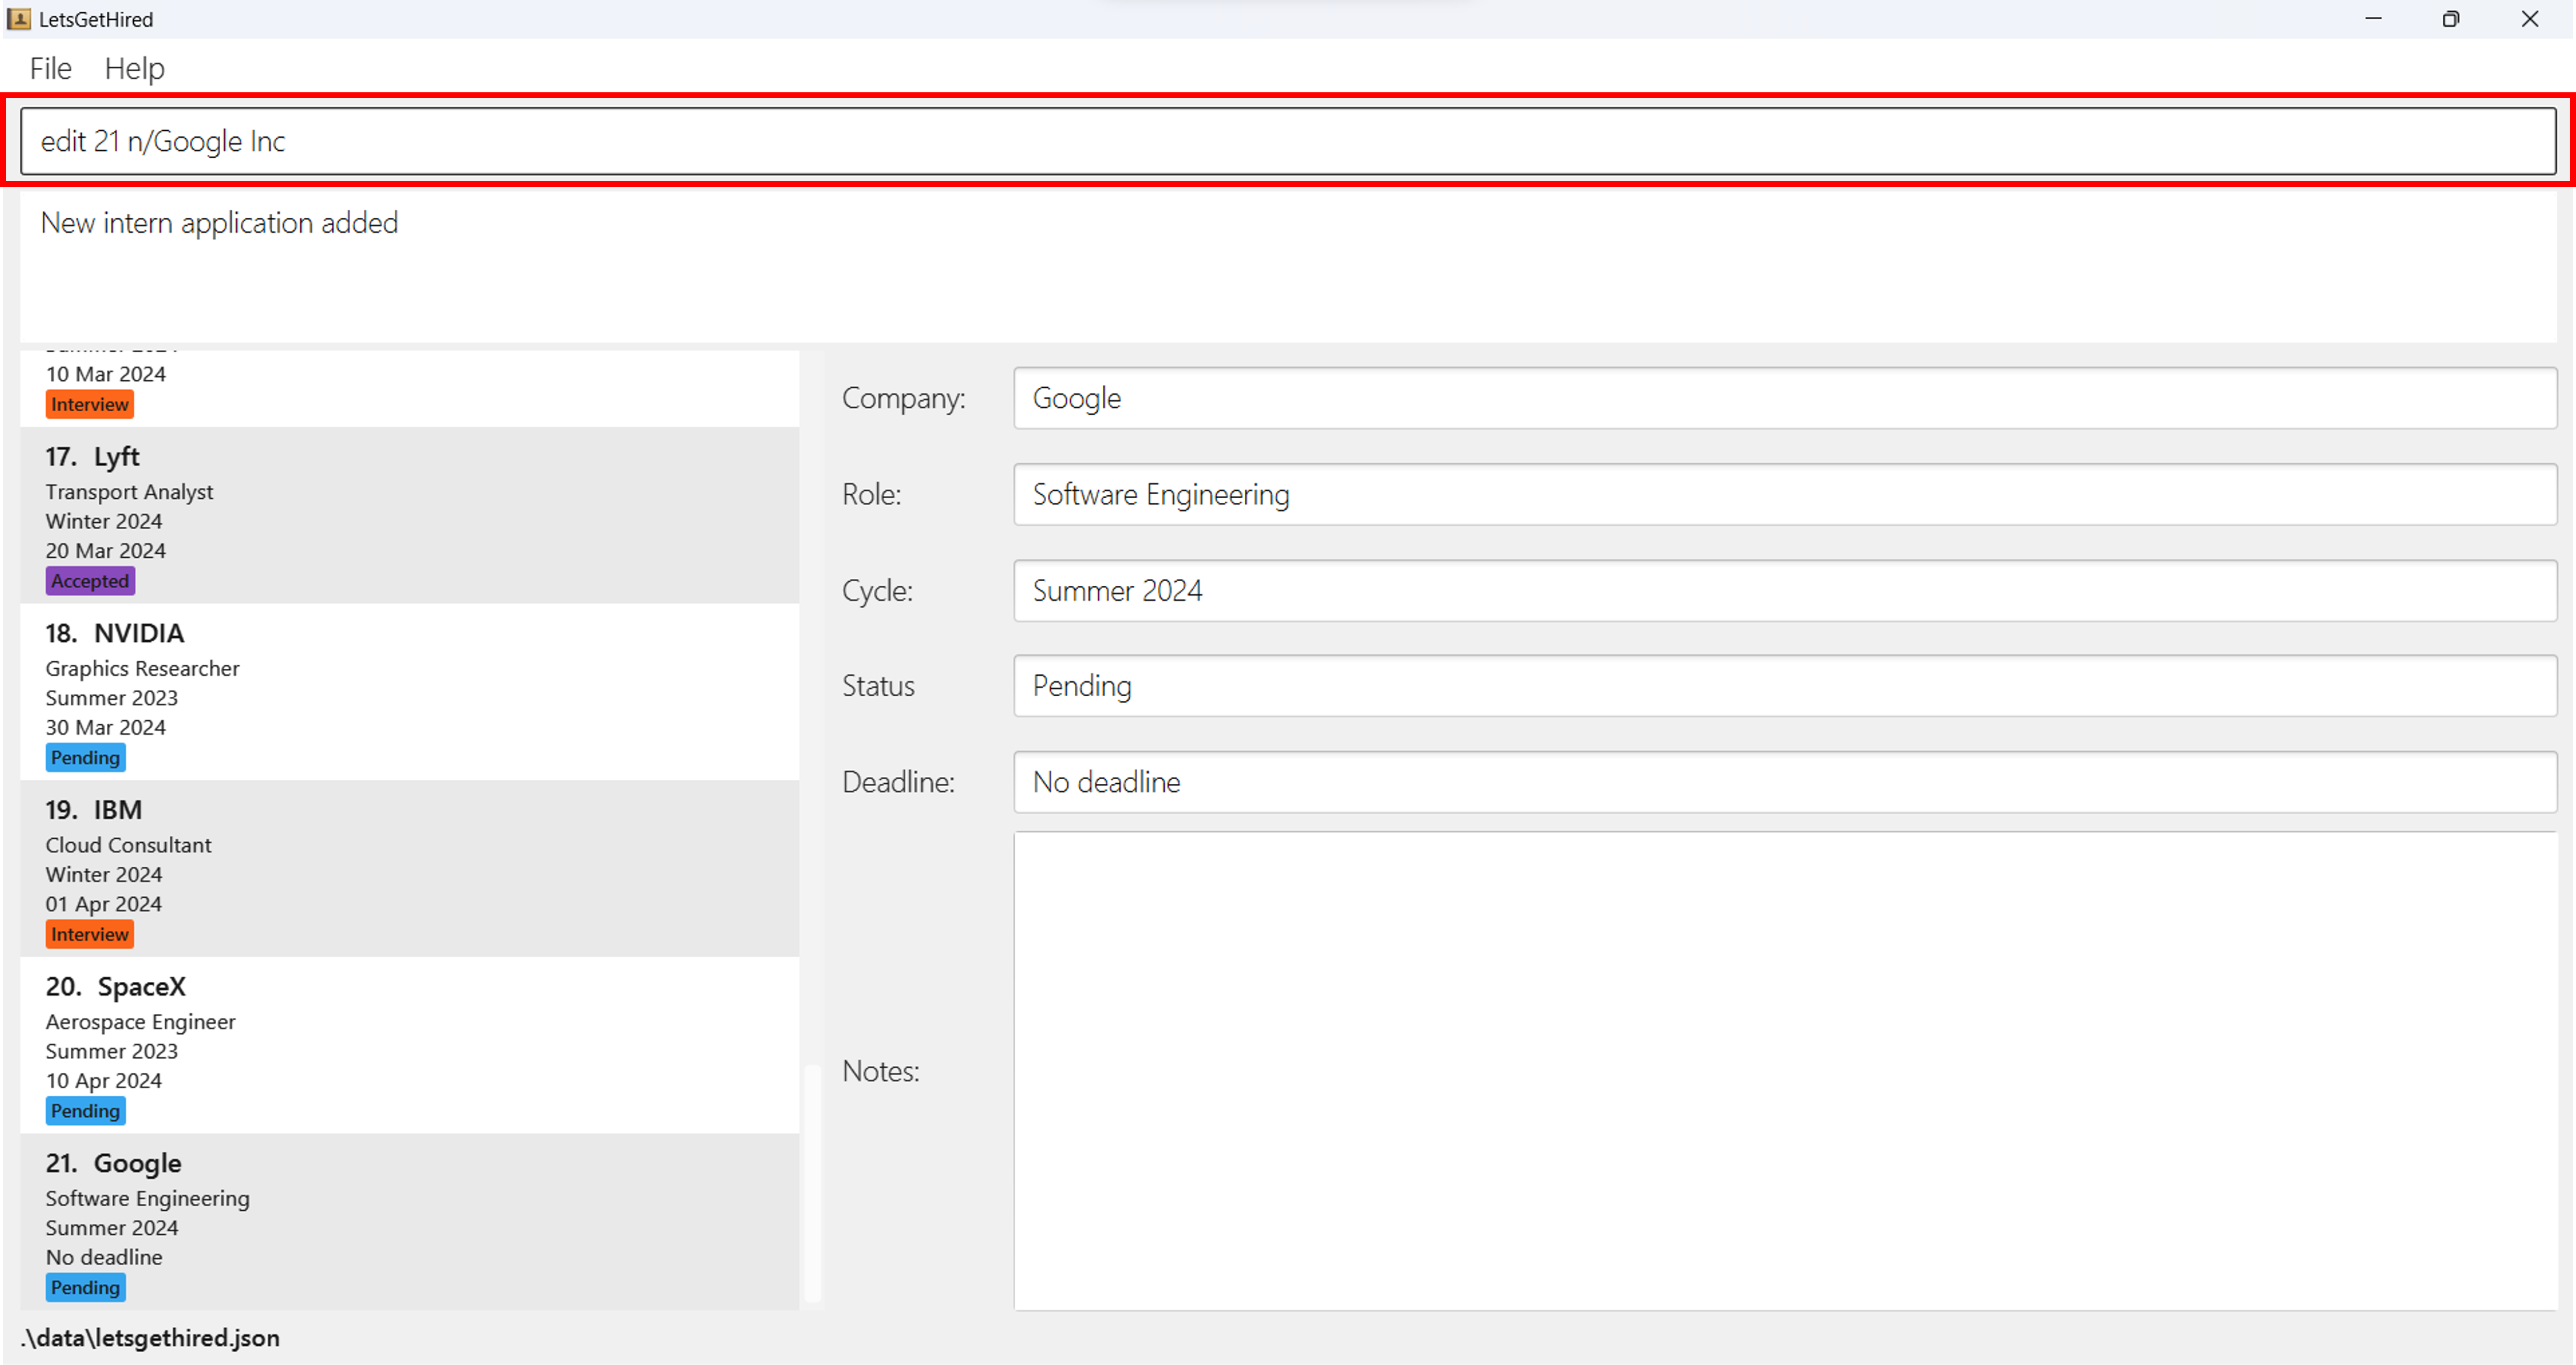
After hitting Enter, your internship application will be updated with "Google
Inc" as the new company name.
Always ensure your application details are accurate to avoid confusion in the future.
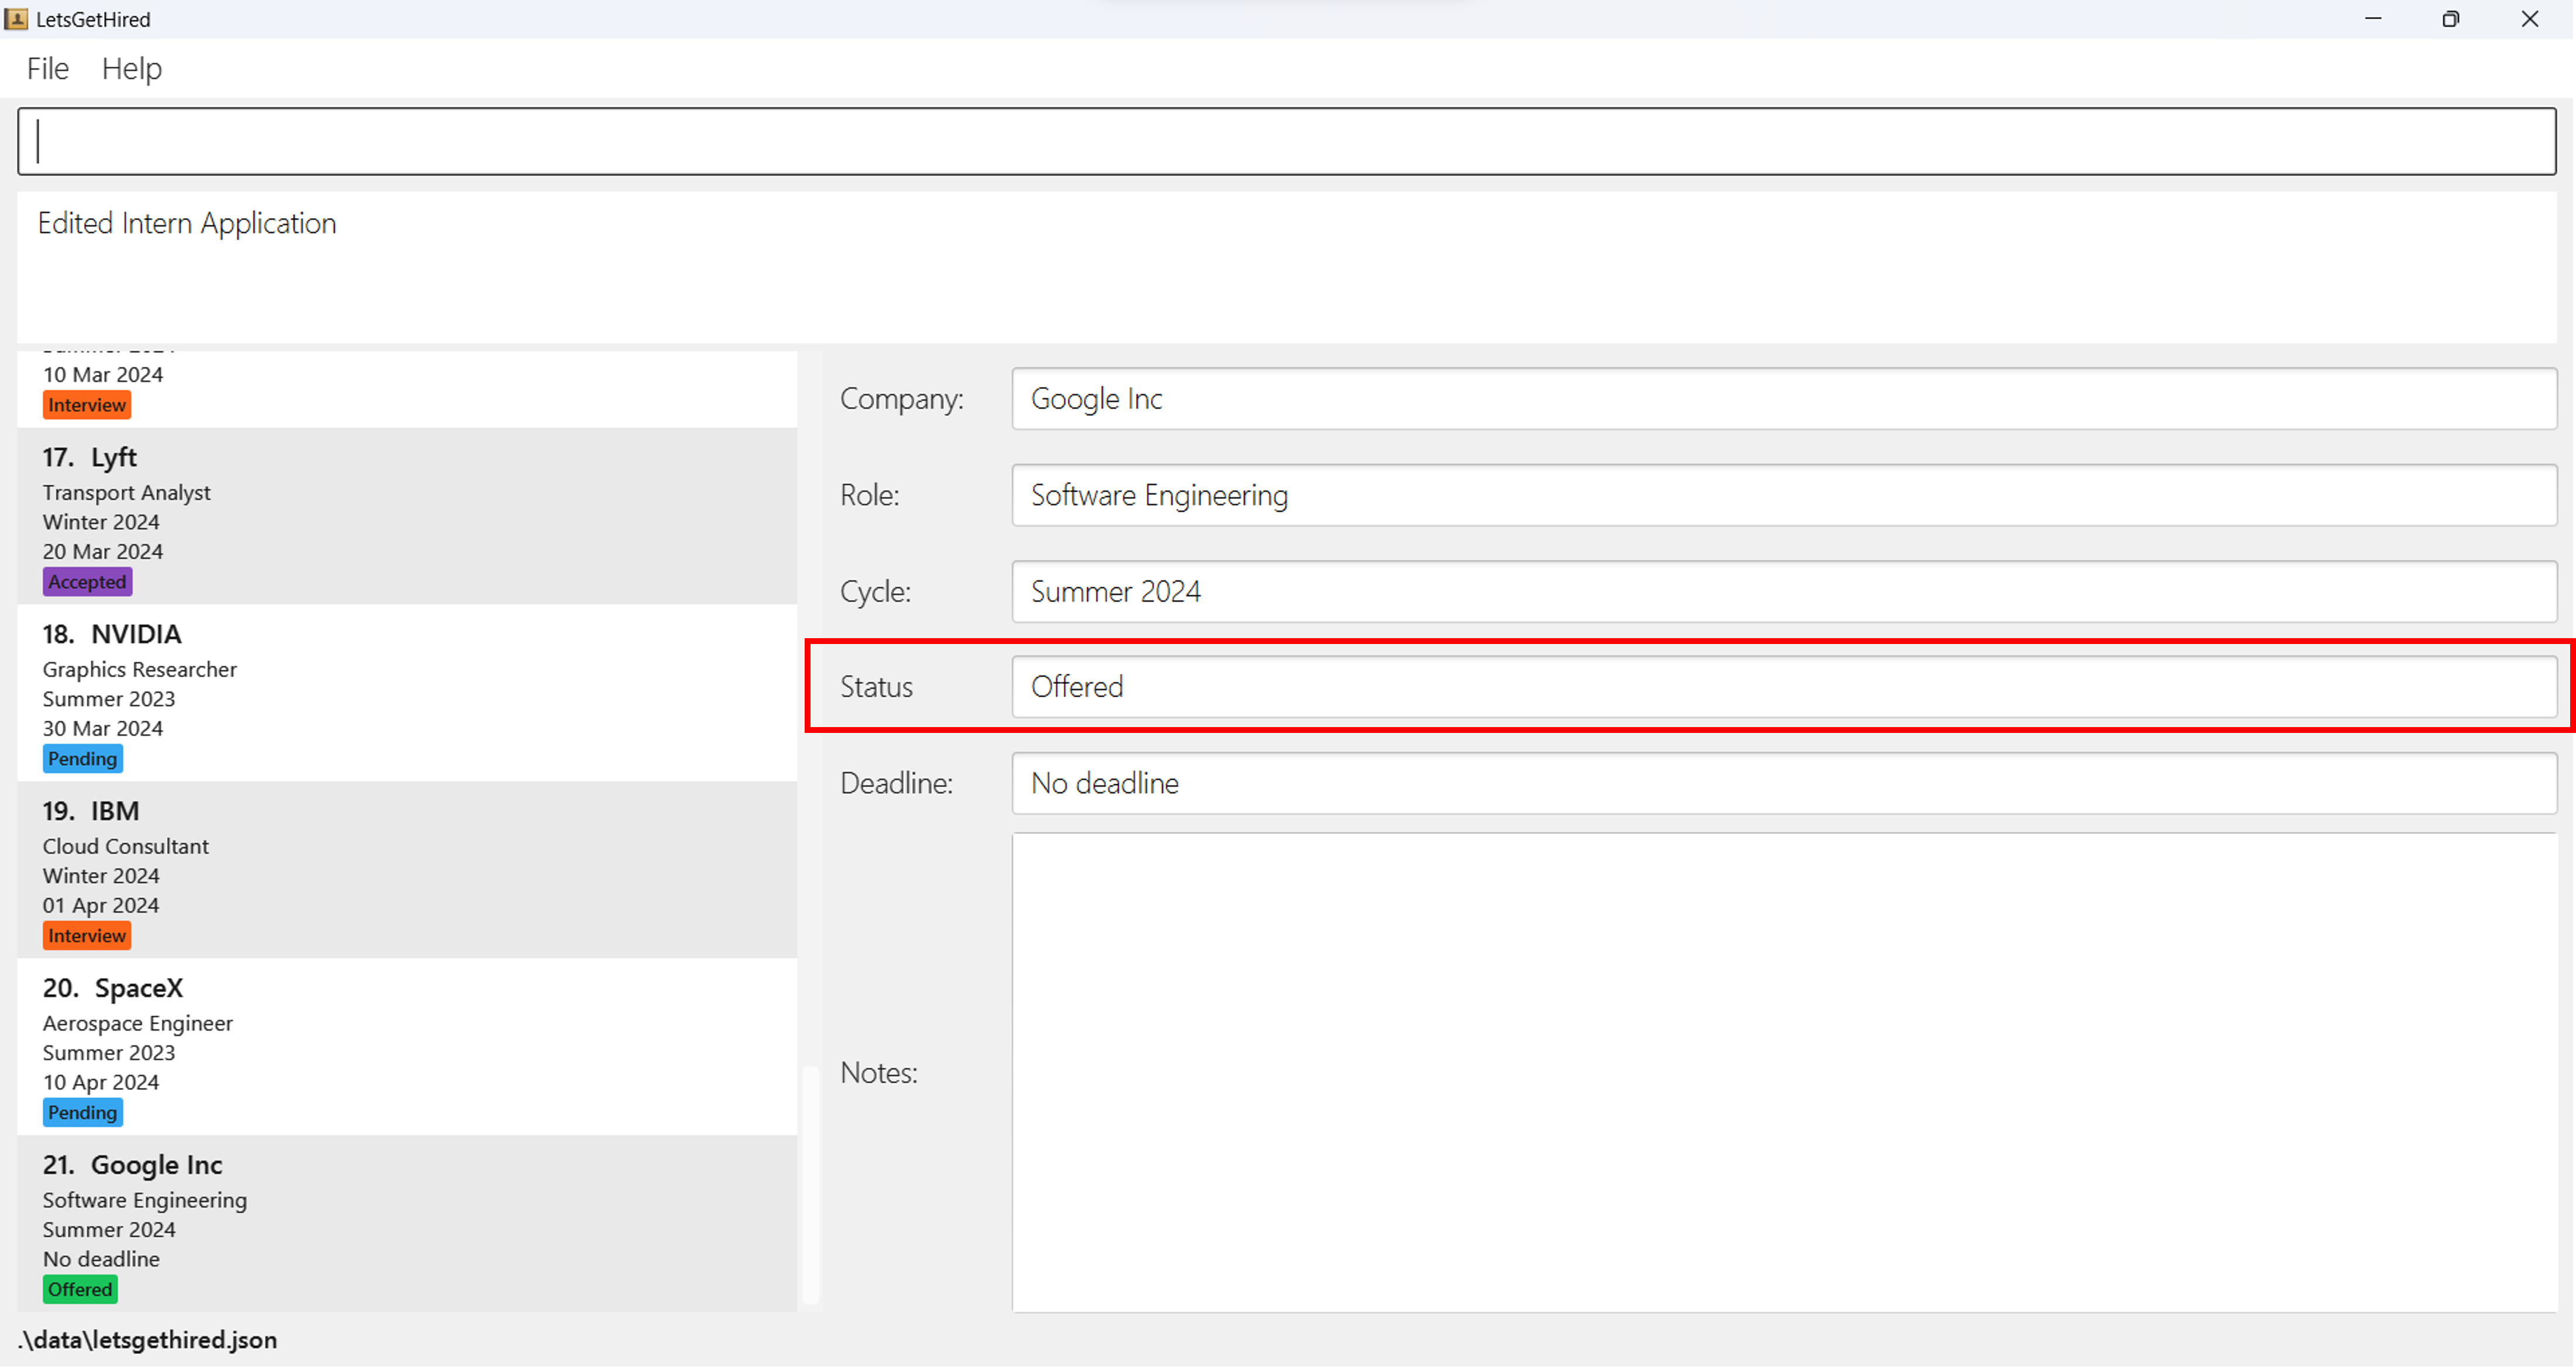
Step 3: Updating Status
Context: You have submitted your application, and you want to update the application status.
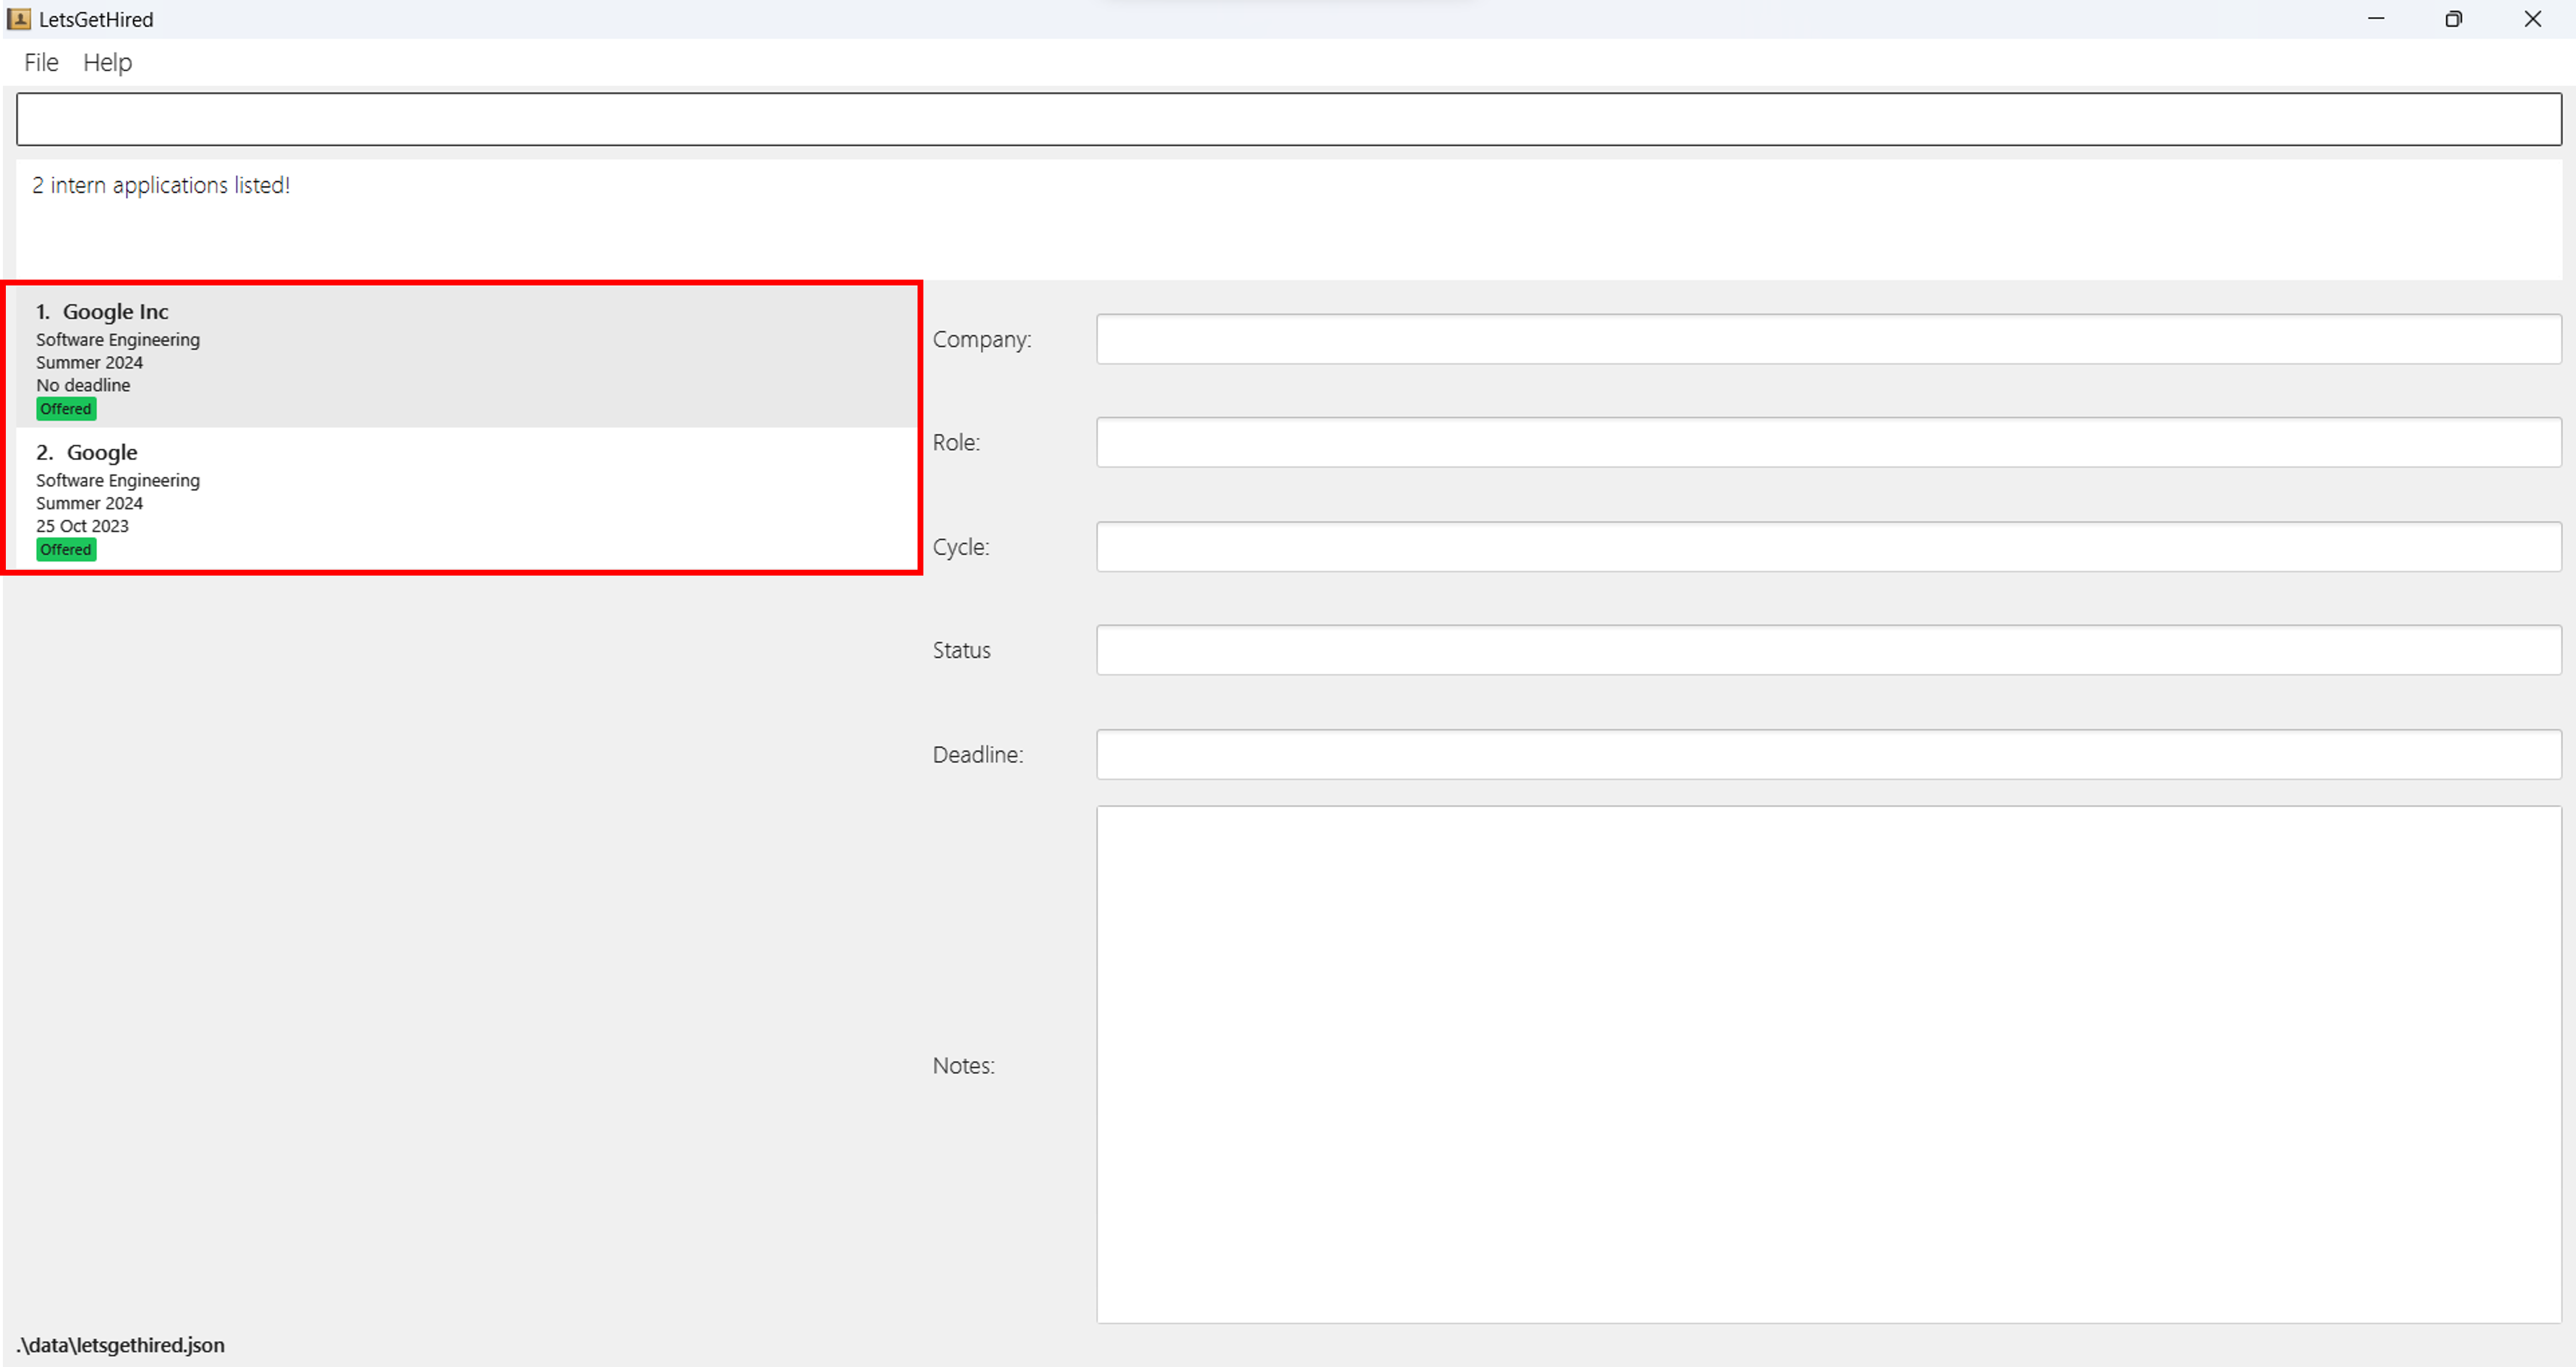
Imagine that your internship application to Google Inc was a success, and you received an offer.
To update the status of your internship application, use the edit command,
followed by the index of the internship application to be edited (in this case,
it's 21) and the updated status:
edit 21 s/Offered
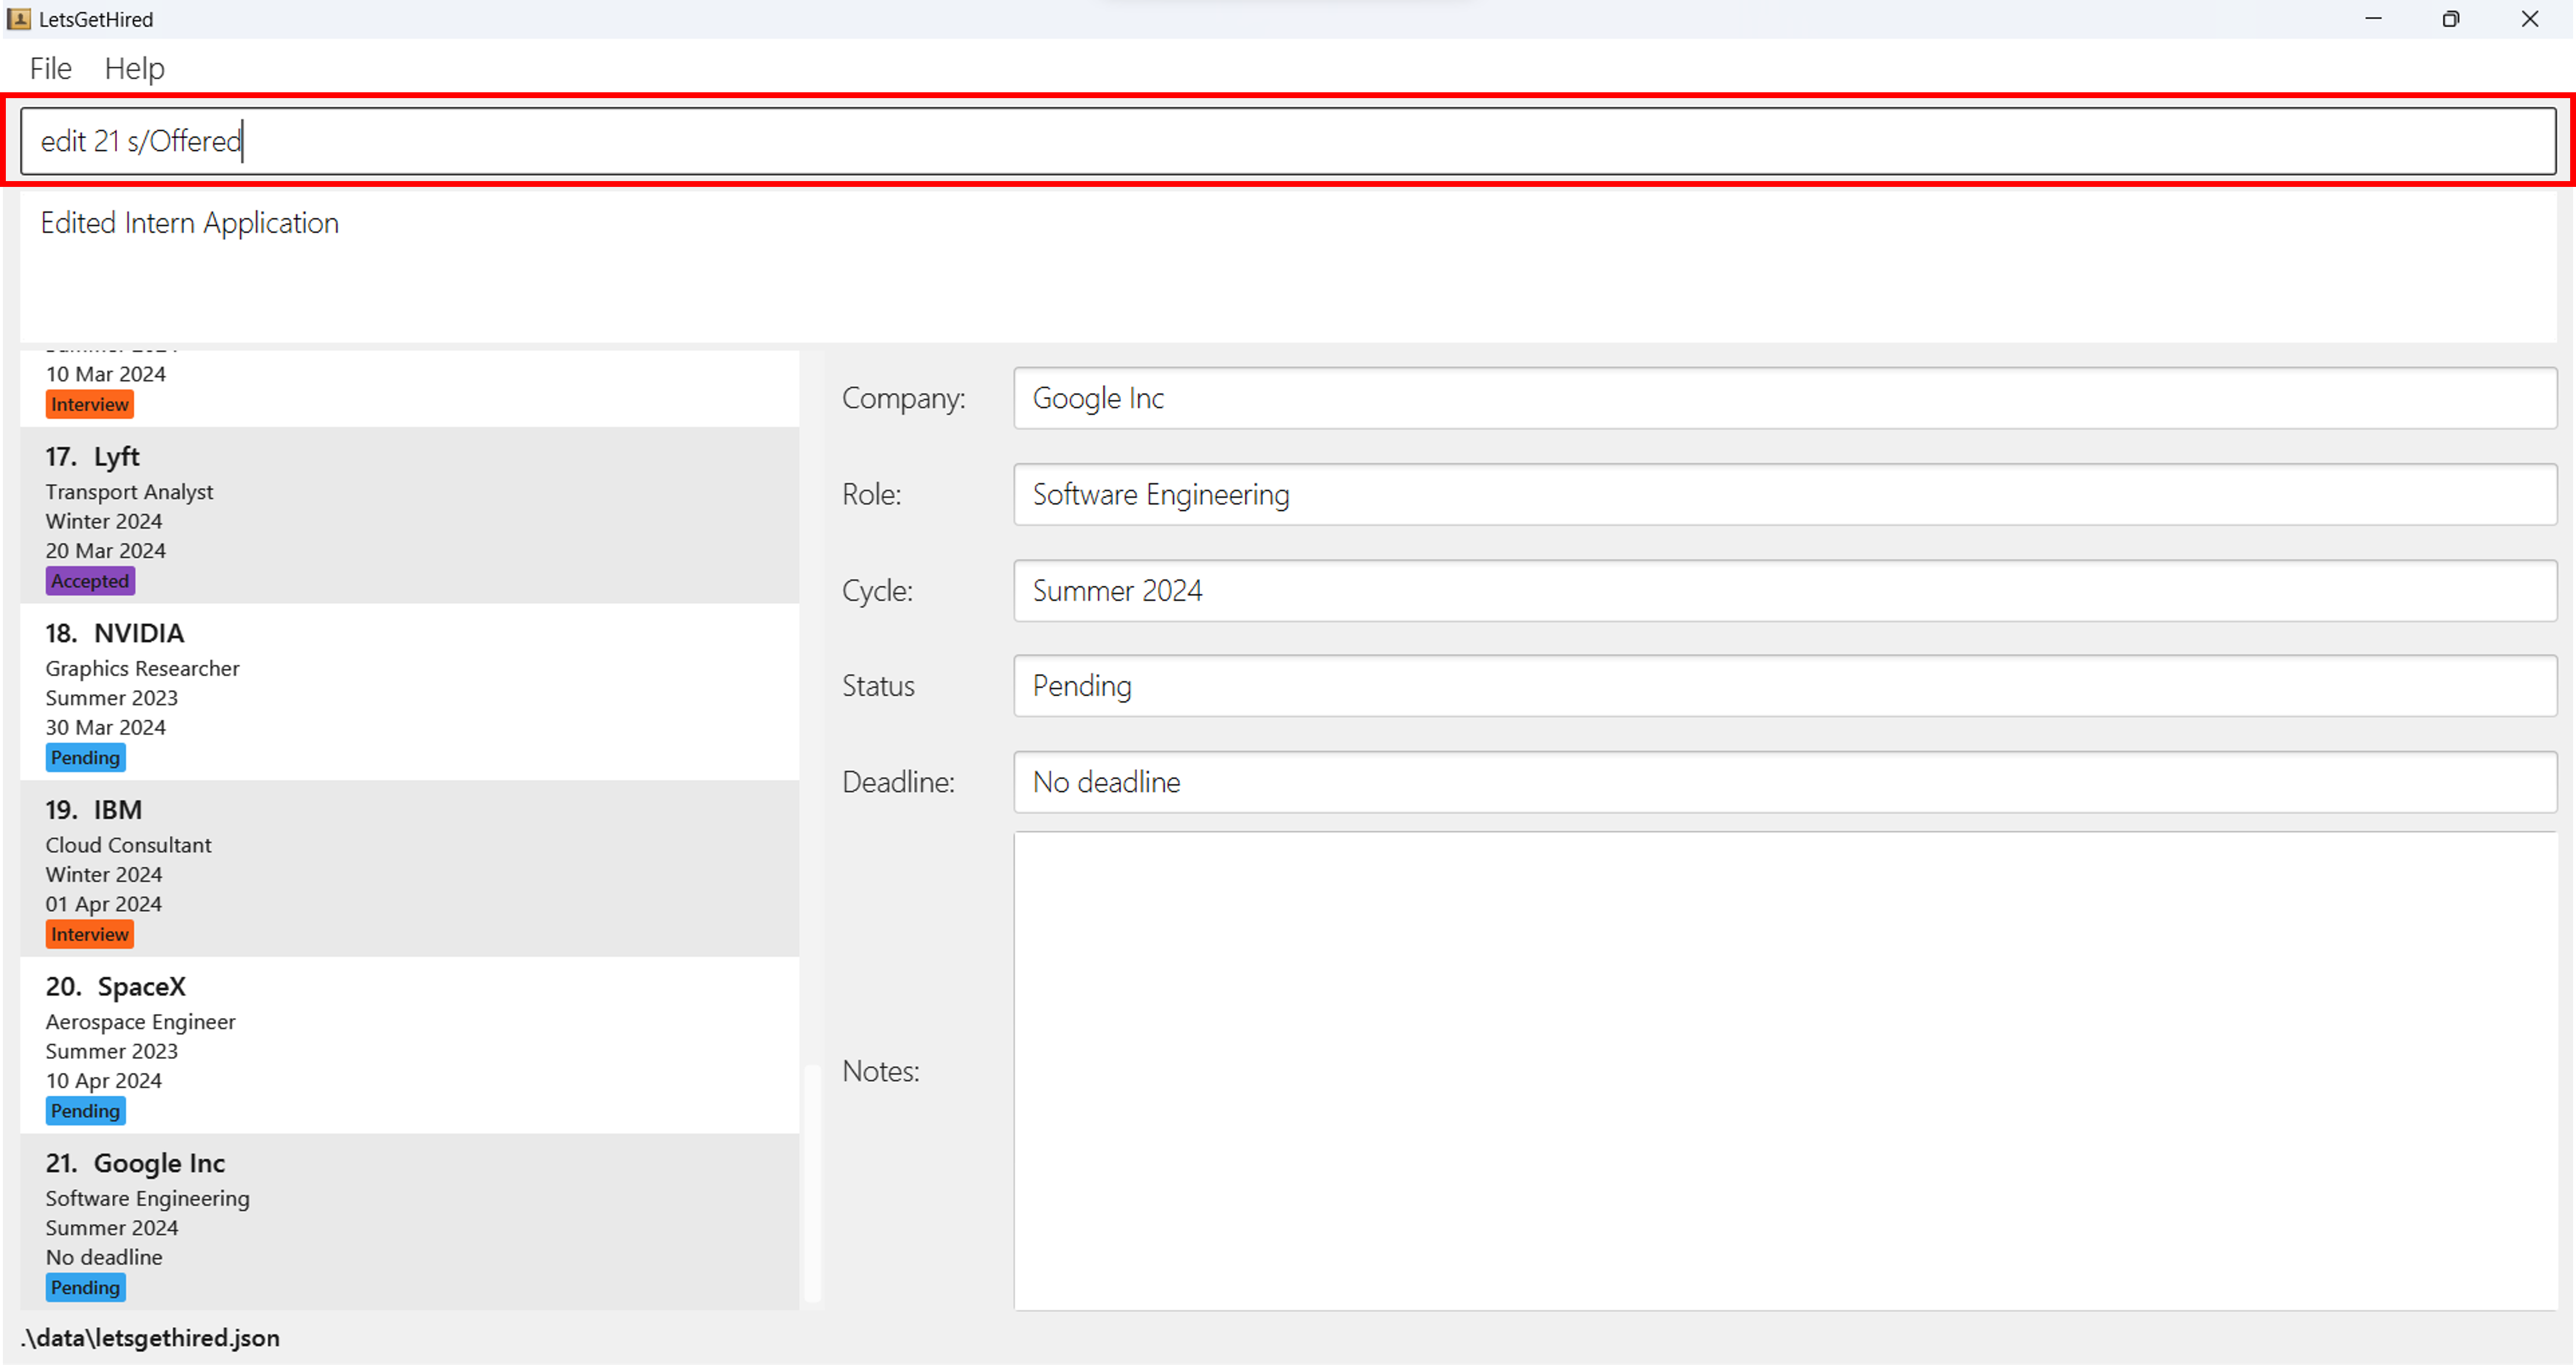
After hitting Enter, your internship application status will be updated to "
Offered".
Keeping your application status up-to-date helps you to stay organized and informed.
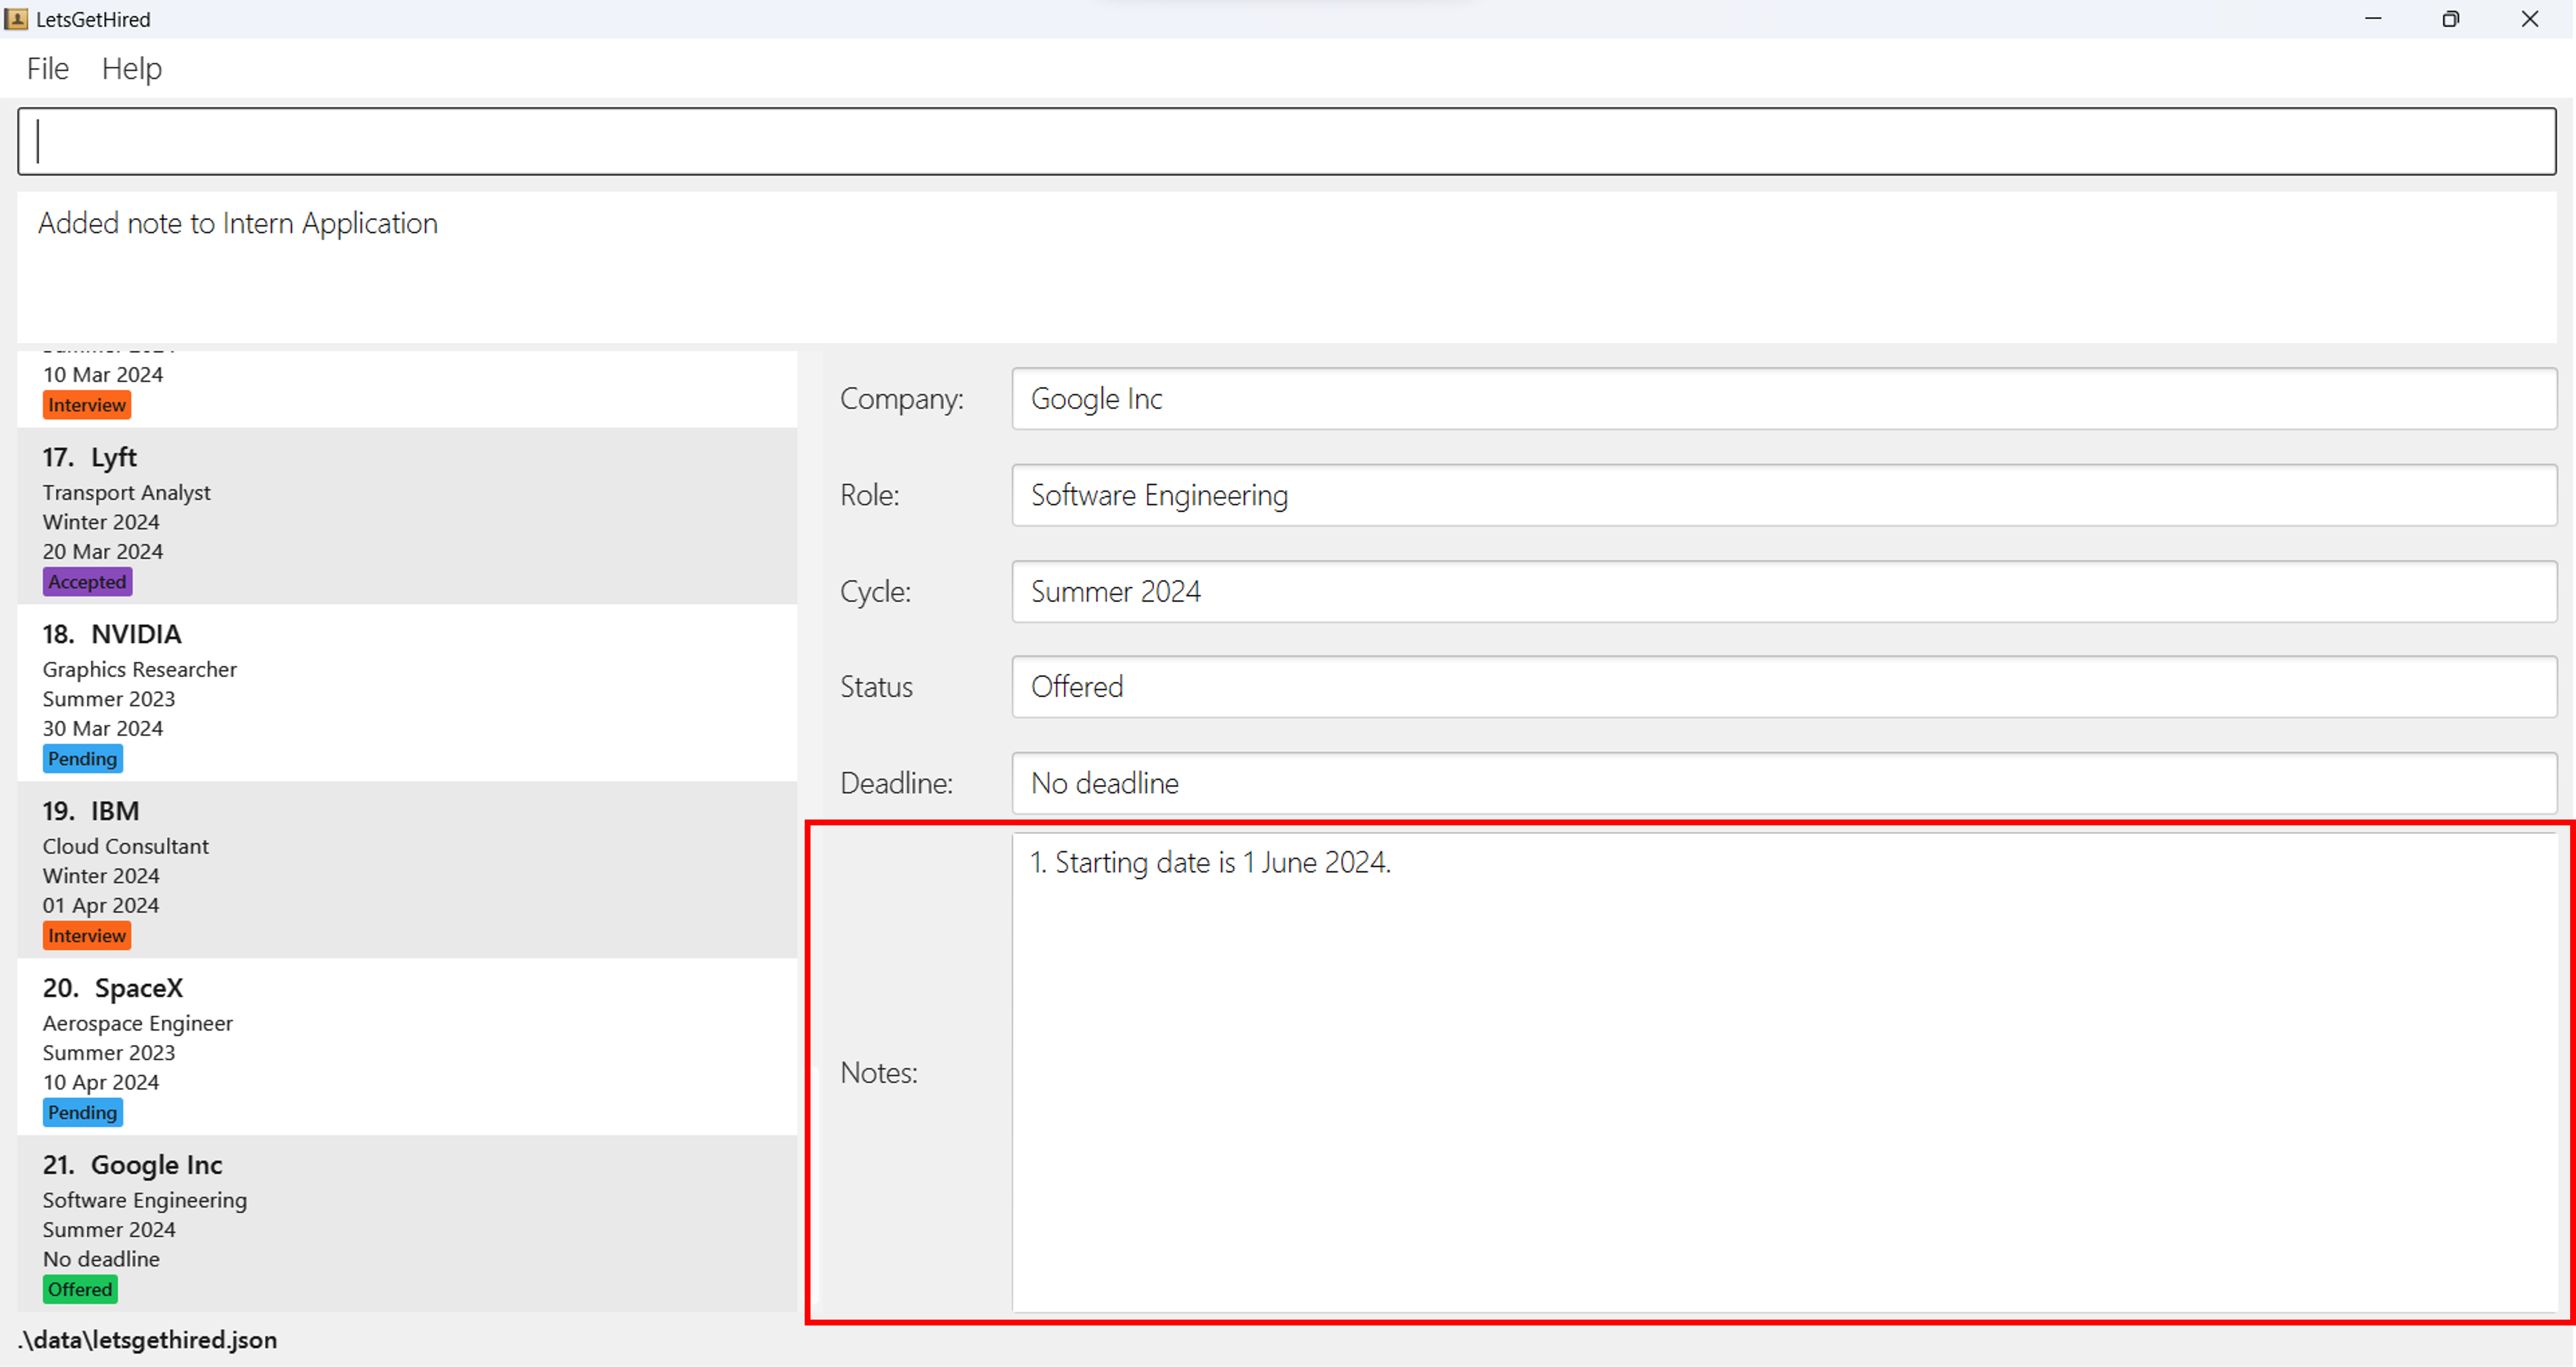
Step 4: Adding Notes
Context: You want to keep track of additional information about the internship, such as job requirements.
Imagine that you want to write a note about the starting date of your internship at Google Inc.
To add notes to your internship application, use the note command,
followed by the index of the internship application
(in this case, it's 21) and your additional notes:
note 21 i/Starting date is 1 June 2024.

After hitting Enter, you have successfully included supplementary information
which you need to remember about the
internship, making it a valuable resource when preparing for interviews or
follow-ups.
Step 5: Start Using LetsGetHired
Congratulations! You have successfully managed your first internship application using LetsGetHired. These steps demonstrate the core functions of the application, helping you stay organized and informed throughout your internship application journey.
For other commands, please refer to the Commands section of the User Guide below.
Commands
This section explains the detailed list of the commands (and its usages) which are available for you to use.
If you have been using LetsGetHired and just need a quick refresher on the commands available, you can jump to the Command Summary section of the User Guide below.
Notes about the command format:
All commands are case-sensitive. For example,
sortis a valid command, butSORTorSoRtare invalid commands.All prefixes are case-sensitive. For example,
s/(the prefix for status) andS/(no attached meaning) are considered different.Words in
UPPER_CASEare parameters which you will type in.add n/COMPANY_NAME r/ROLE c/CYCLEFor example, you can replace
COMPANY_NAME,ROLEandCYCLEas follows:add n/Google r/Software Engineering c/Summer 2024All parameters should be preceded by its respective prefix.
add n/COMPANY_NAME r/ROLE c/CYCLEFor example,
n/is the prefix for theCOMPANY_NAMEparameter.r/is the prefix forROLEandc/is the prefix forCYCLE.Exception: The
INDEXparameter does not require any prefix.Words in
[square brackets]are optional parameters.add n/COMPANY_NAME r/ROLE c/CYCLE [s/STATUS] [d/DEADLINE]For example, you can use the above command as:
add n/Google r/Software Engineering c/Summer 2024OR
add n/Google r/Software Engineering c/Summer 2024 s/OfferedOR
add n/Google r/Software Engineering c/Summer 2024 d/25 Oct 2023OR
add n/Google r/Software Engineering c/Summer 2024 s/Offered d/25 Oct 2023You can type parameters in any order.
e.g. if the command specifiesc/CYCLE r/ROLE, typingr/ROLE c/CYCLEis also acceptable.Irrelevant parameters for commands that do not take in parameters (such as
helpandlist) will be ignored.
e.g. if the command specifieshelp 123, it will be interpreted ashelp.
If you are using a PDF version of this User Guide, be careful when copying and pasting commands that span multiple lines as space characters surrounding line-breaks may be omitted when copied over to the application.
Viewing Help: help
The help command is designed to offer you instant guidance.
If you ever find yourself unsure about how to use the system or need a quick
reminder of the available commands,
the help command will provide direct access to this User Guide,
ensuring you have all the information you need at your fingertips.
Command Usage
Command:
help
Parameters:
The help command does not require any parameters.
Example:
If you wish to access the User Guide, simply type:
help
Upon hitting Enter, the application will display the link to this User Guide,
offering details and examples for all available commands.

- Utilize the
helpcommand whenever you're uncertain about the functionalities or need a refresher on how to use certain commands. - As you become more accustomed to the system, you might find that you use
the
helpcommand less frequently. Nevertheless, it's always there as a reliable resource should you need it.
Listing Your Internship Applications: list
The list command is your quick snapshot tool, providing a comprehensive view of all your internship applications.
It conveniently presents every application you've added, helping you gain a holistic perspective of your internship search and manage your applications effectively.
Command Usage
Command:
list
Parameters:
The list command does not require any parameters.
Example:
To view all your internship applications, simply type:
list
Upon hitting Enter, the application will display a complete list of all
your recorded internship applications.
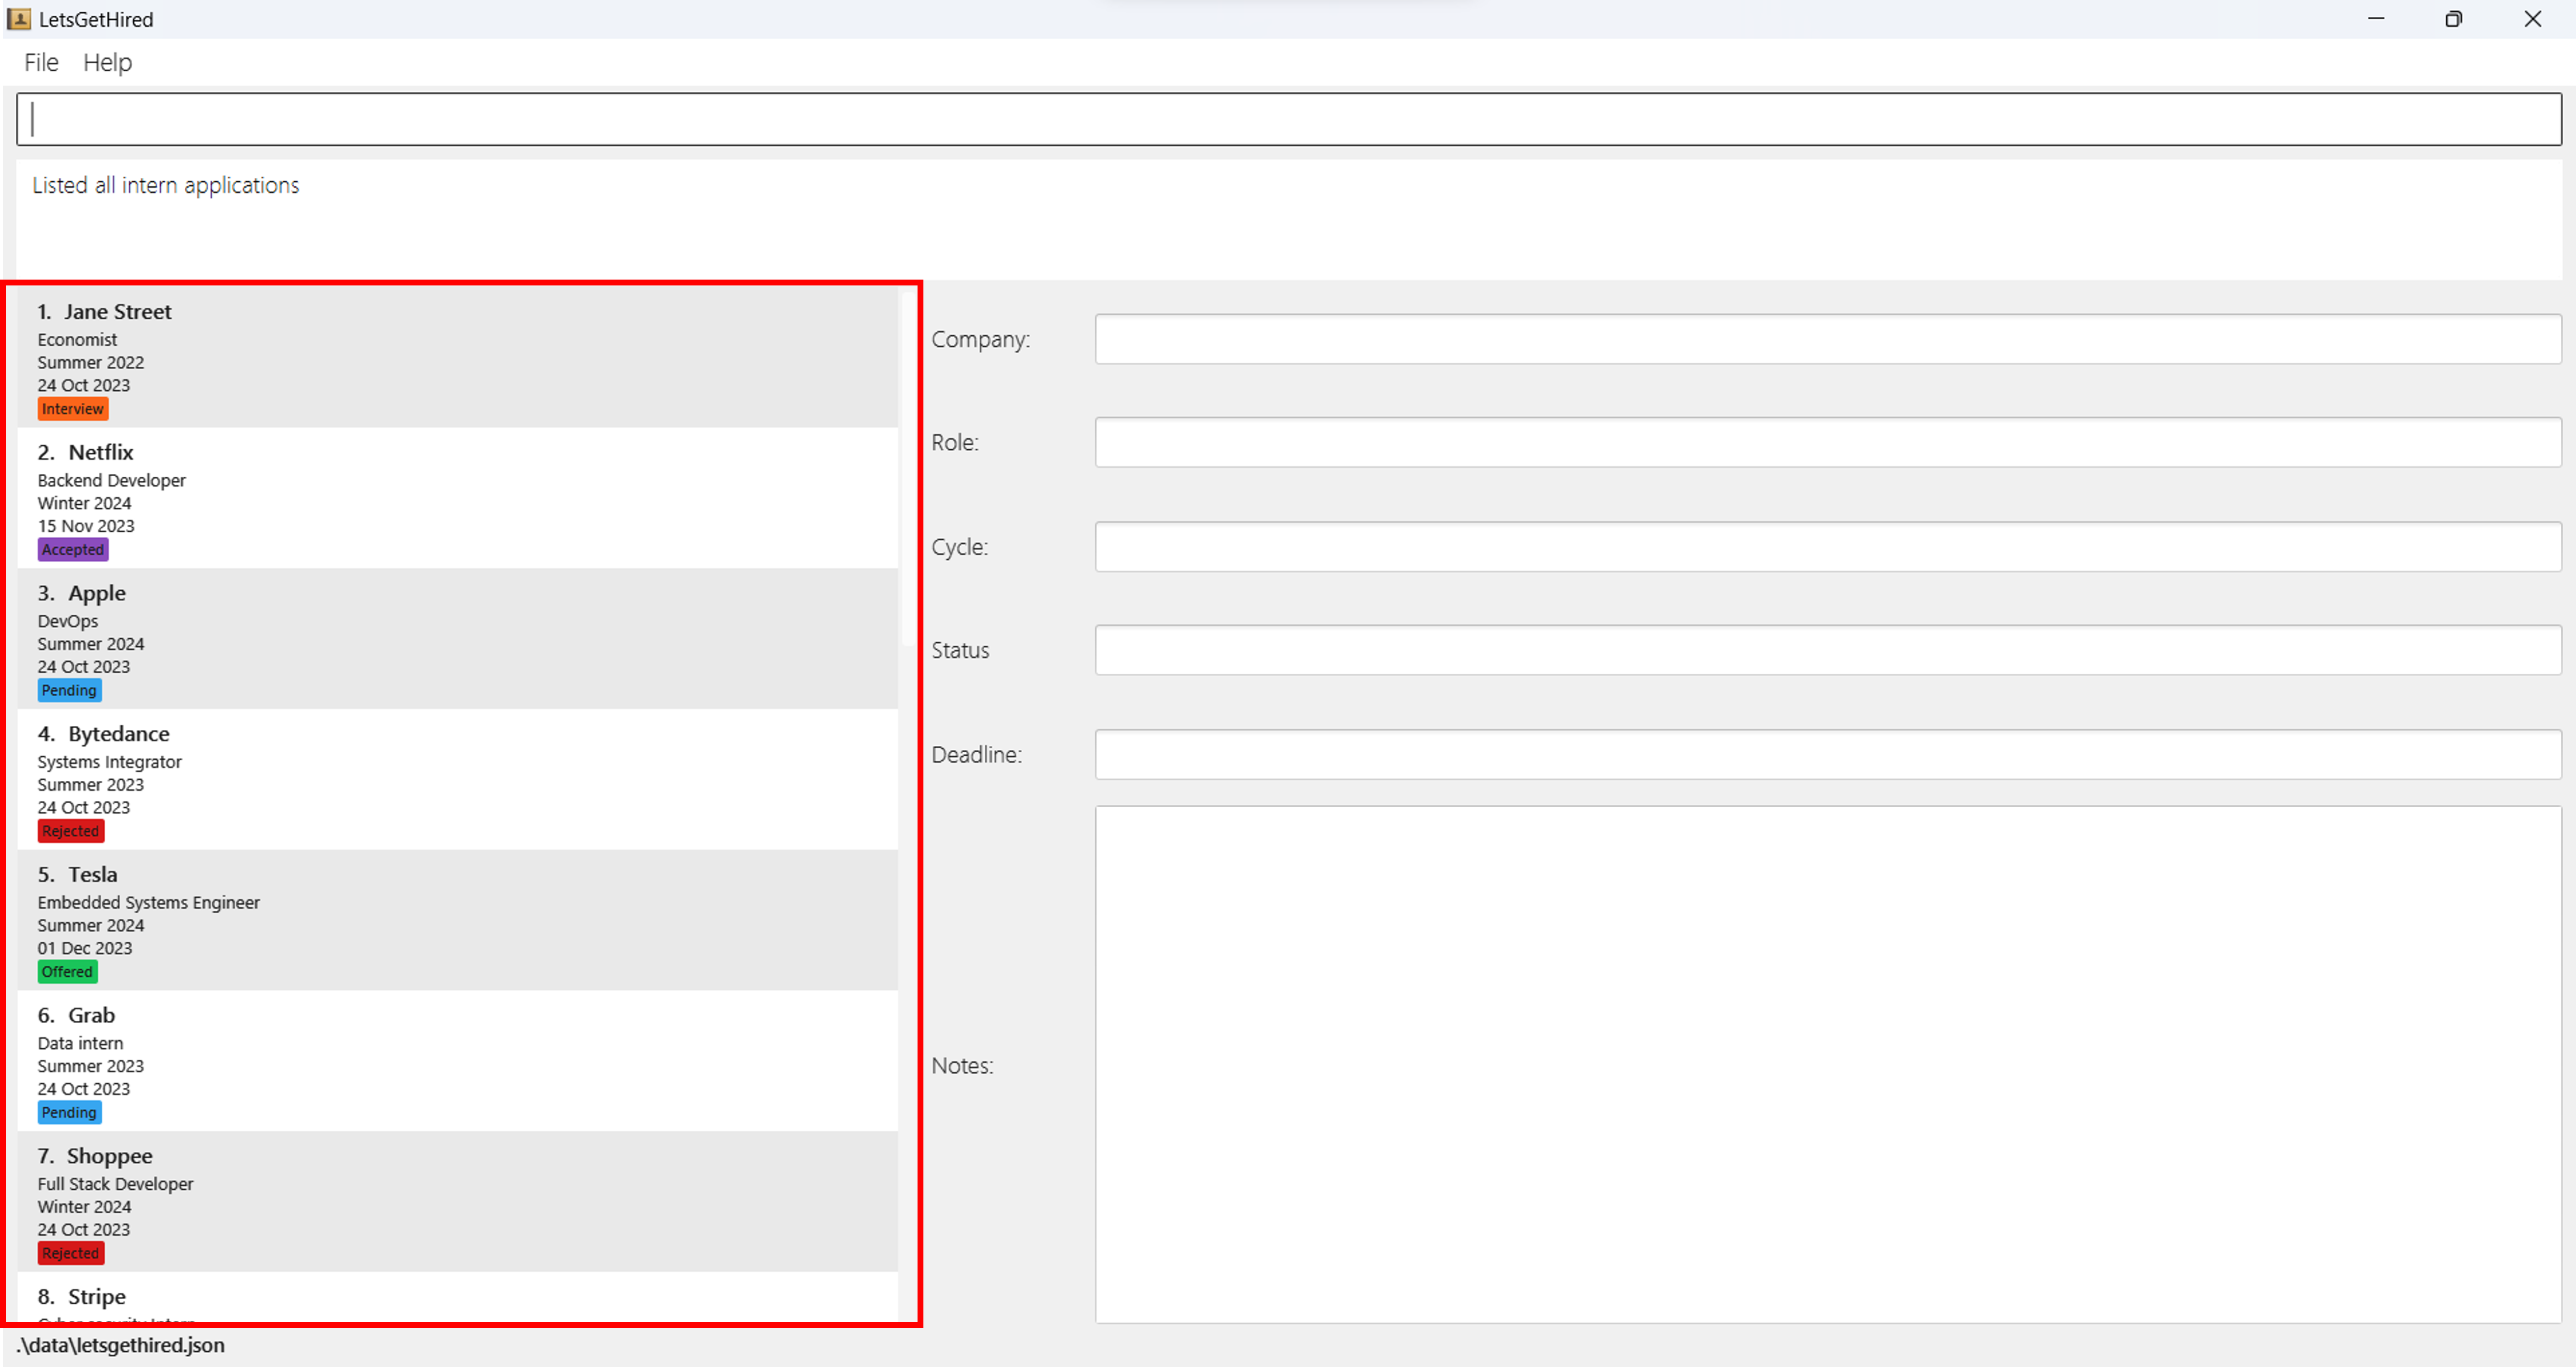
This display provides a comprehensive overview of your applications, detailing the company name, role, cycle, status, and deadline for each. By glancing through the list, you can quickly assess your application status, the diversity of roles you've applied for, and any impending deadlines.
- Use the
listcommand frequently to keep track of your applications and ensure you're on top of any required follow-ups or upcoming interviews. - Combined with the
sortcommand, thelistfunction becomes an even more powerful tool, enabling you to customize the view of your applications based on specific criteria.
Adding Your New Internship Application: add
The add command is an integral part of managing your internship applications.
It enables you to seamlessly input new applications into your record. By keeping all your applications up-to-date, you can efficiently keep track of your progress, upcoming interviews, and crucial deadlines.
Command Usage
Command:
add n/COMPANY_NAME r/ROLE c/CYCLE [s/STATUS] [d/DEADLINE]
Parameters:
n/COMPANY_NAME: The company's name where you've applied.
- Example:
Jane Street,Google
- Example:
r/ROLE: The role you've applied for.
- Example:
Software Engineering Intern
- Example:
c/CYCLE: The internship cycle, which typically corresponds to the season or term.
Example:
Summer,WinterPlease ensure the cycles you enter are valid for your use. This design allows for versatility in usage without strict validation that could hinder your experience.
s/STATUS (Optional): The current status of your application.
Choose your application
STATUSfrom the following:Pending(default value, if not provided)InterviewAssessmentOfferedRejected
d/DEADLINE (Optional): The application deadline or any other crucial dates.
- The
DEADLINEshould adhere to thedd MMM yyyyformat. For instance:25 Oct 2023. - If the
DEADLINEparameter is not provided,No Deadlinewill be the default value.
- The
Example:
To add an internship application for a Software Engineering role at Google for the Summer 2024 cycle with an Offered status and a deadline on 25th October 2023, you can type:
add n/Google r/Software Engineering c/Summer 2024 s/Offered d/25 Oct 2023
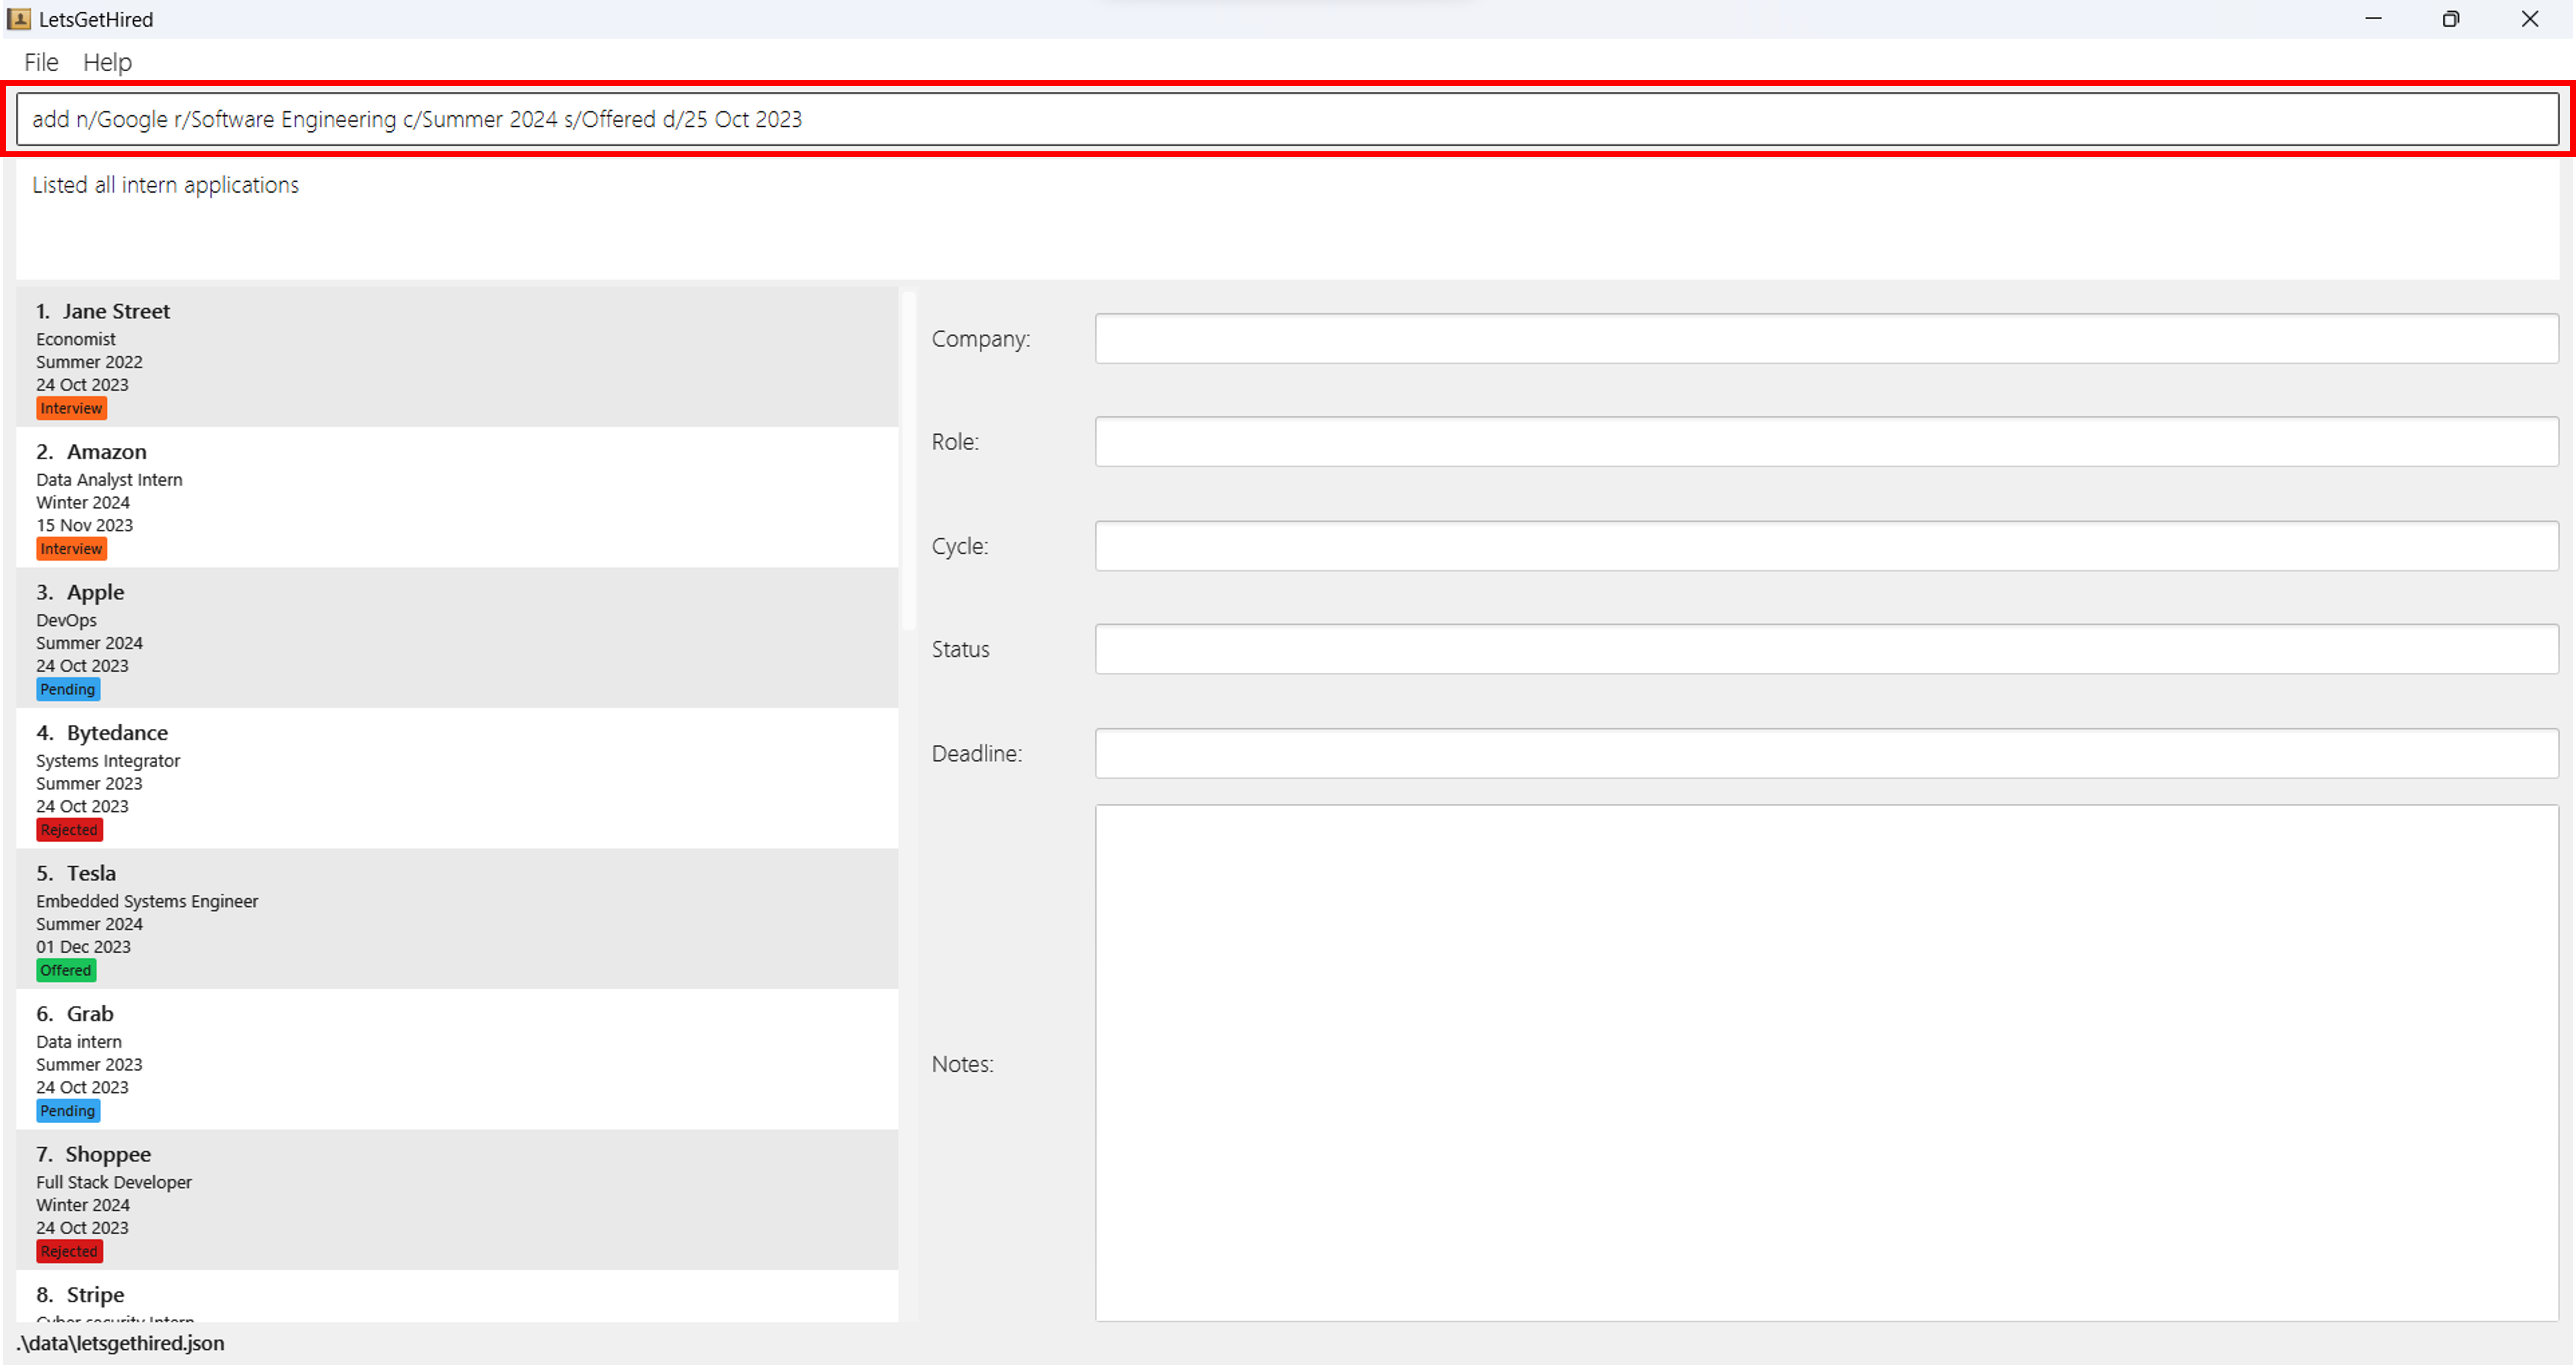
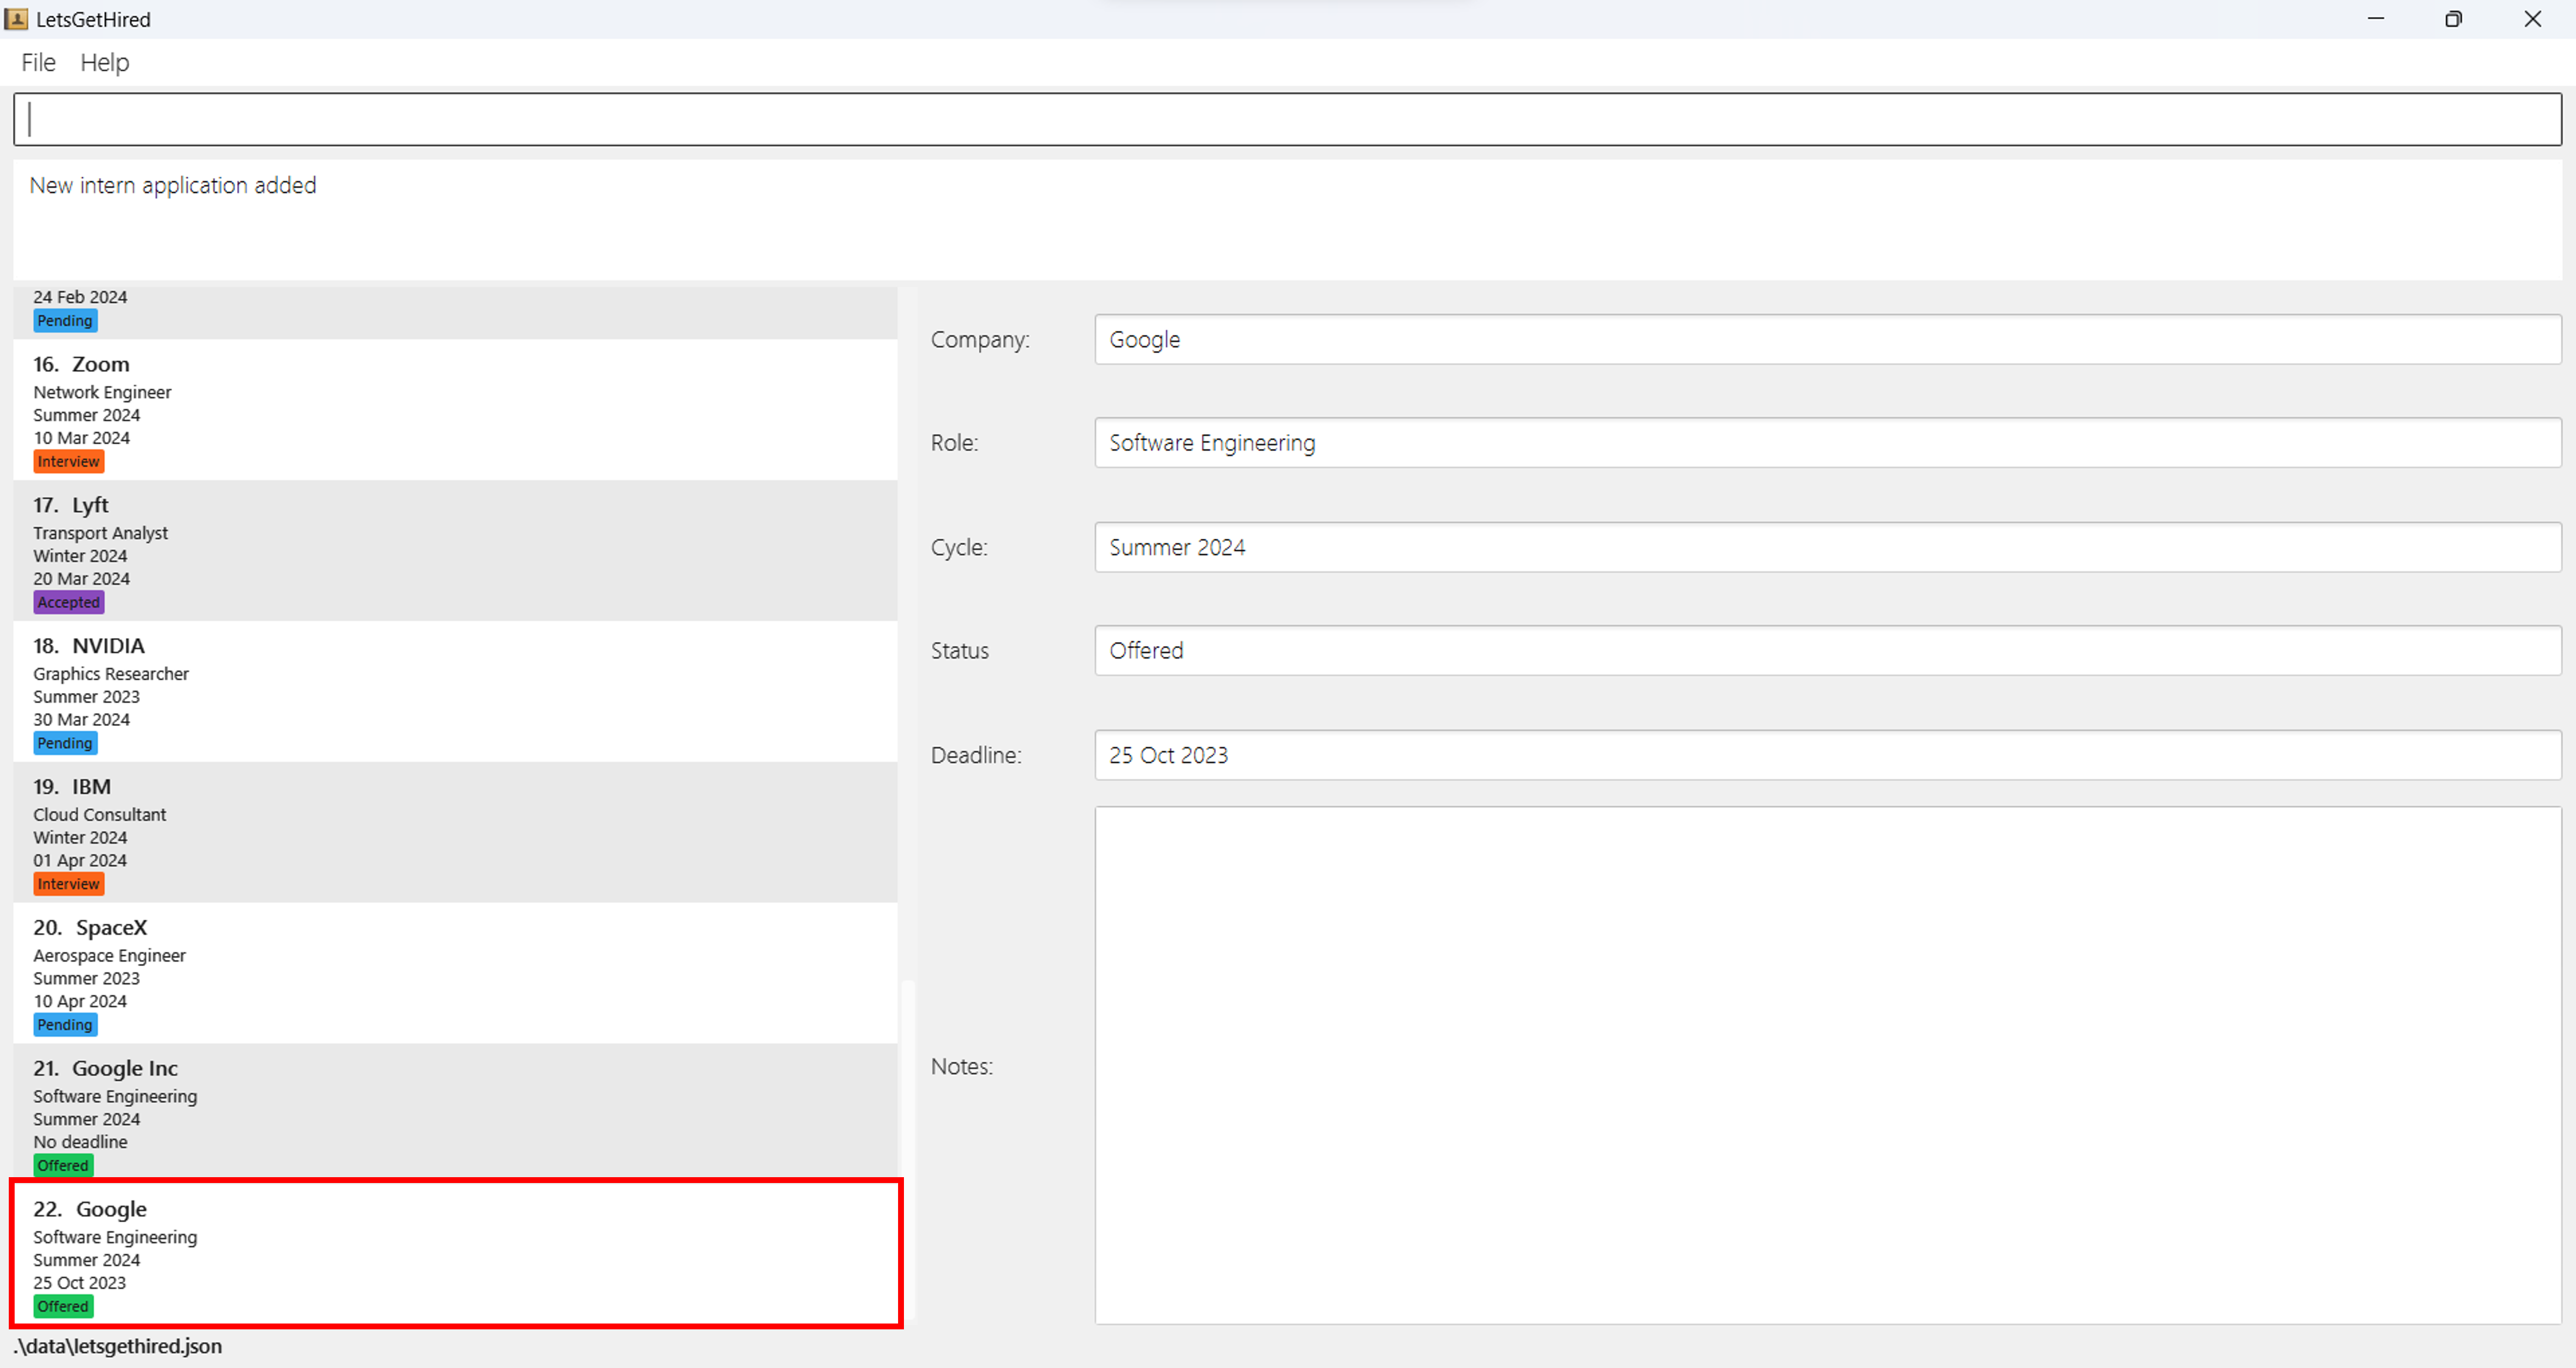
Upon hitting Enter, your internship application details will be recorded and
presented in the list.
This ensures that as you apply to more roles and receive updates on your
applications, every piece of information is
systematically stored, making tracking and follow-ups more manageable.
- Regularly adding applications immediately after submission ensures you don't miss out on tracking any application.
- Remember to update the
STATUSof your applications as they progress. This way, you'll always be aware of which stage each application is at.
Editing Your Internship Application : edit
The edit command offers flexibility in managing your internship applications.
As the status of your applications change, or if you notice inaccuracies in the
details you've entered,
the edit command ensures you can update any part of your application
without any hassle.
Command Usage
Command:
edit INDEX [n/COMPANY_NAME] [r/ROLE] [c/CYCLE] [s/STATUS] [d/DEADLINE]
Parameters:
At least one of the optional parameters must be provided.
INDEX: Represents the position of the internship application in your list that you wish to update.
The
INDEXshould be a positive integer. For example:1,2,3, etc. This corresponds to the application's position in your list.n/COMPANY_NAME (Optional): The updated company name.
r/ROLE (Optional): The updated internship role.
c/CYCLE (Optional): The updated internship cycle.
s/STATUS (Optional): The updated status of your application.
d/DEADLINE (Optional): The updated deadline or any related dates.
Example:
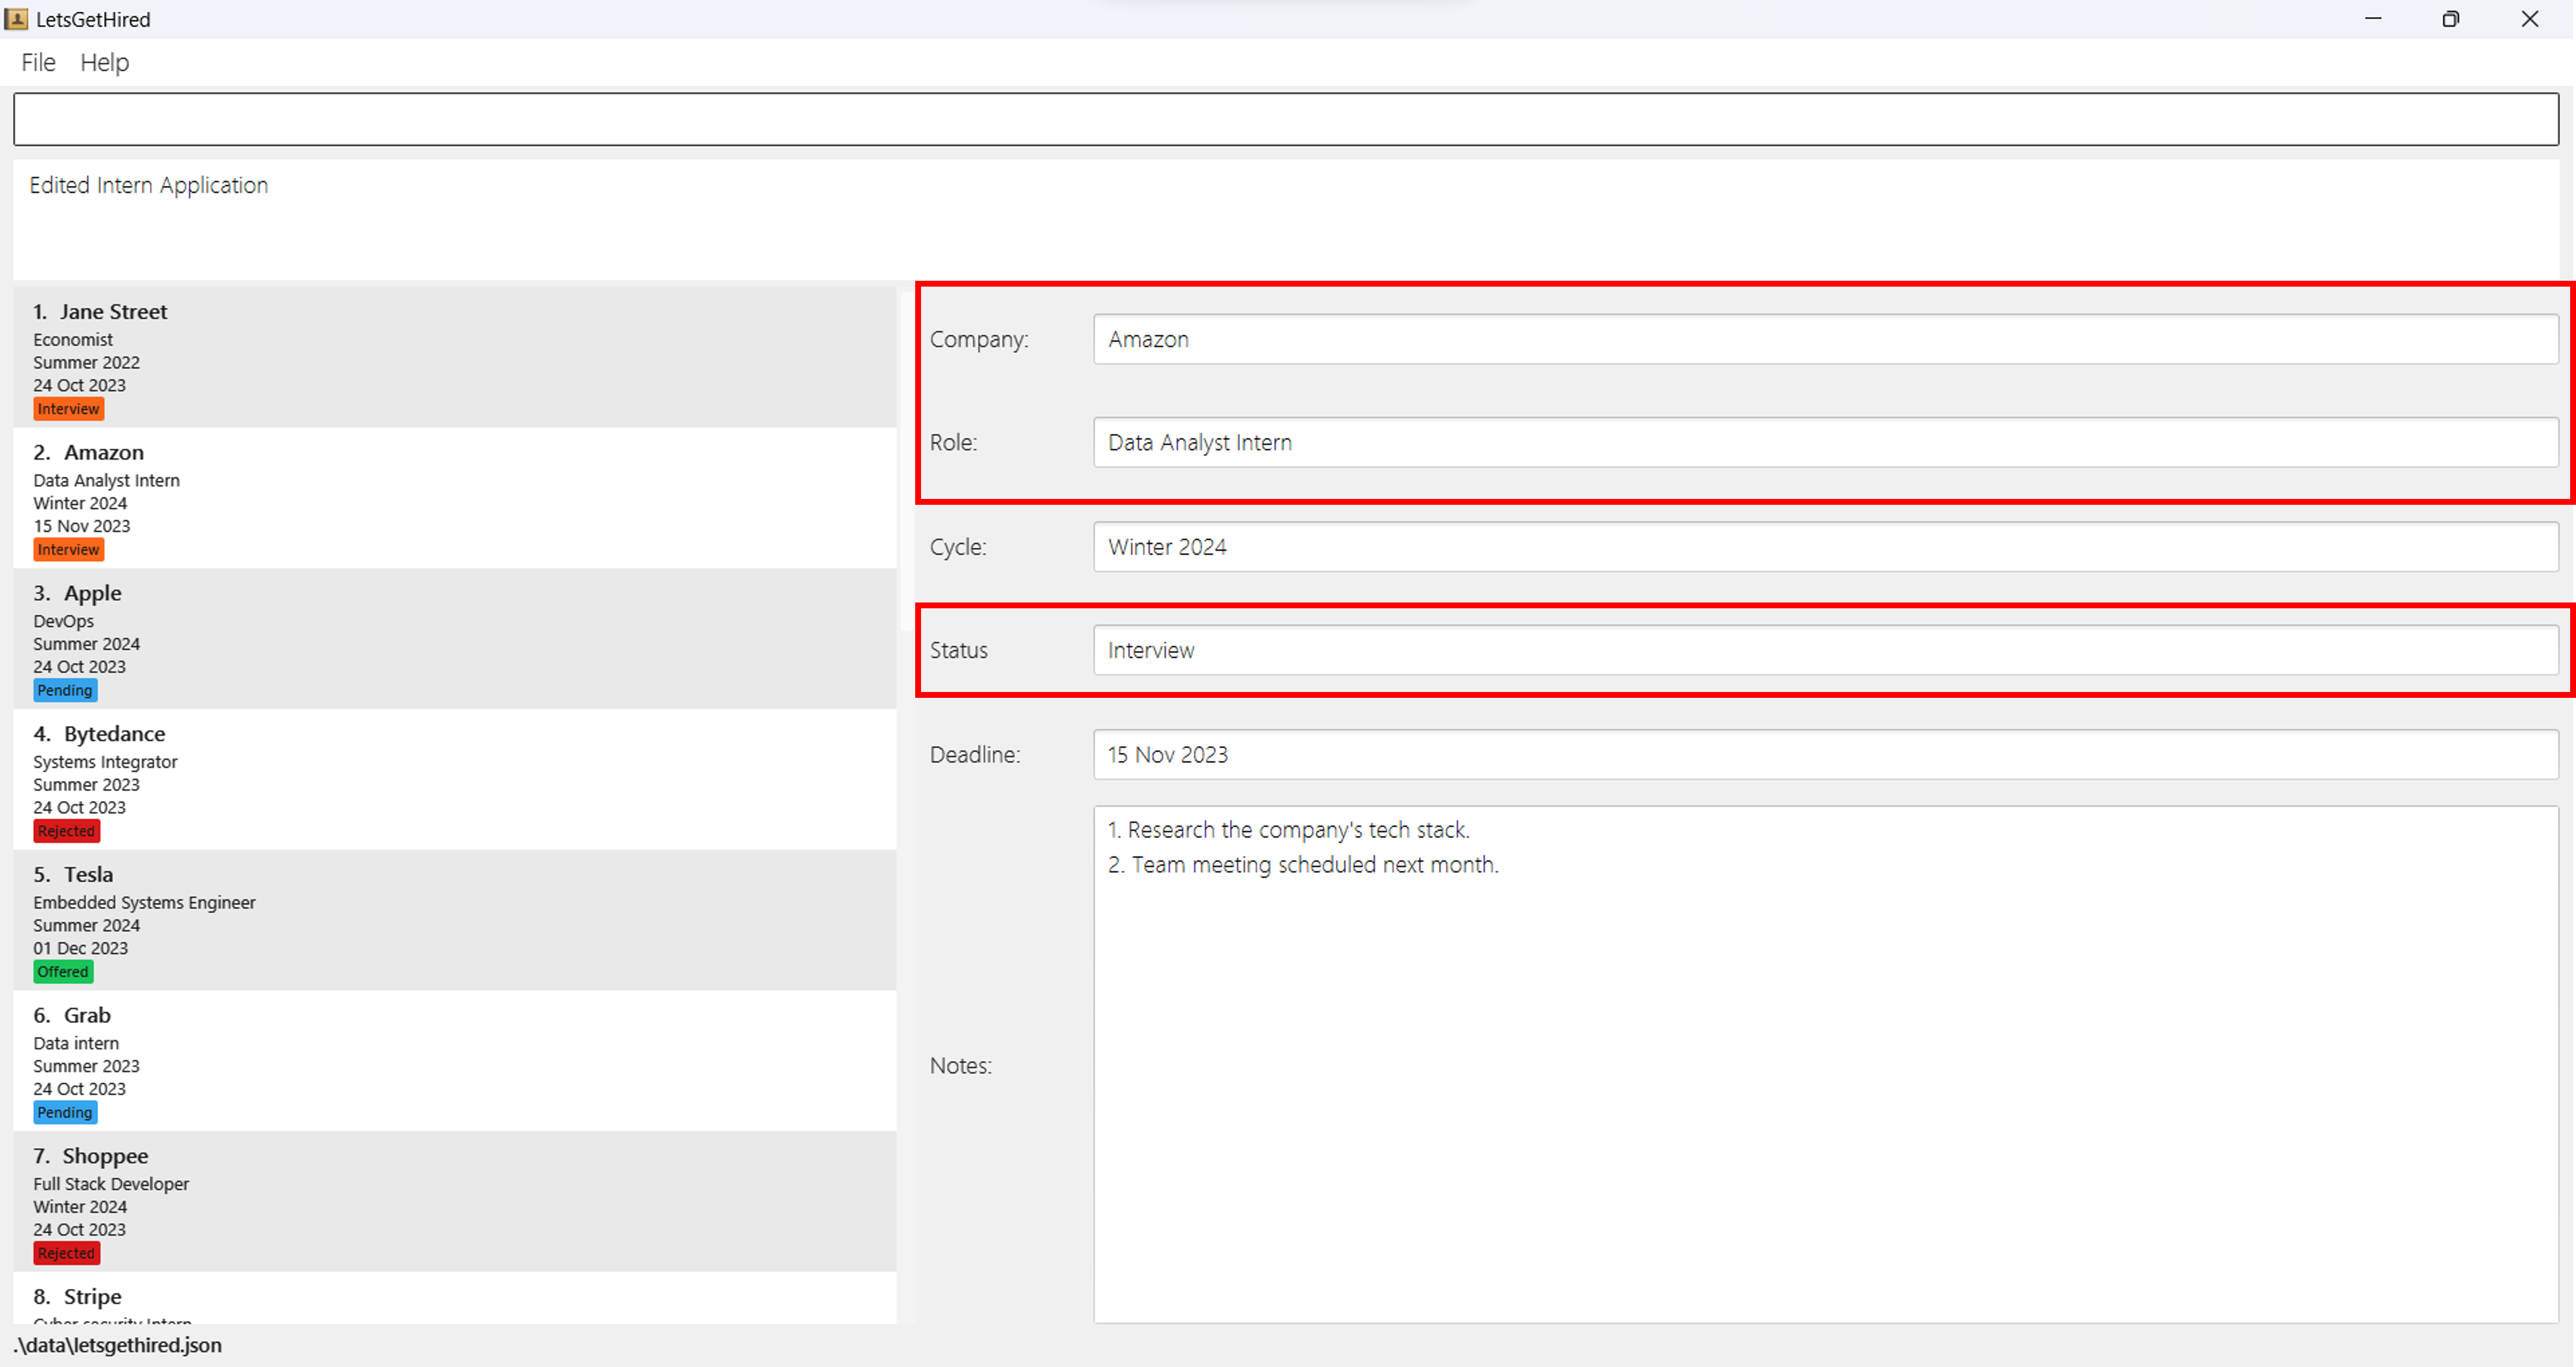
Let's say you want to edit the second internship application in your list to change the company name to Amazon, update the role to Data Analyst Intern, and modify the status to Interview. The command would look like this:
edit 2 n/Amazon r/Data Analyst Intern s/Interview
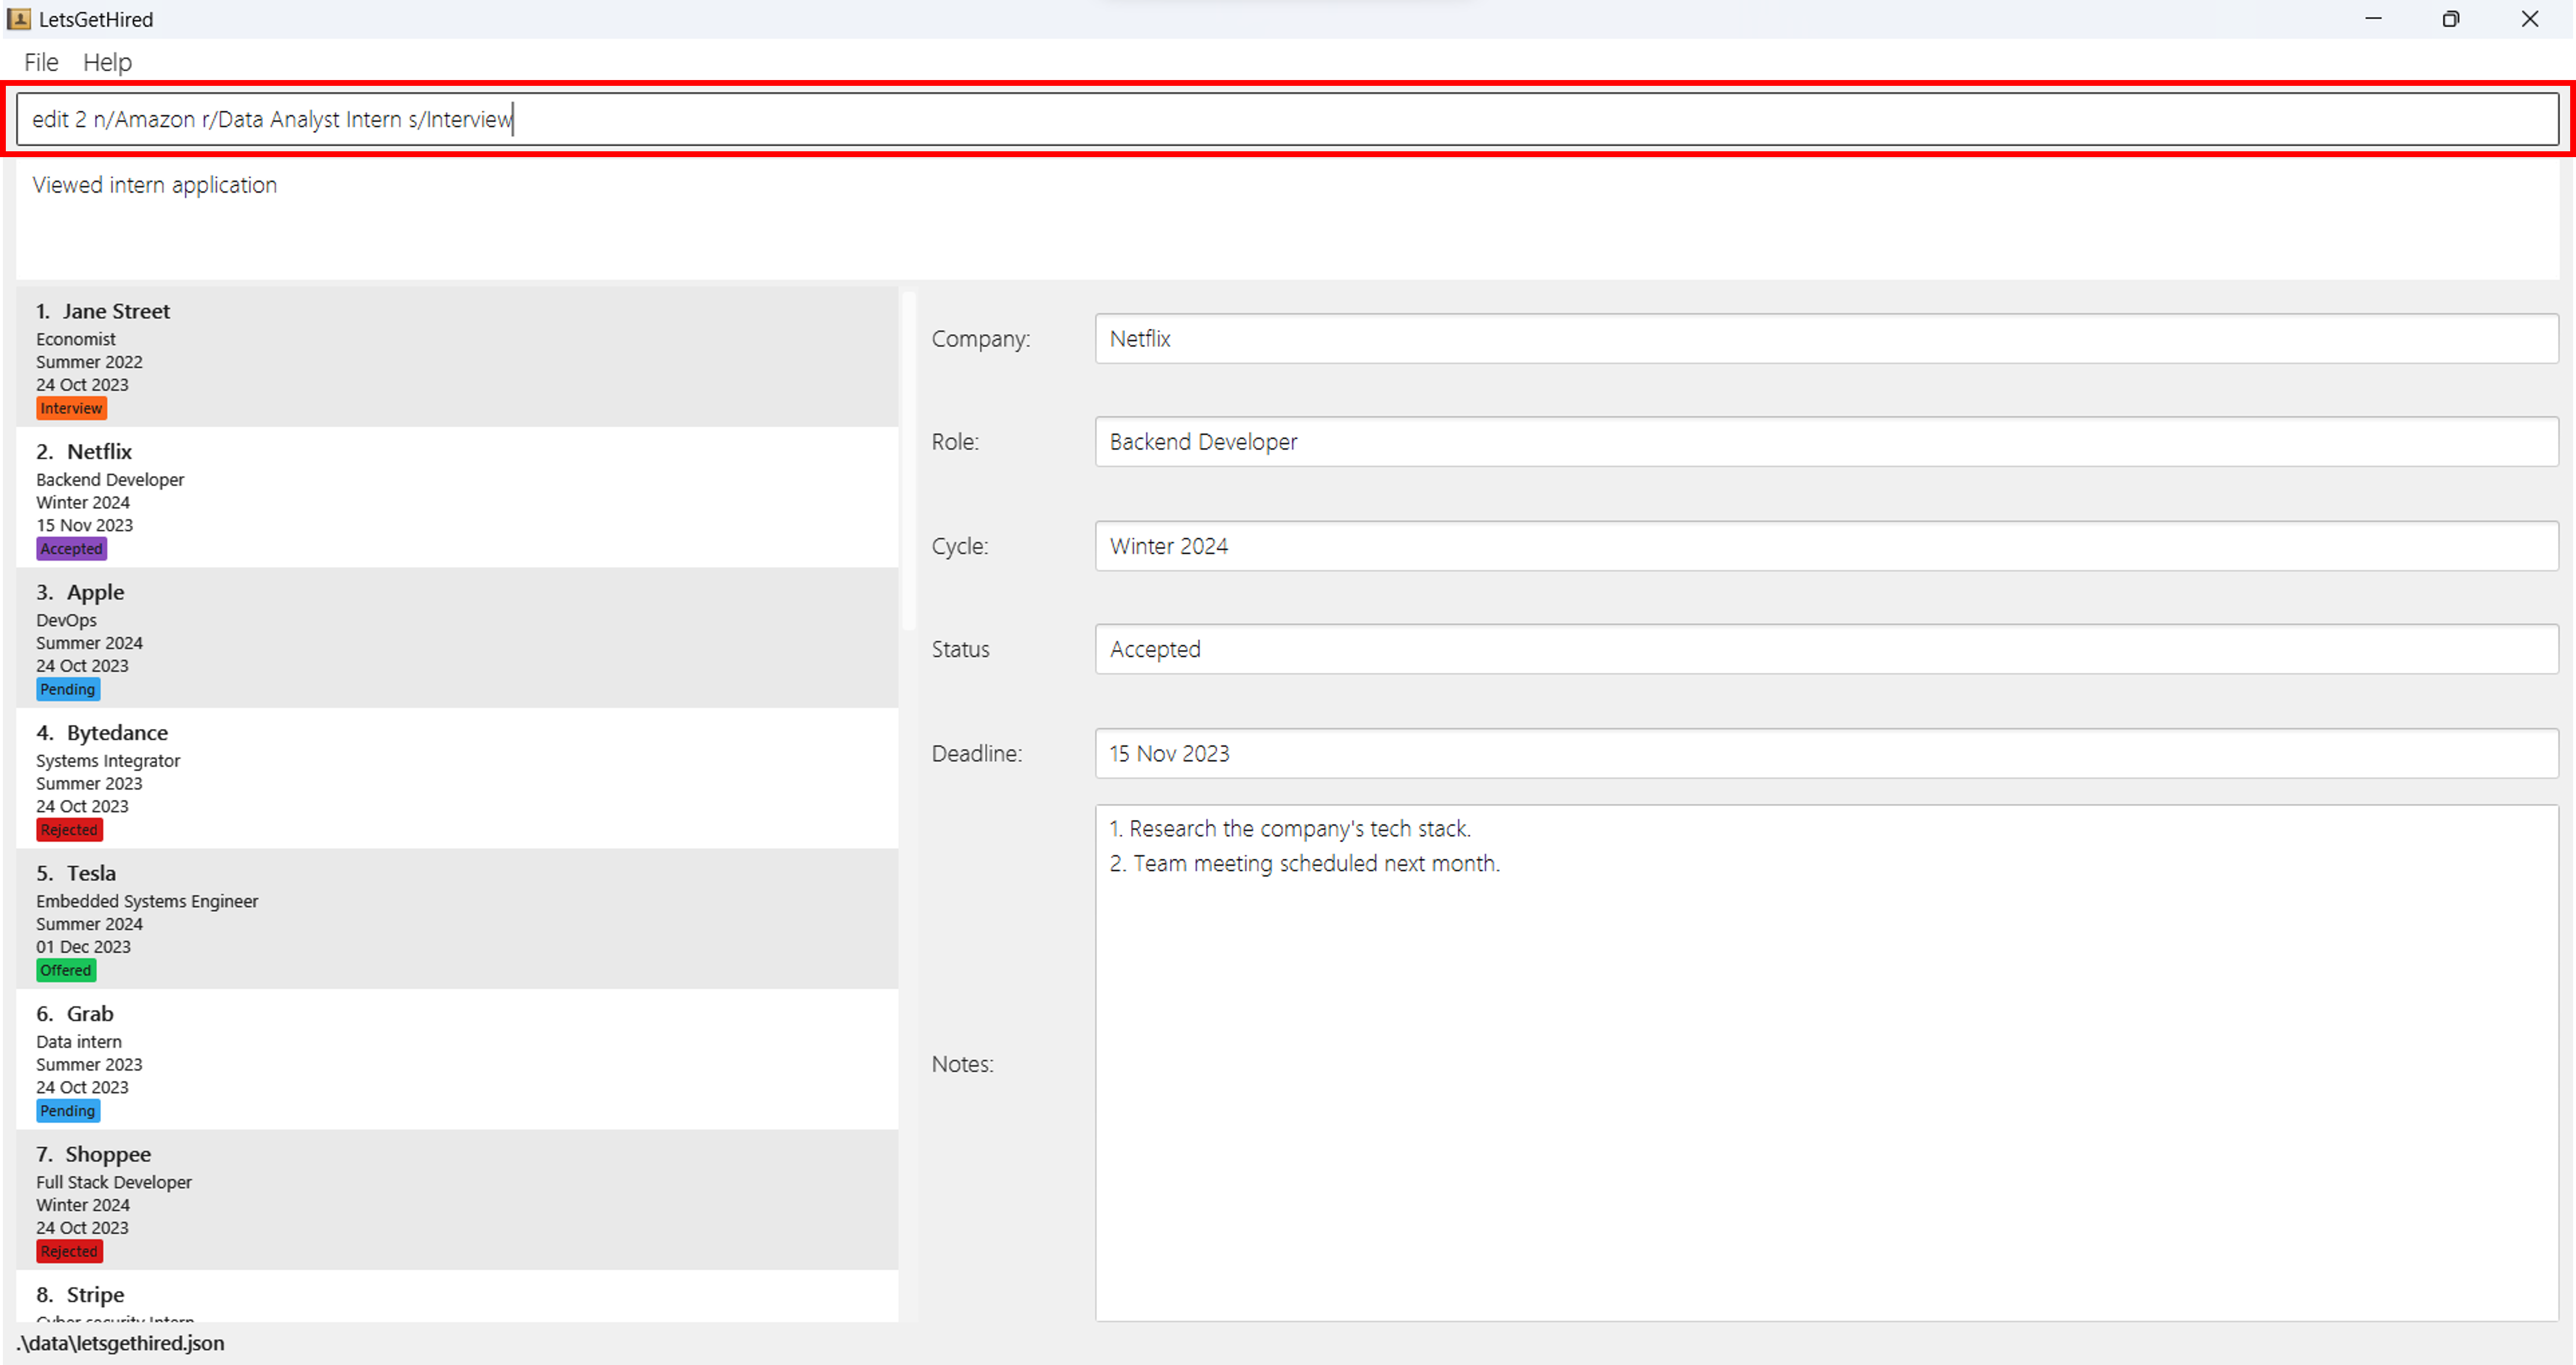
After hitting Enter, you can see that the original details of the application
are updated.
This ensures your application list remains current and accurate, reflecting the
latest changes or corrections you've made.
- Always confirm the
INDEXof the application you want to edit by using thelistcommand before executing theeditcommand. This helps avoid unintended modifications. - While it's crucial to keep your applications updated, make sure to double-check the changes you're making to ensure accuracy.
Managing Notes In Your Internship Application : note
The note command is a beneficial tool designed to enrich your internship
applications with additional details.
Adding a note:
As you progress through your application process, there might be specific
information, feedback, or reminders
you'd like to attach to an application for future reference. The note command
allows you to effortlessly do just that.
Command Usage
Command:
note INDEX i/NOTE
Parameters:
INDEX: Represents the position of the internship application in your list to which you wish to attach a note.
The
INDEXshould be a positive integer. For example:1,2,3, etc. This corresponds to the application's position in your list.i/NOTE: The note or information you'd like to add. This could be feedback from an interview, reminders for follow-up, or any other relevant details.
Example:
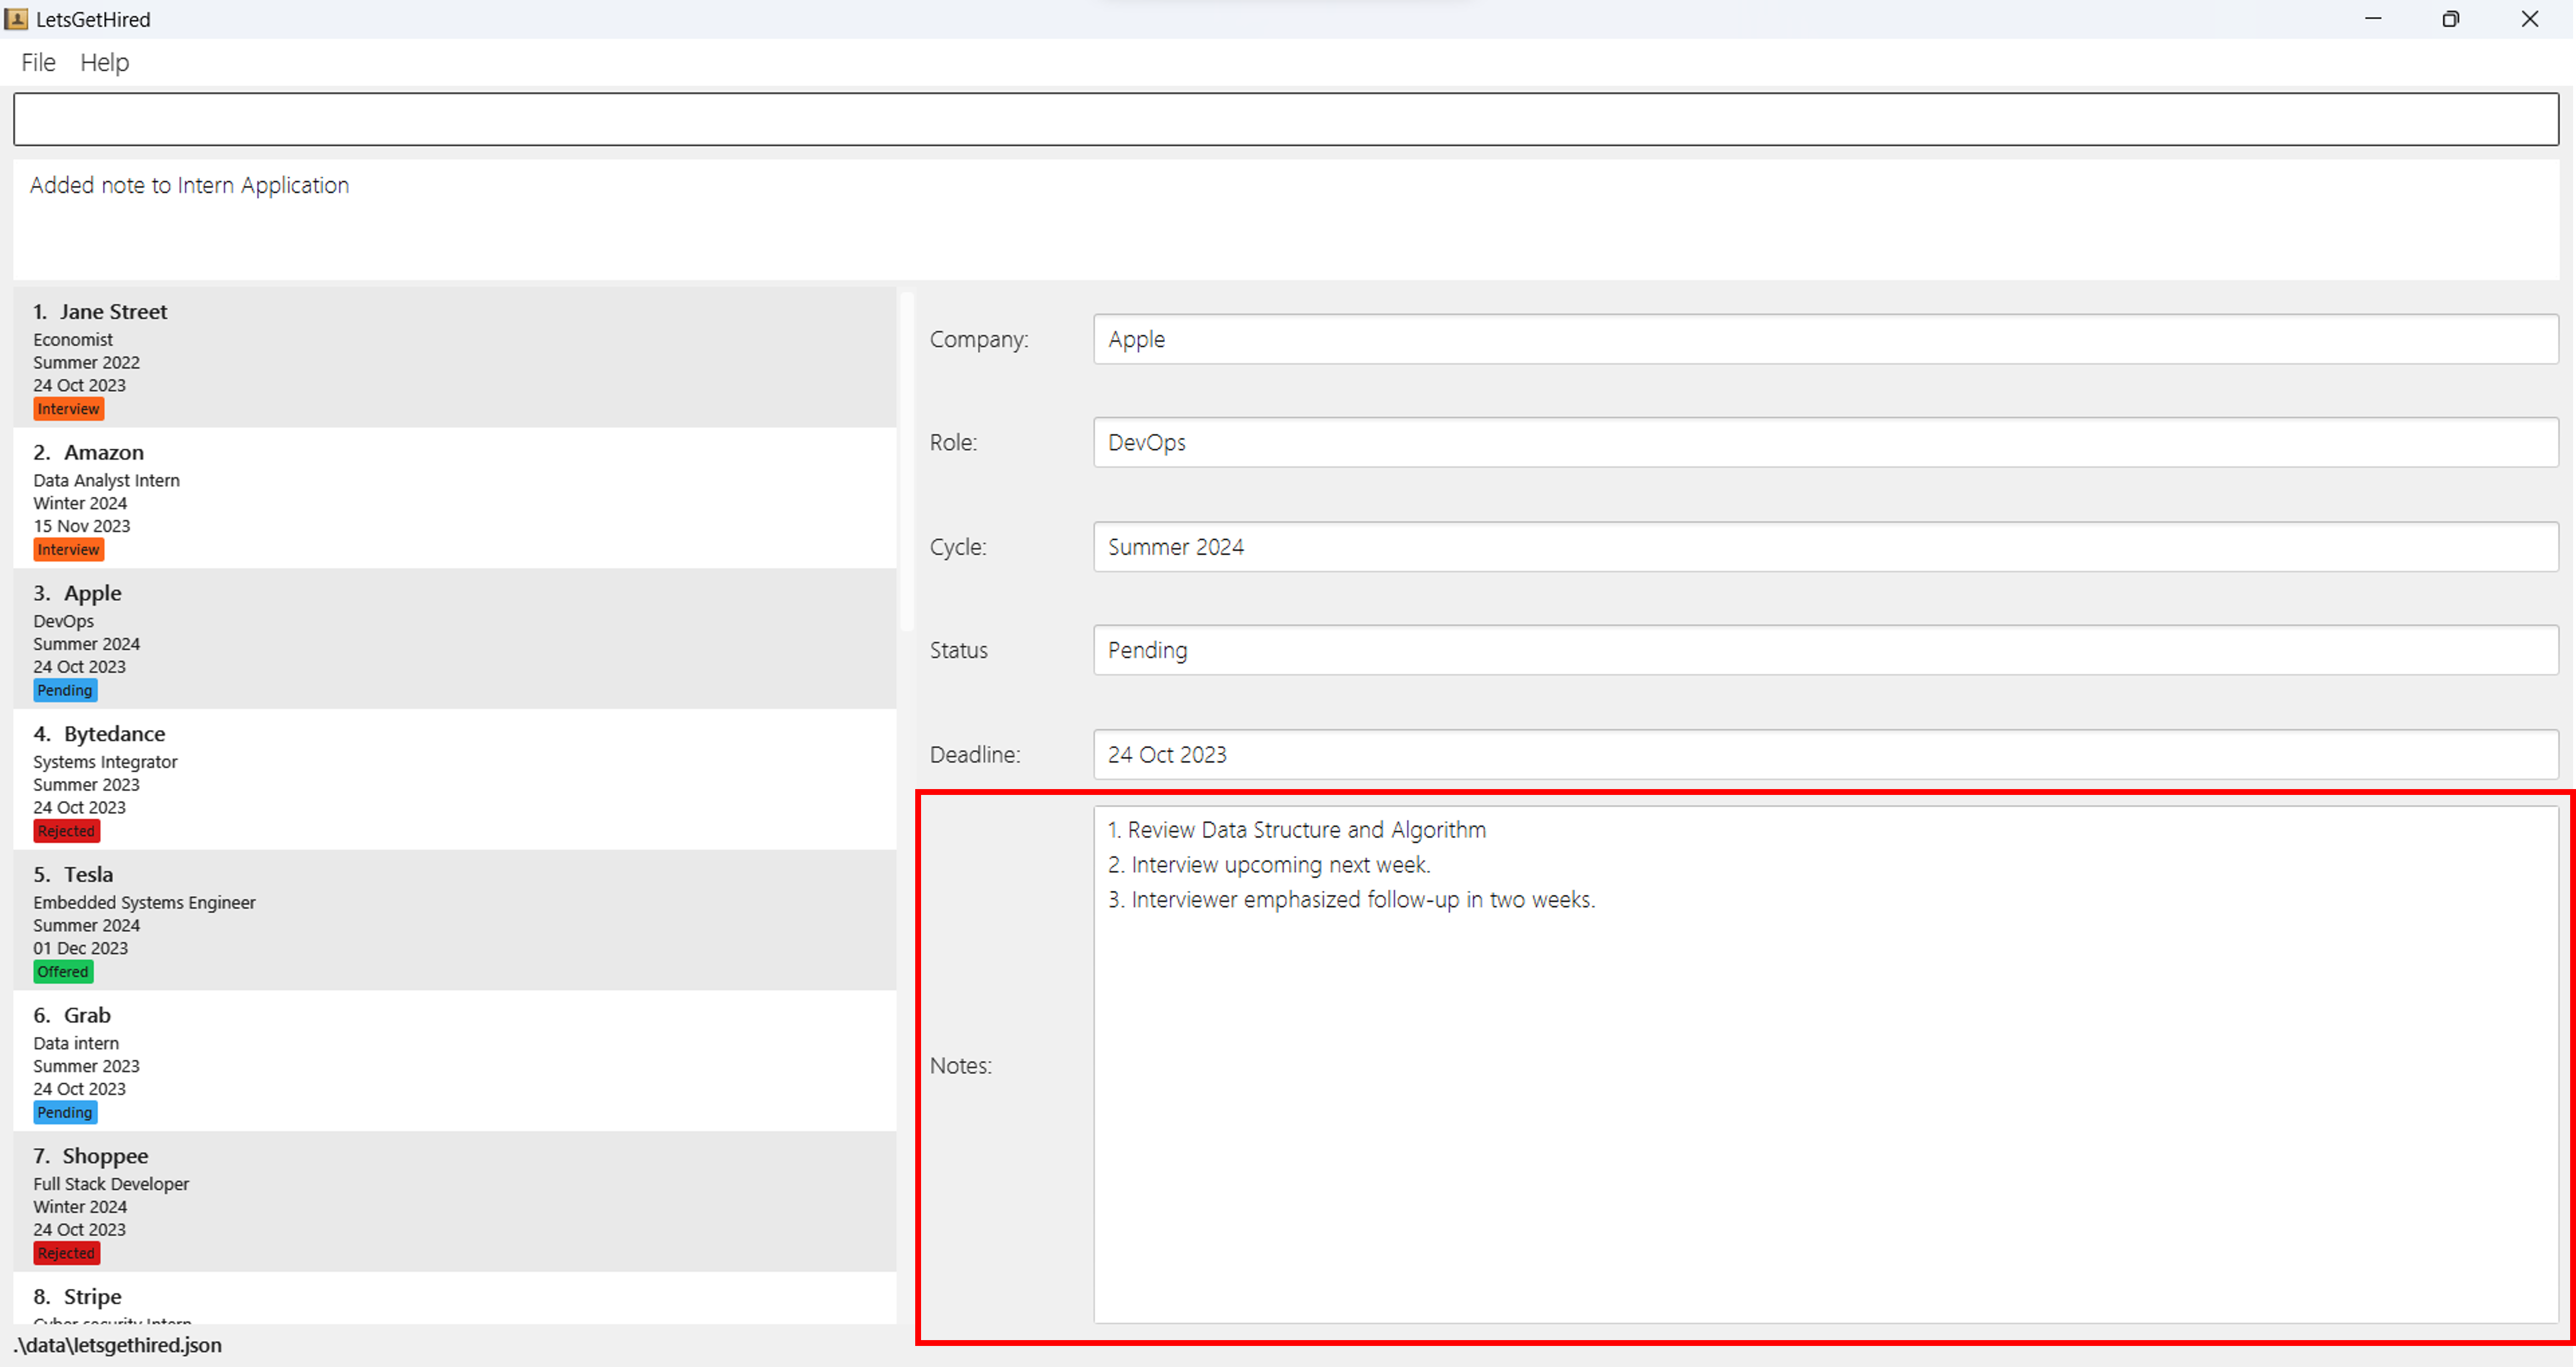
Suppose you just had an interview for the third internship application on your list, and you'd like to add a note mentioning that the interviewer emphasized a follow-up in two weeks. The command would look like this:
note 3 i/Interviewer emphasized follow-up in two weeks.
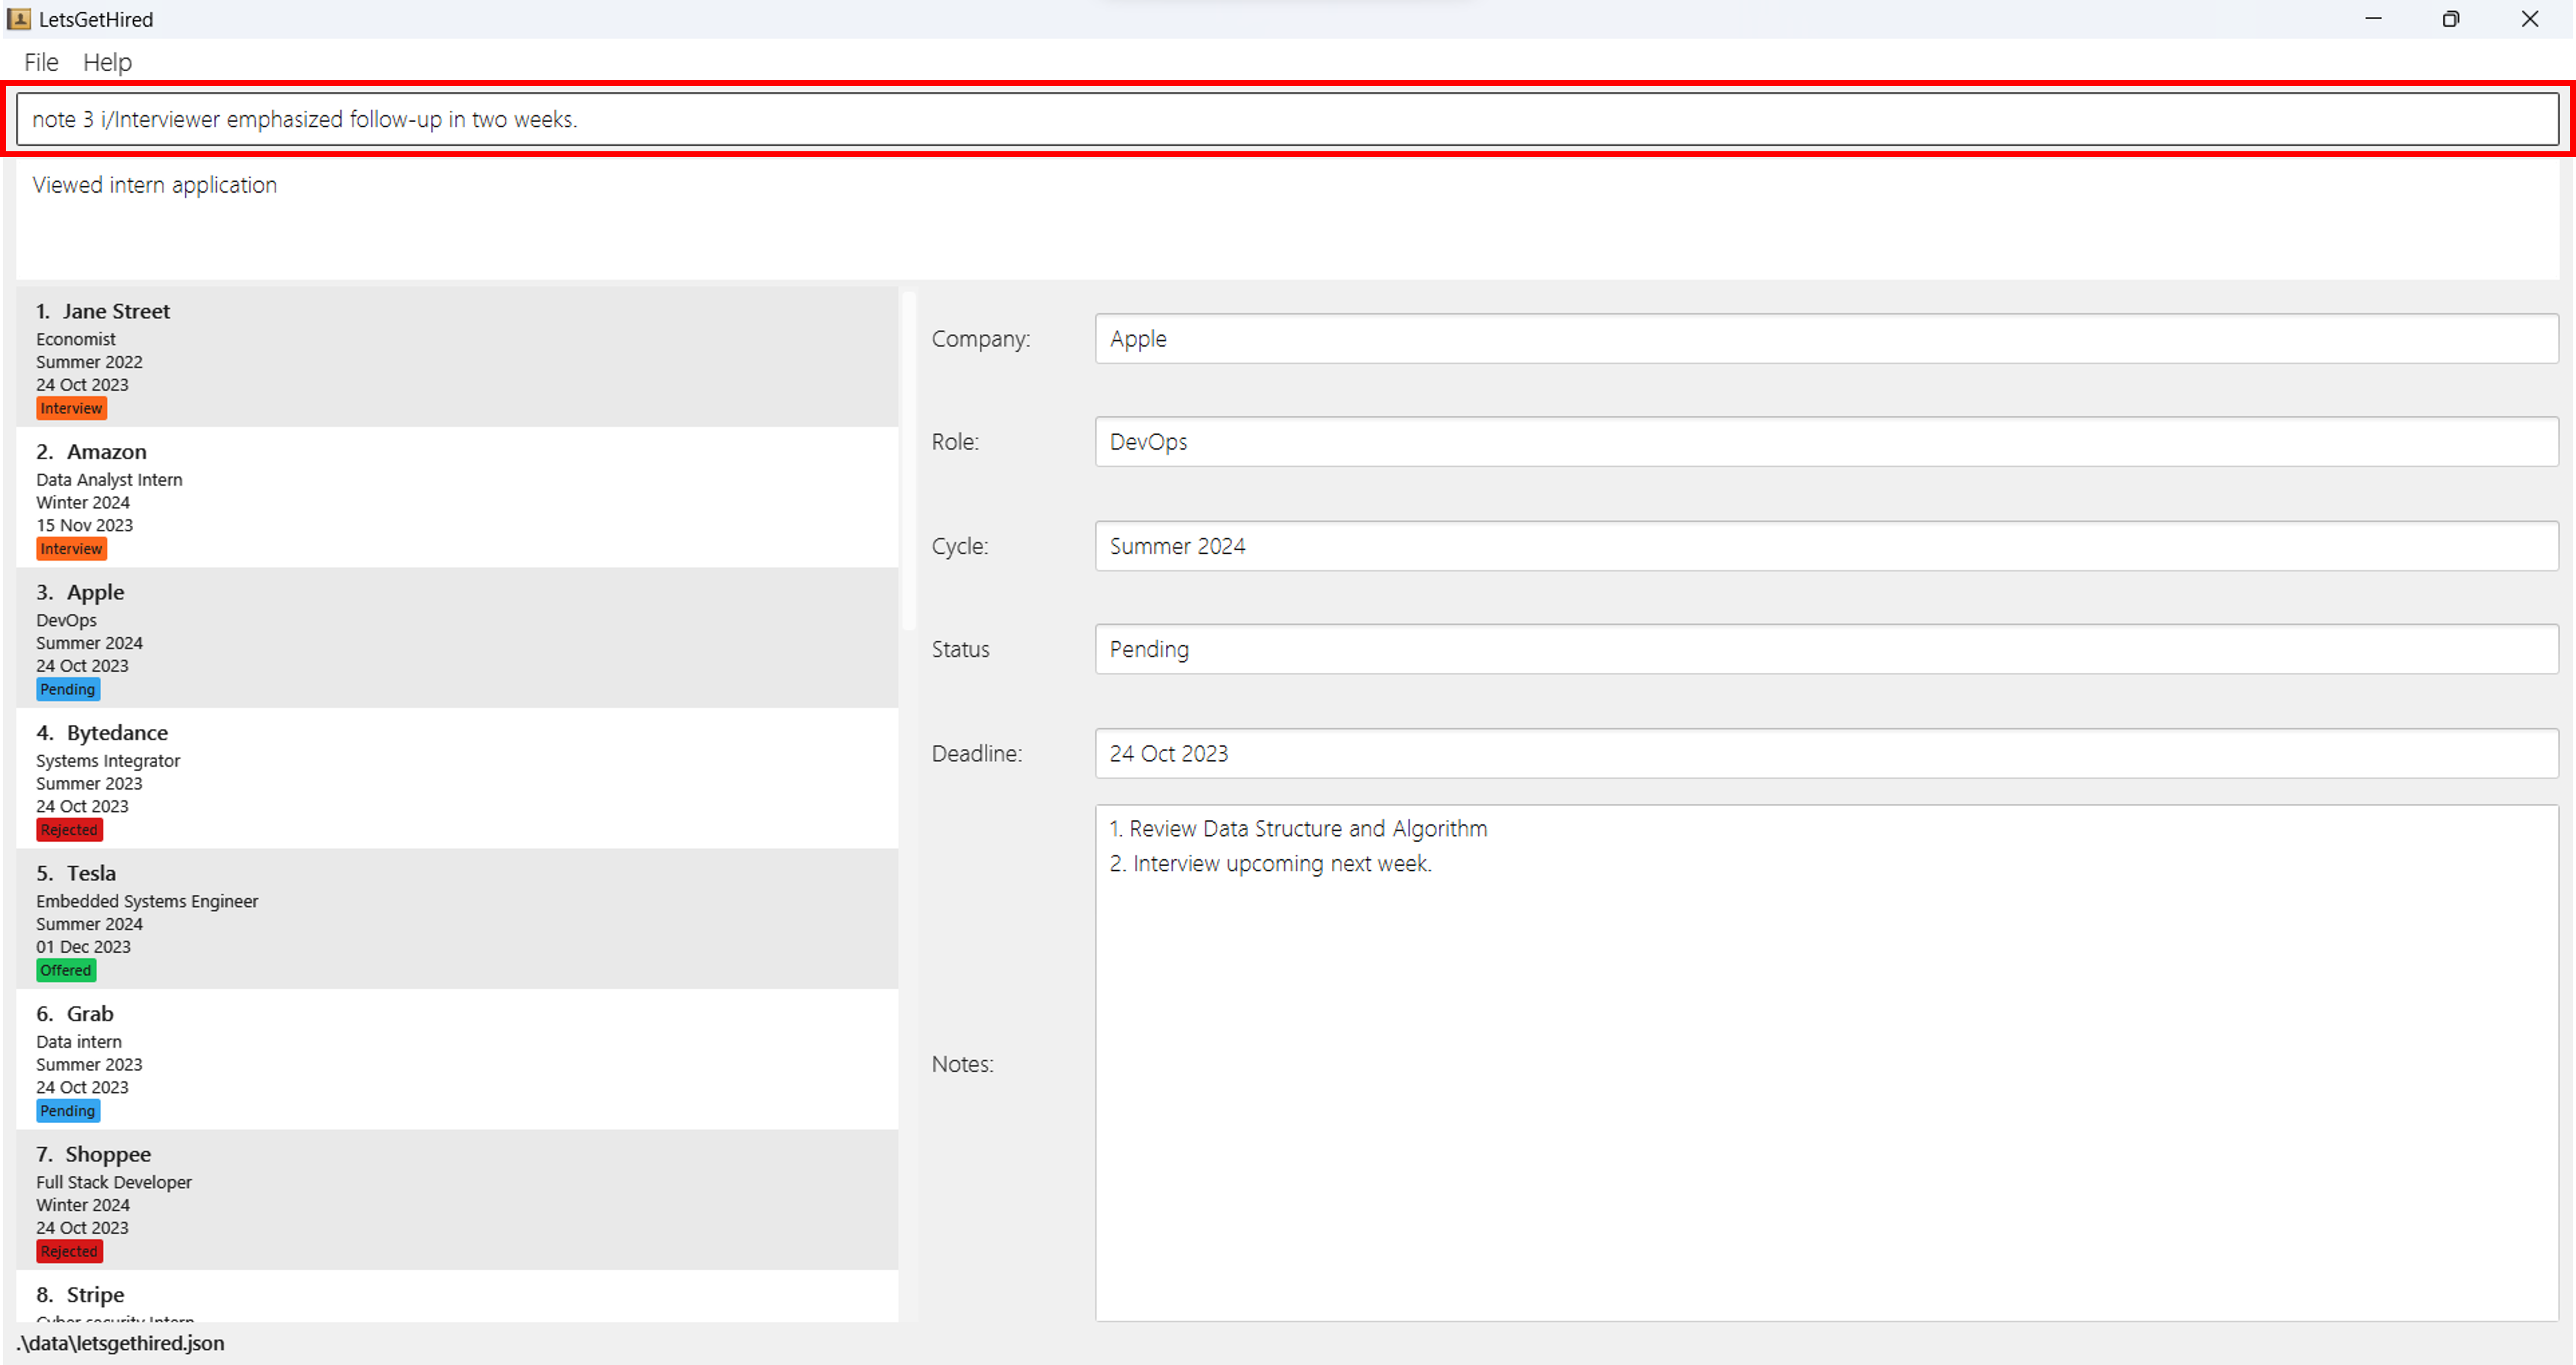
After hitting Enter, you can see that the new note gets attached to the
specified internship application.
This ensures you have a comprehensive view of each application, complete with
any supplementary details or reminders you've deemed important.
- Making a habit of attaching notes, especially after interviews or significant interactions, will ensure you don't forget crucial details.
- Reviewing notes can be particularly helpful when preparing for subsequent rounds of interviews or follow-ups.
Deleting a note:
As you progress through your application process, there might be notes that has
become outdated or irrelevant.
The note command allows you to effortlessly delete these notes as well.
Command Usage
Command:
note INDEX o/NOTE_INDEX
Parameters:
INDEX: Represents the position of the internship application in your list which contains the note you wish to delete.
The
INDEXshould be a positive integer. For example:1,2,3, etc. This corresponds to the application's position in your list.o/NOTE_INDEX: Represents the position of the note in the note list of the application to which you wish to delete.
The
NOTE_INDEXshould be a positive integer. For example:1,2,3, etc. This corresponds to the note’s position in your list.
Example:
Suppose you just had an interview for the third internship application on your list, and you'd like to delete the third note in your third internship application in the tracker. The command would look like this:
note 3 o/3
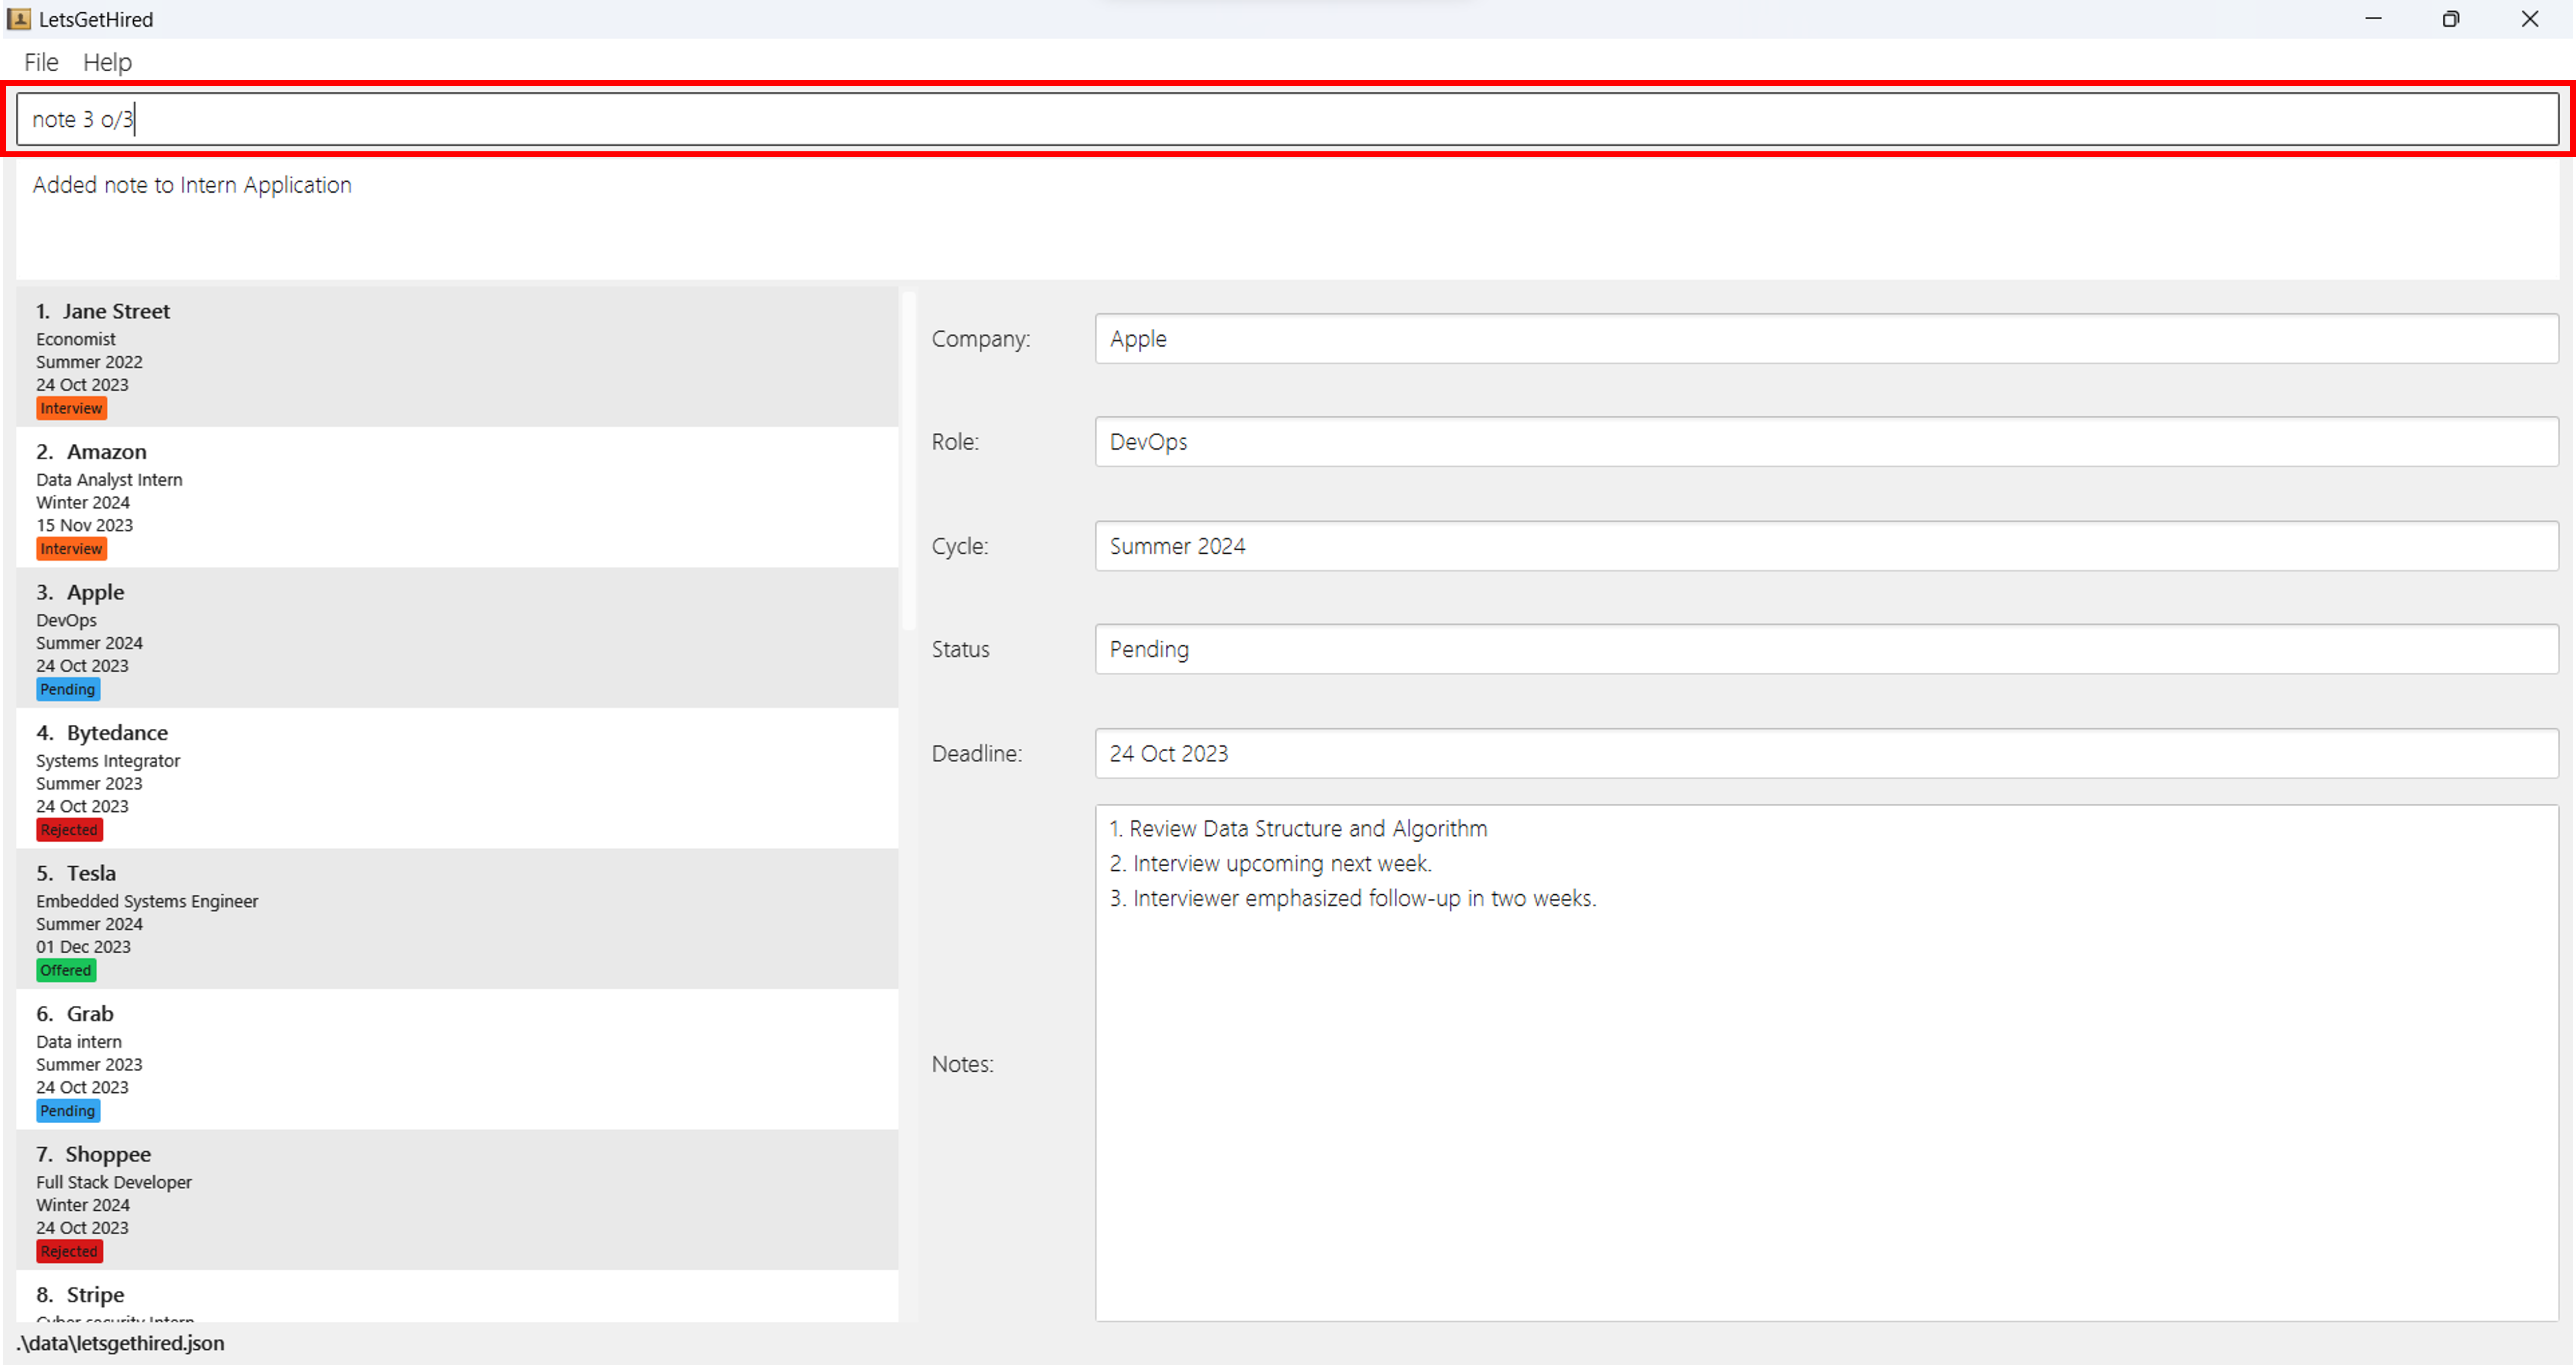
After hitting Enter, you can see that the third note is immediately deleted
from the list of notes.
- Regularly maintain and curate your notes to keep each internship application clear and relevant. This prevents the accumulation of outdated or unnecessary details over time.
Deleting Your Internship Application : delete
The delete command is an essential tool in your internship application
management toolkit, designed to help you maintain a clean and relevant list
of applications.
As situations change, such as when you decide not to pursue a particular
opportunity or when an application is no longer relevant,
the delete command ensures you can easily remove it from your records.
Command Usage
Command:
delete INDEX
Parameters:
INDEX: Represents the position of the internship application in your list that you wish to delete.
The
INDEXshould be a positive integer. For example:1,2,3, etc. This corresponds to the application's position in your list.
Example:
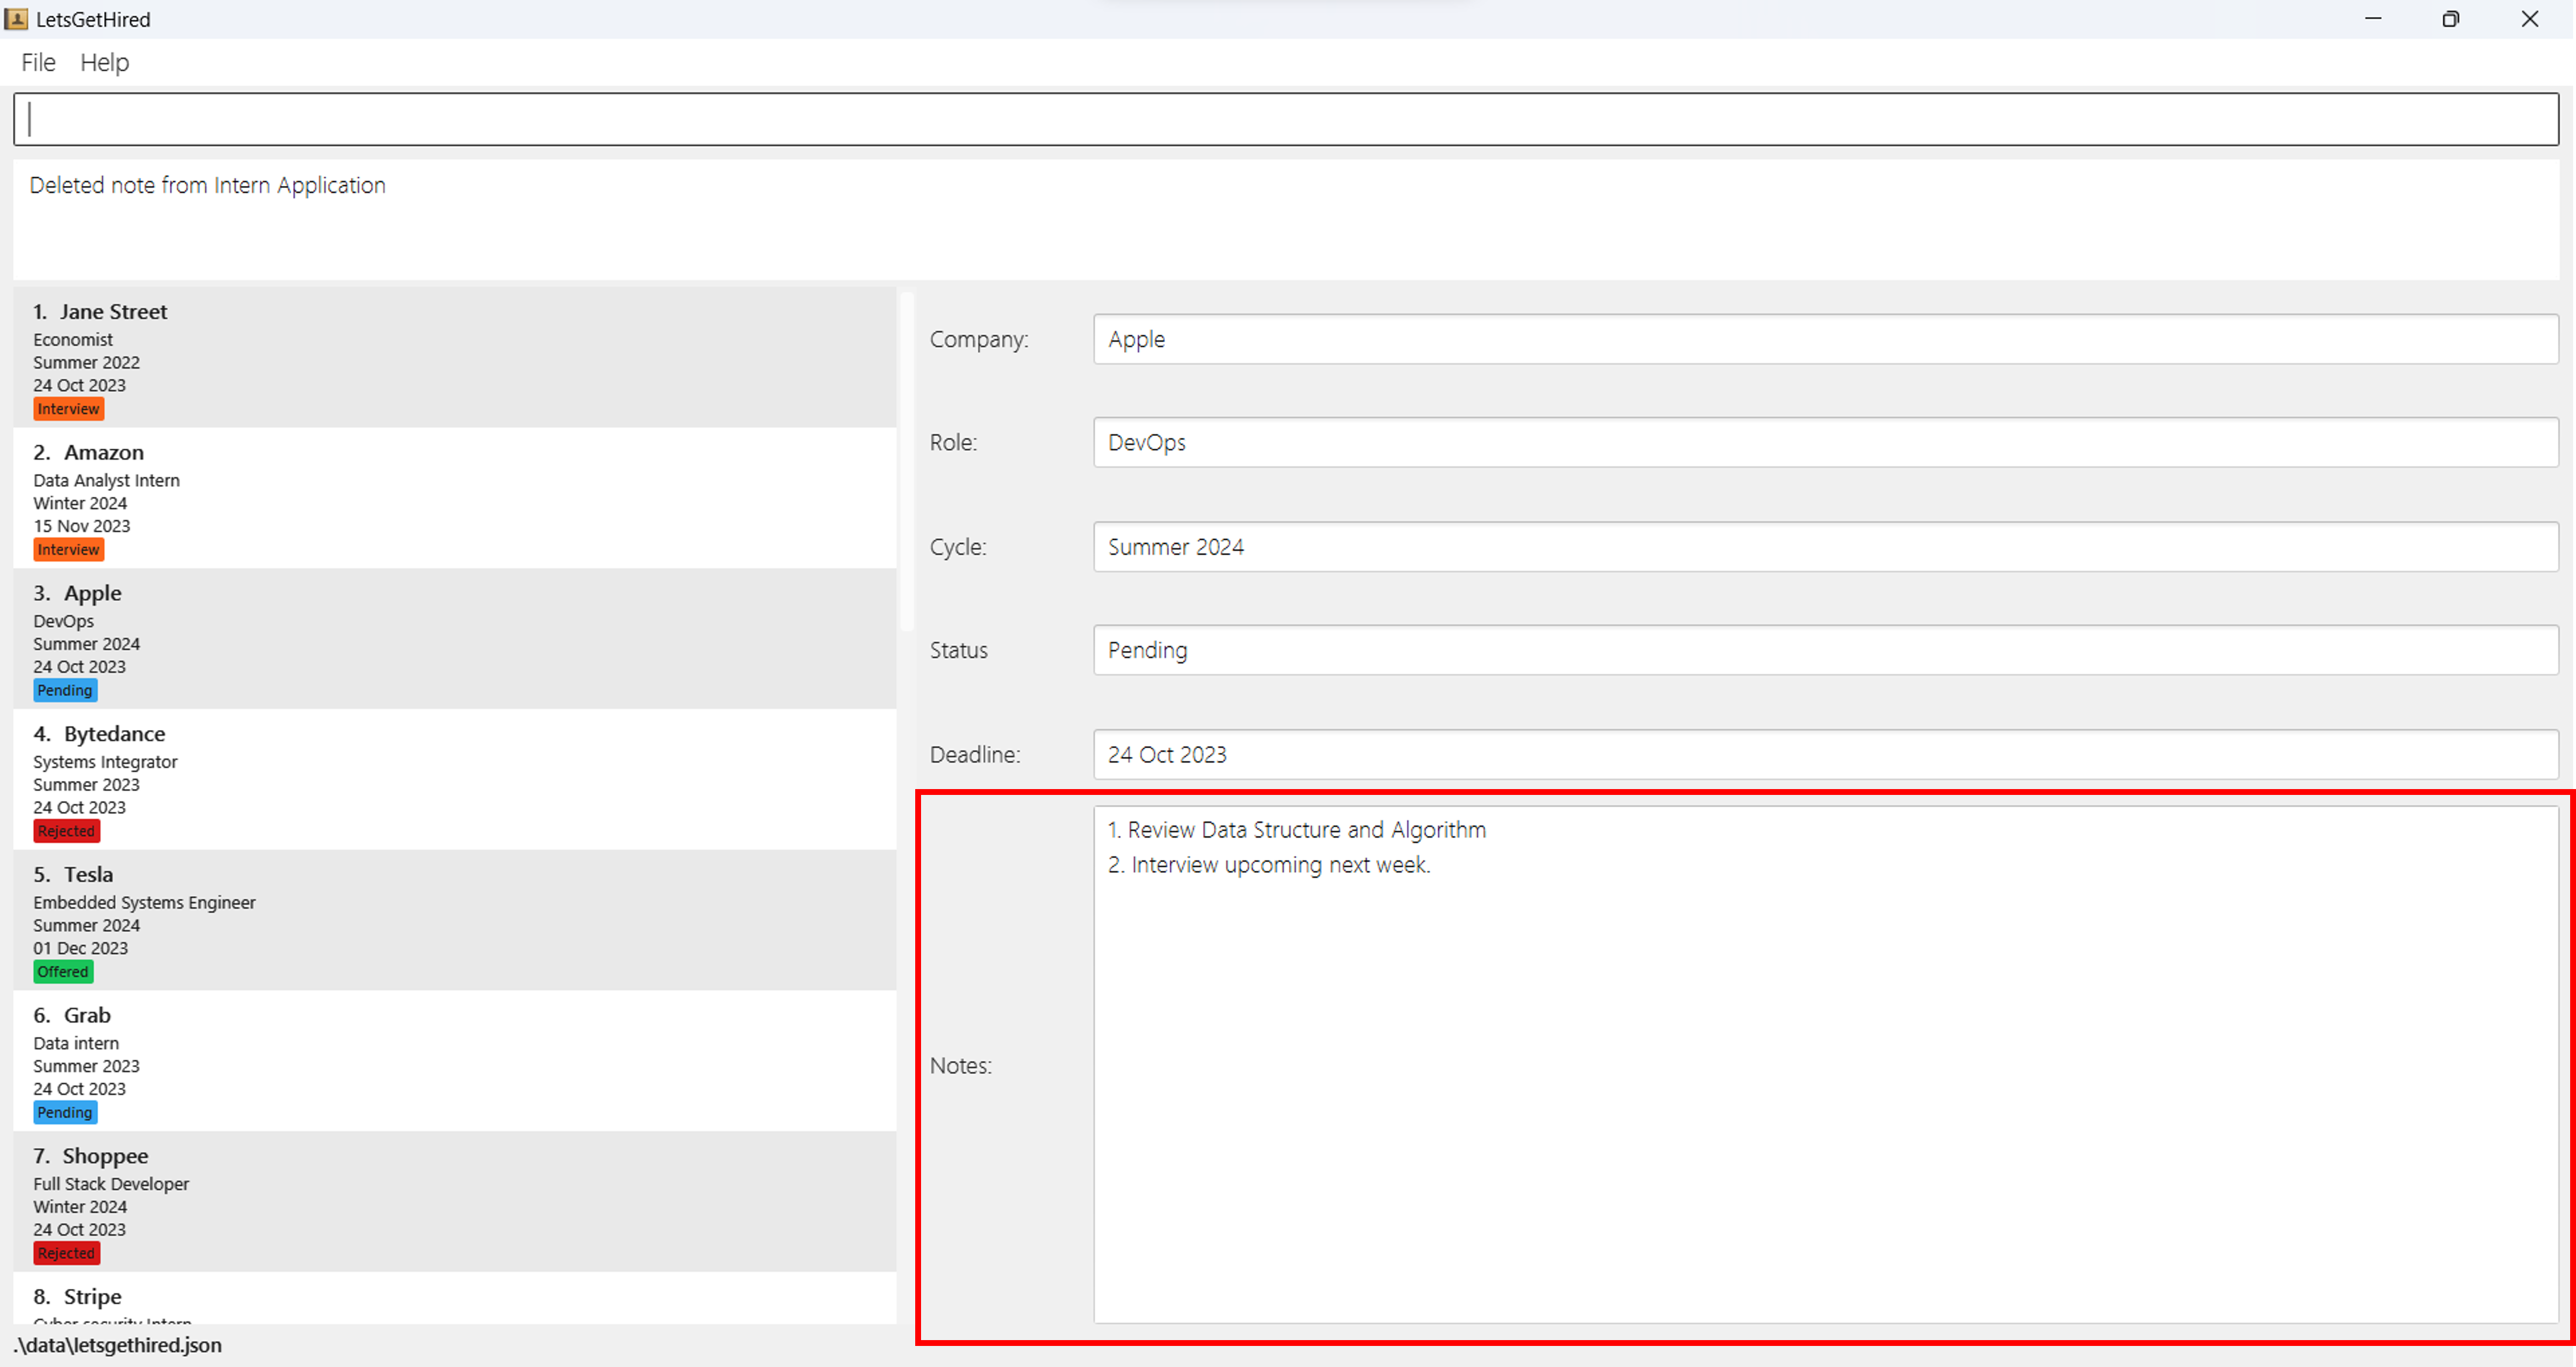
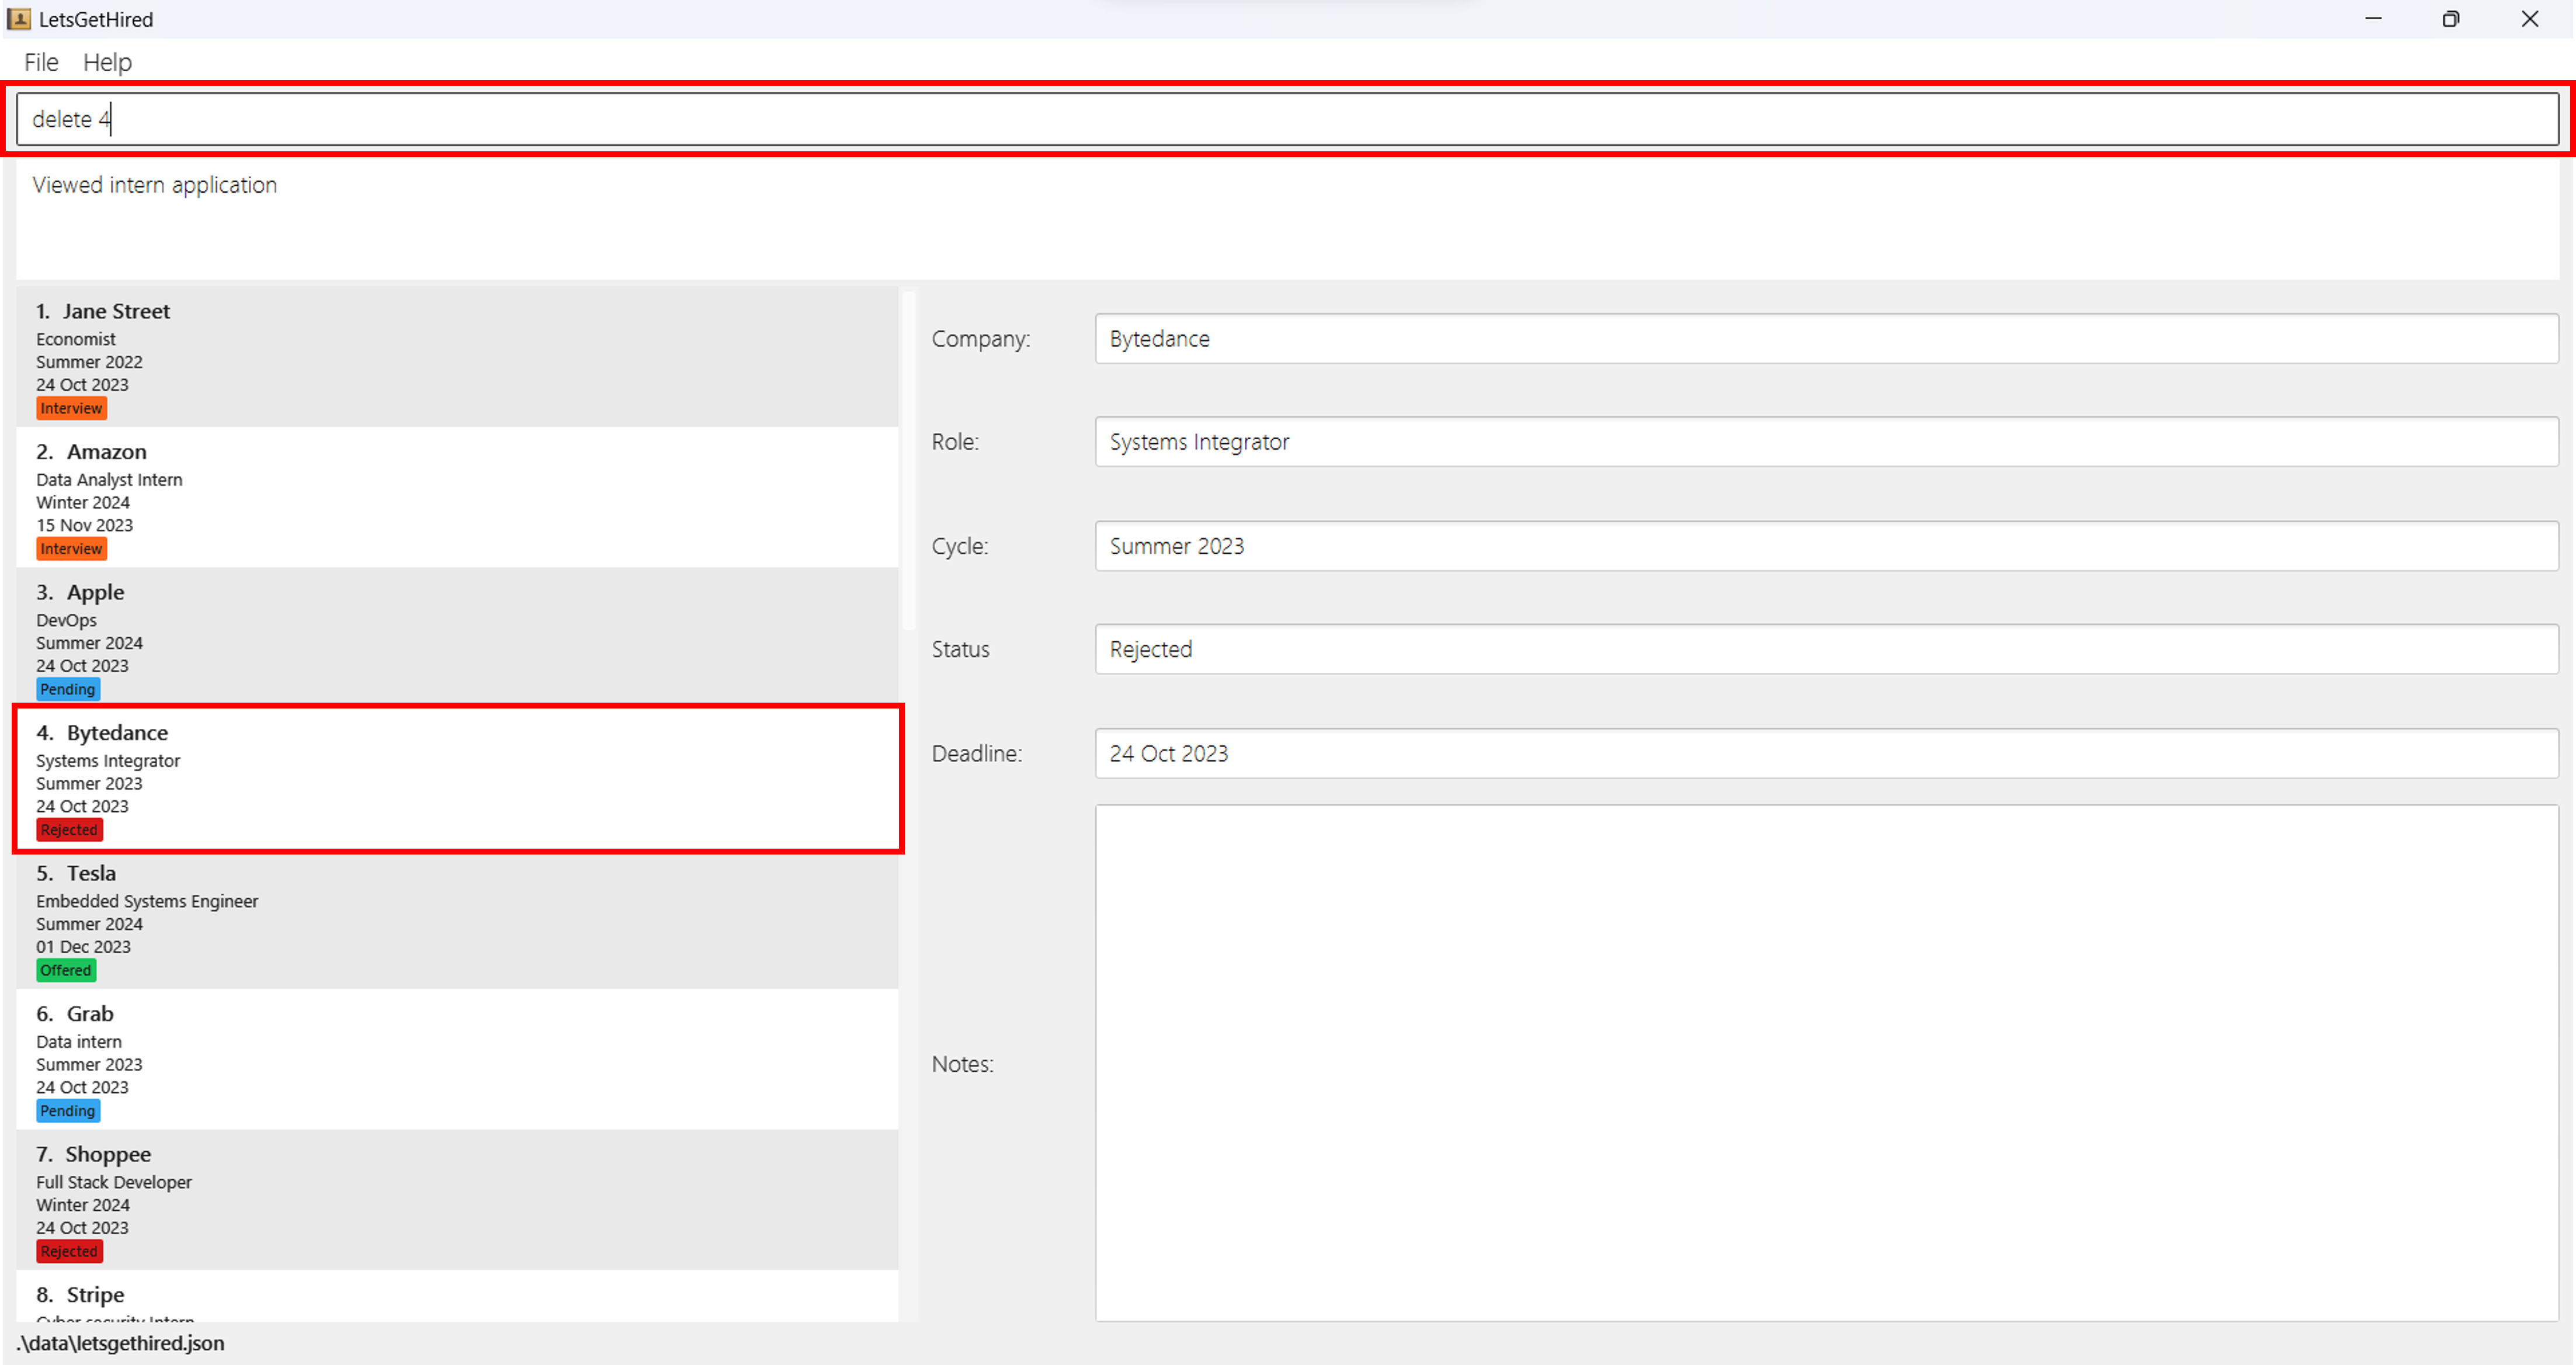
If you decide that the fourth internship application on your list is no longer relevant, and you want to remove it, the command would look like this:
delete 4
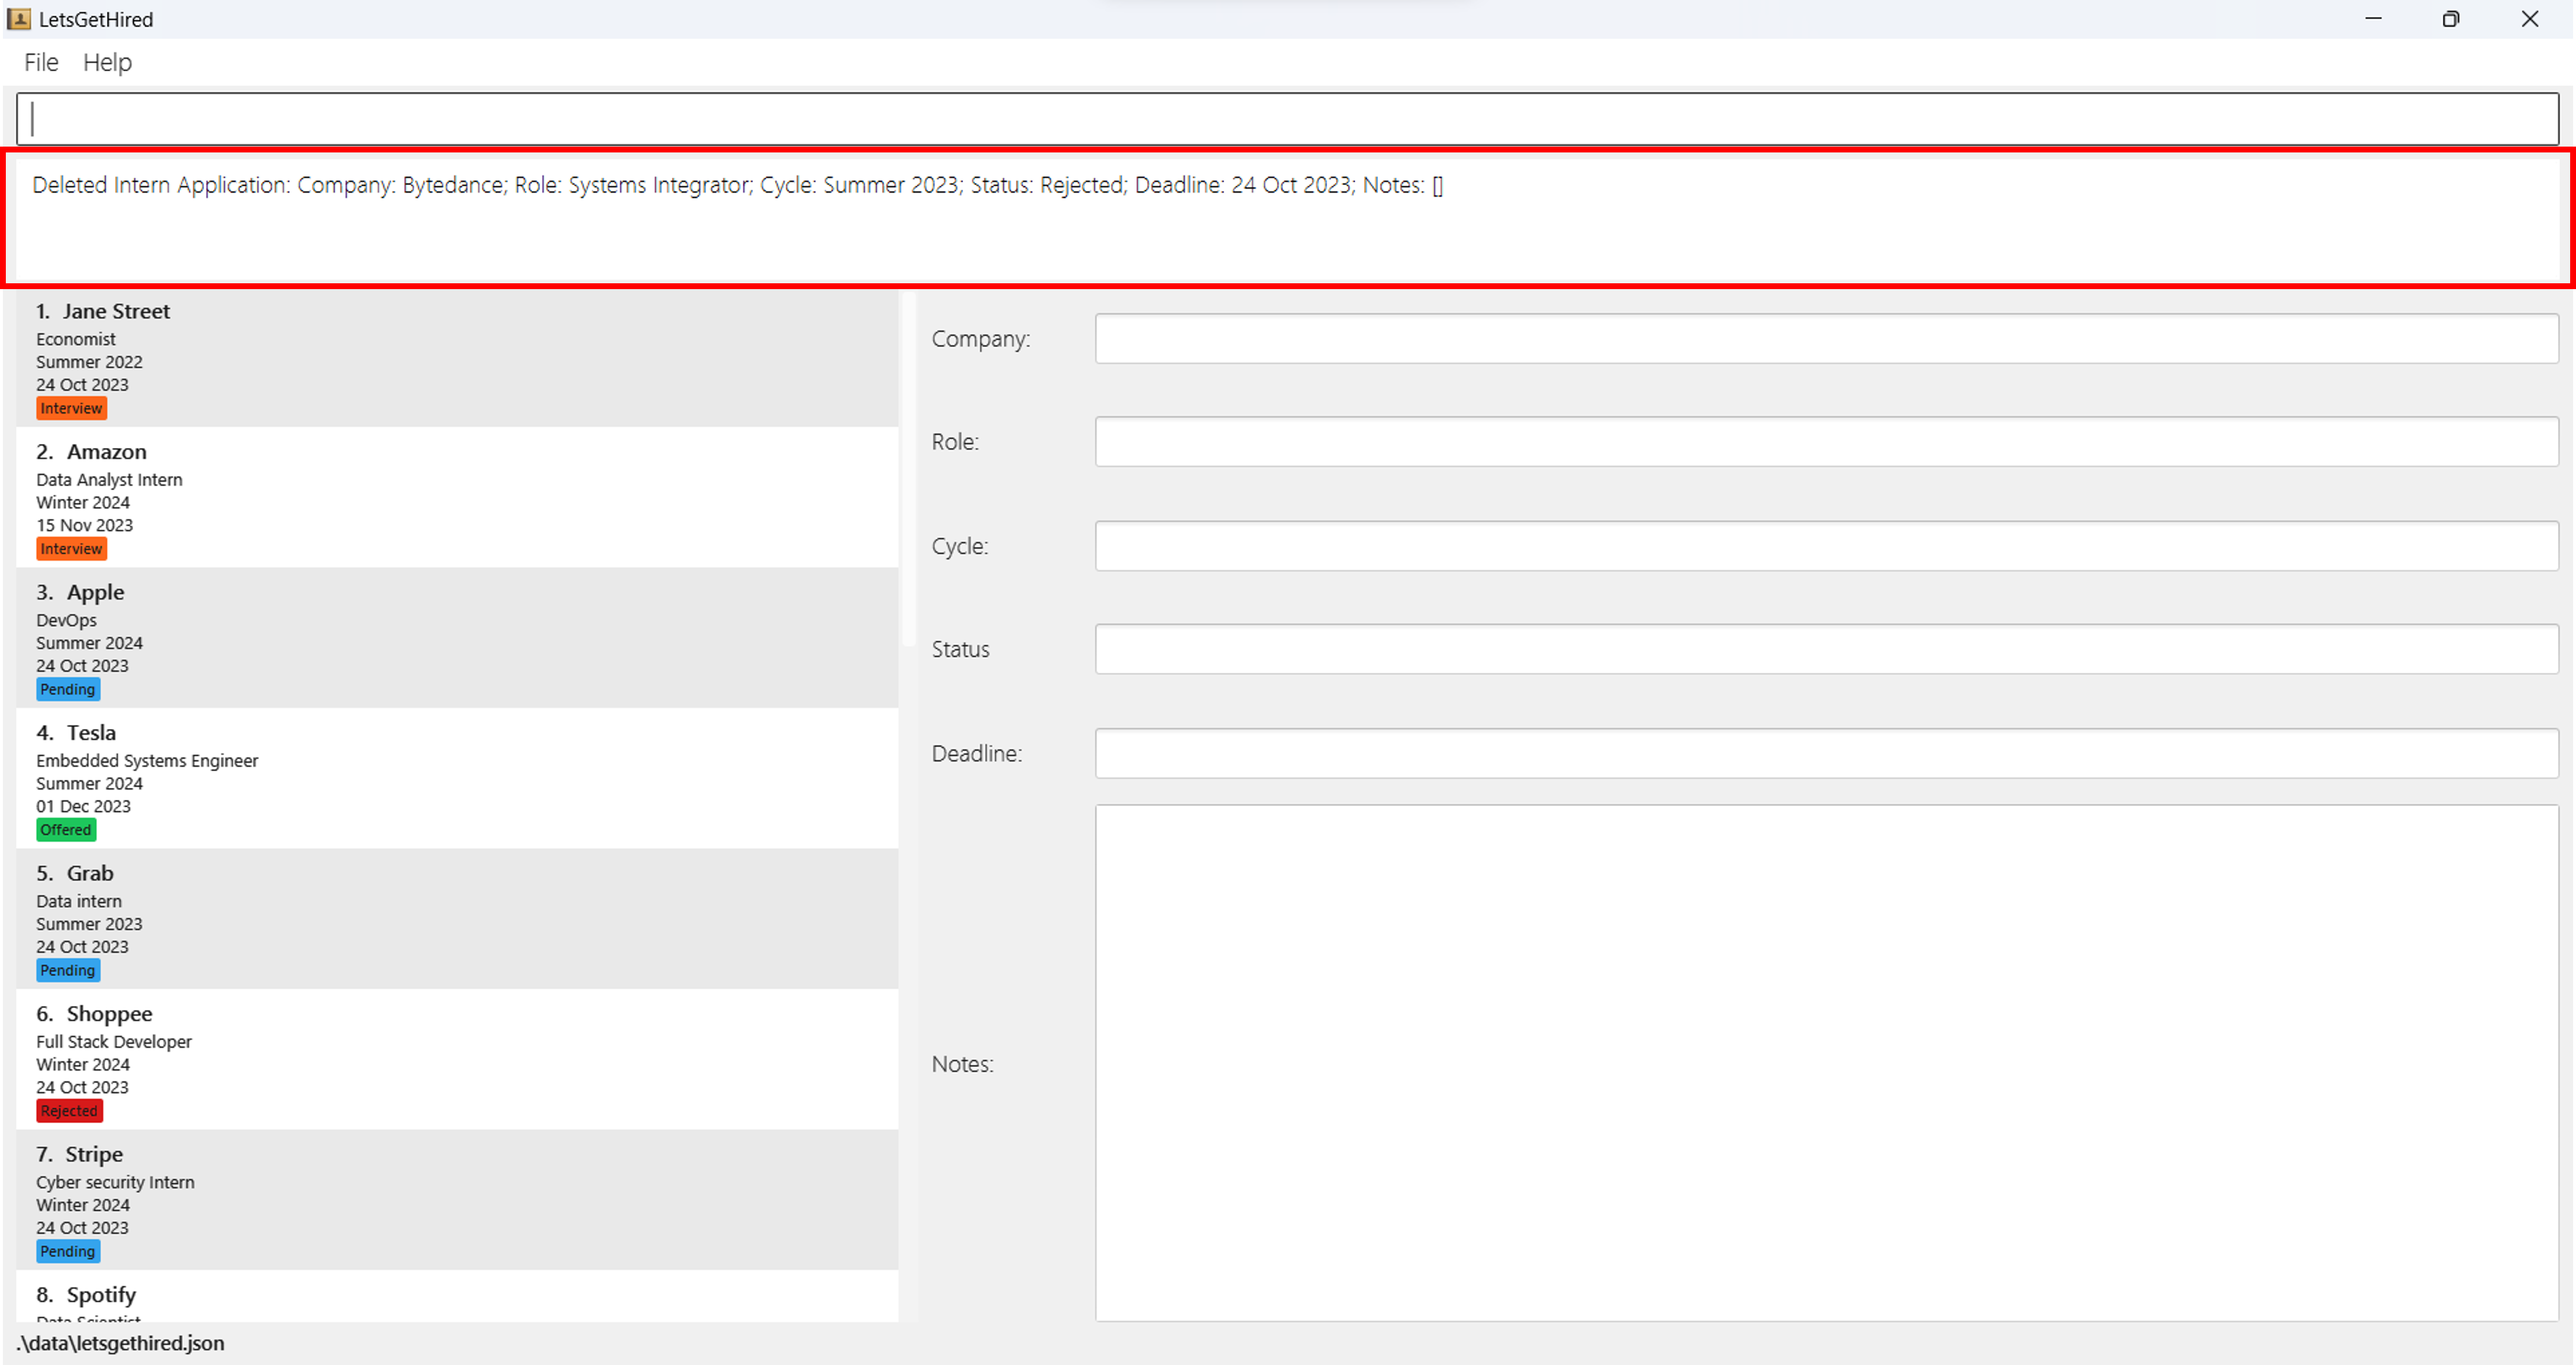
After hitting Enter, you can see that the fourth internship application is
removed from the list.
The remaining applications adjust their index numbers accordingly, ensuring a
continuous sequence.
- Before executing the
deletecommand, always double-check theINDEXto ensure you are removing the correct application. - If you accidentally deleted the wrong internship application, you can use
the
undocommand to reverse this command.
Reverting Your Mistake: undo
The undo command allows you to revert any modification made since the start
of the application, so you don't
have to be worried about making a mistake.
Command Usage
Command:
undo
Parameters:
The undo command does not require any parameters.
Example:
To undo your previous change, simply type:
undo
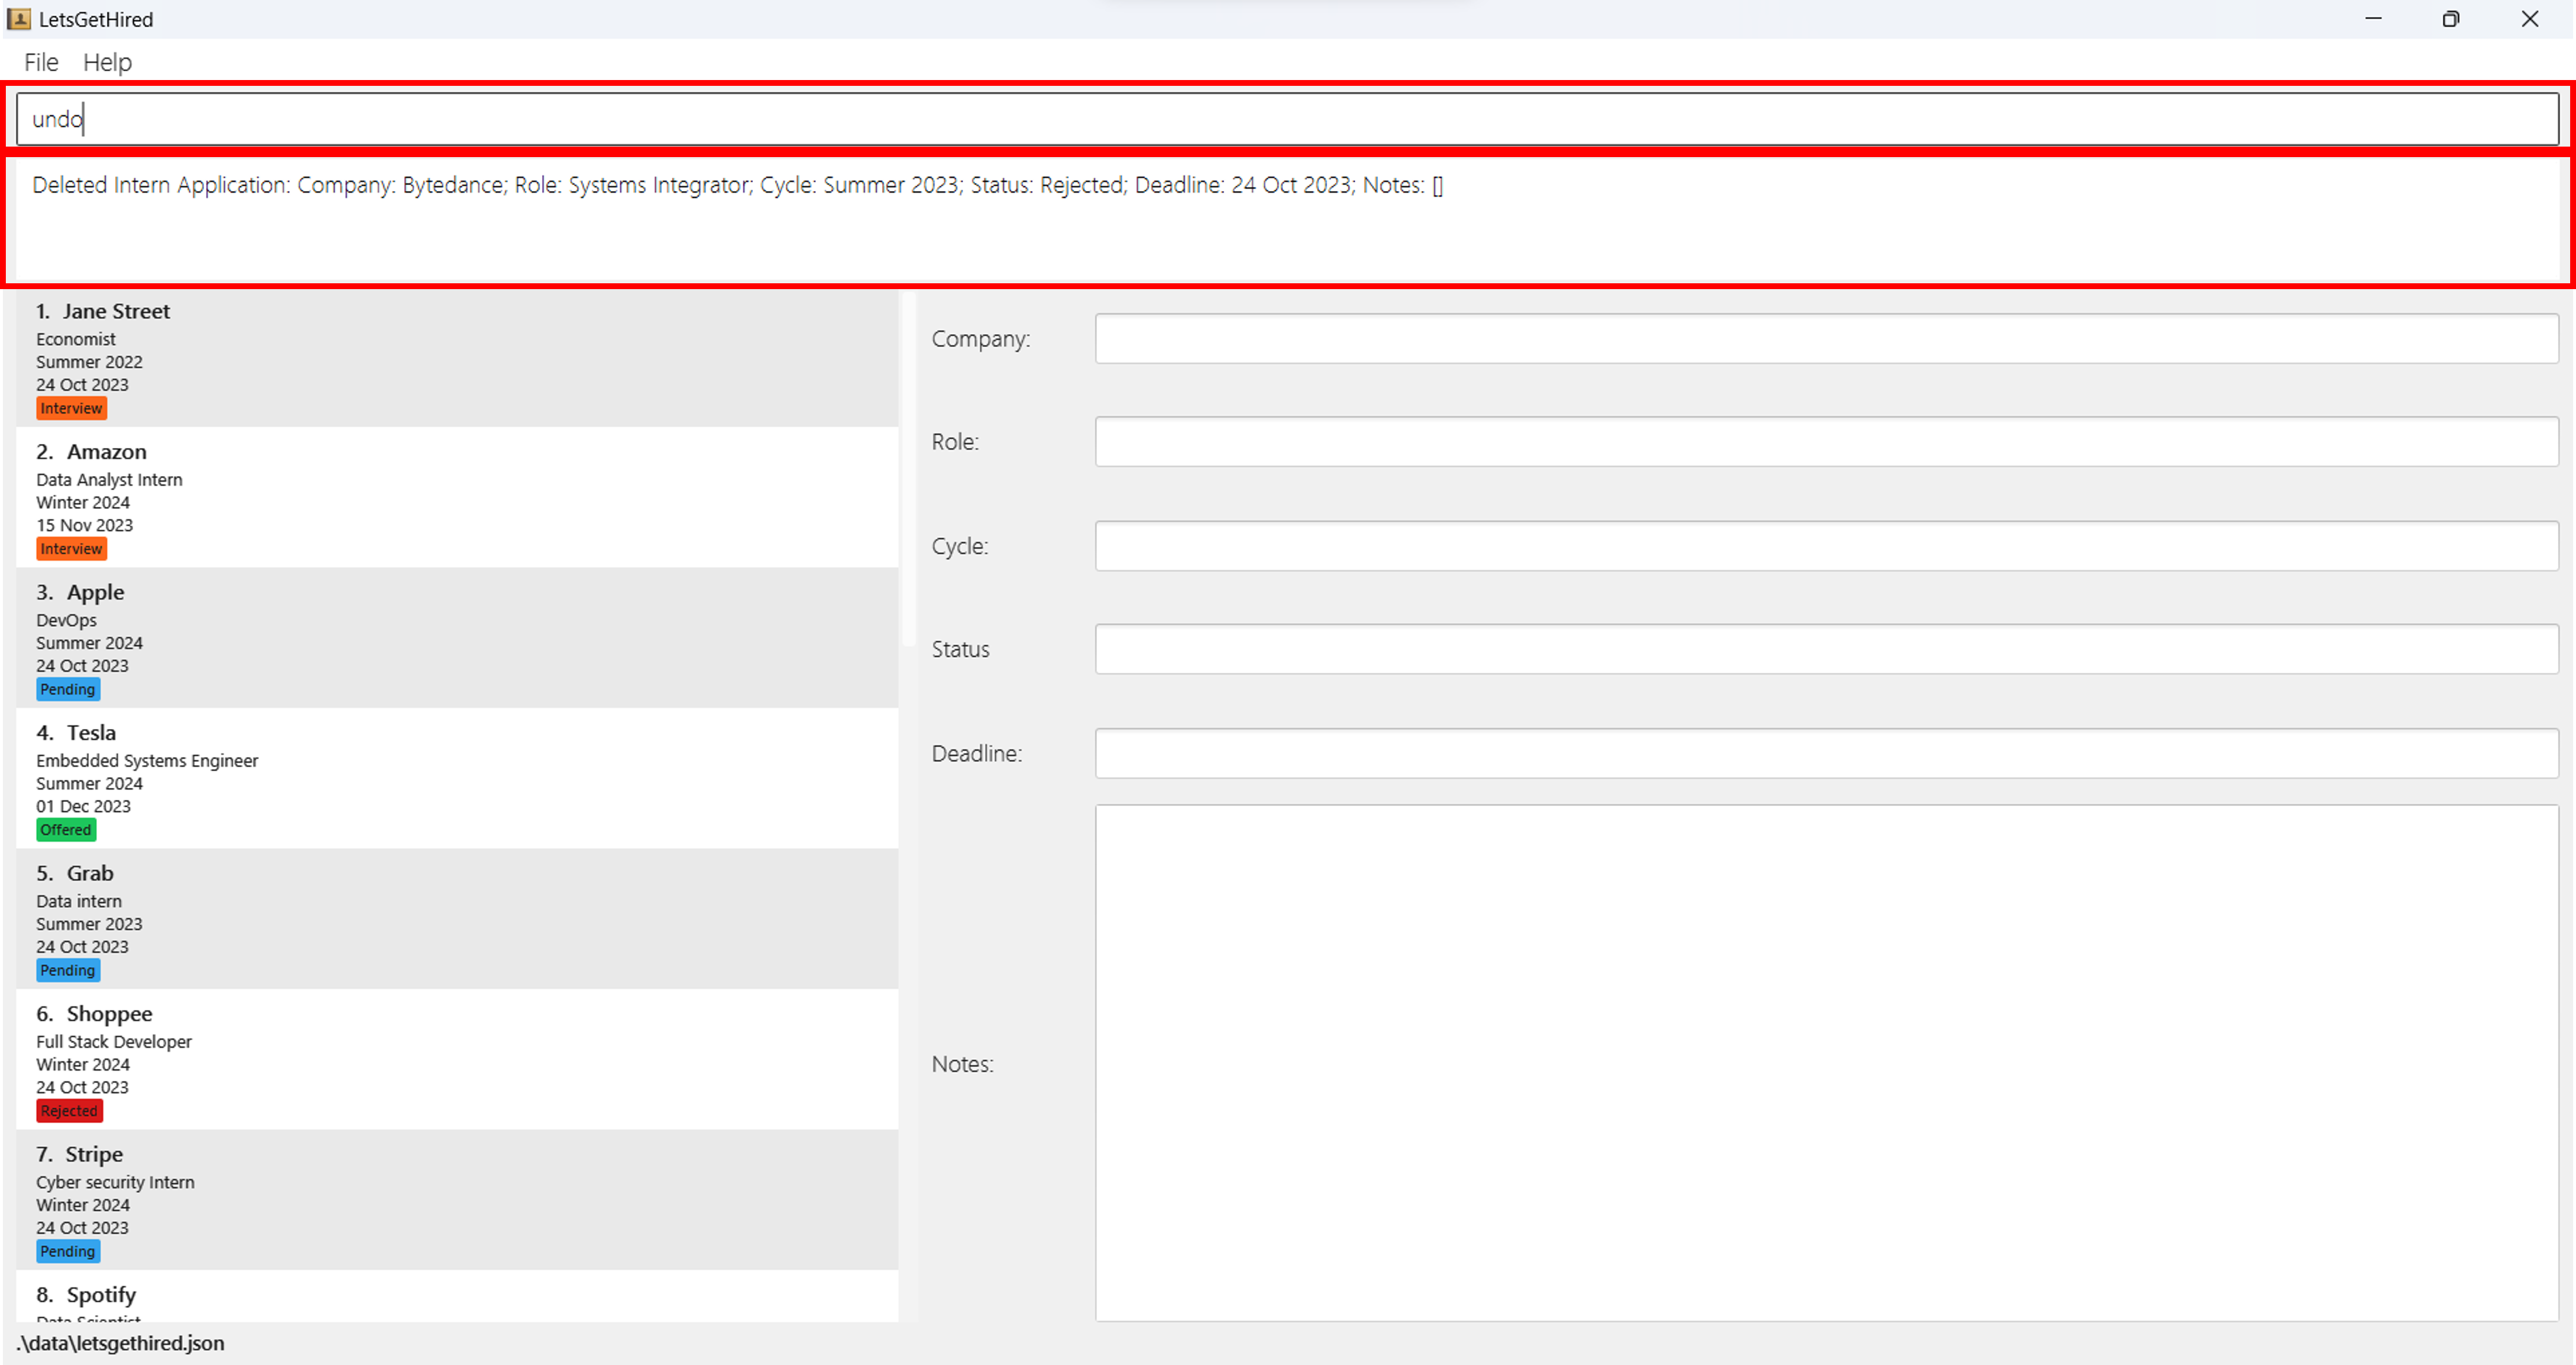
After hitting Enter, the application will undo the
previous add, edit, delete, clear, and note commands.
In the example below, the previous delete command is undone.
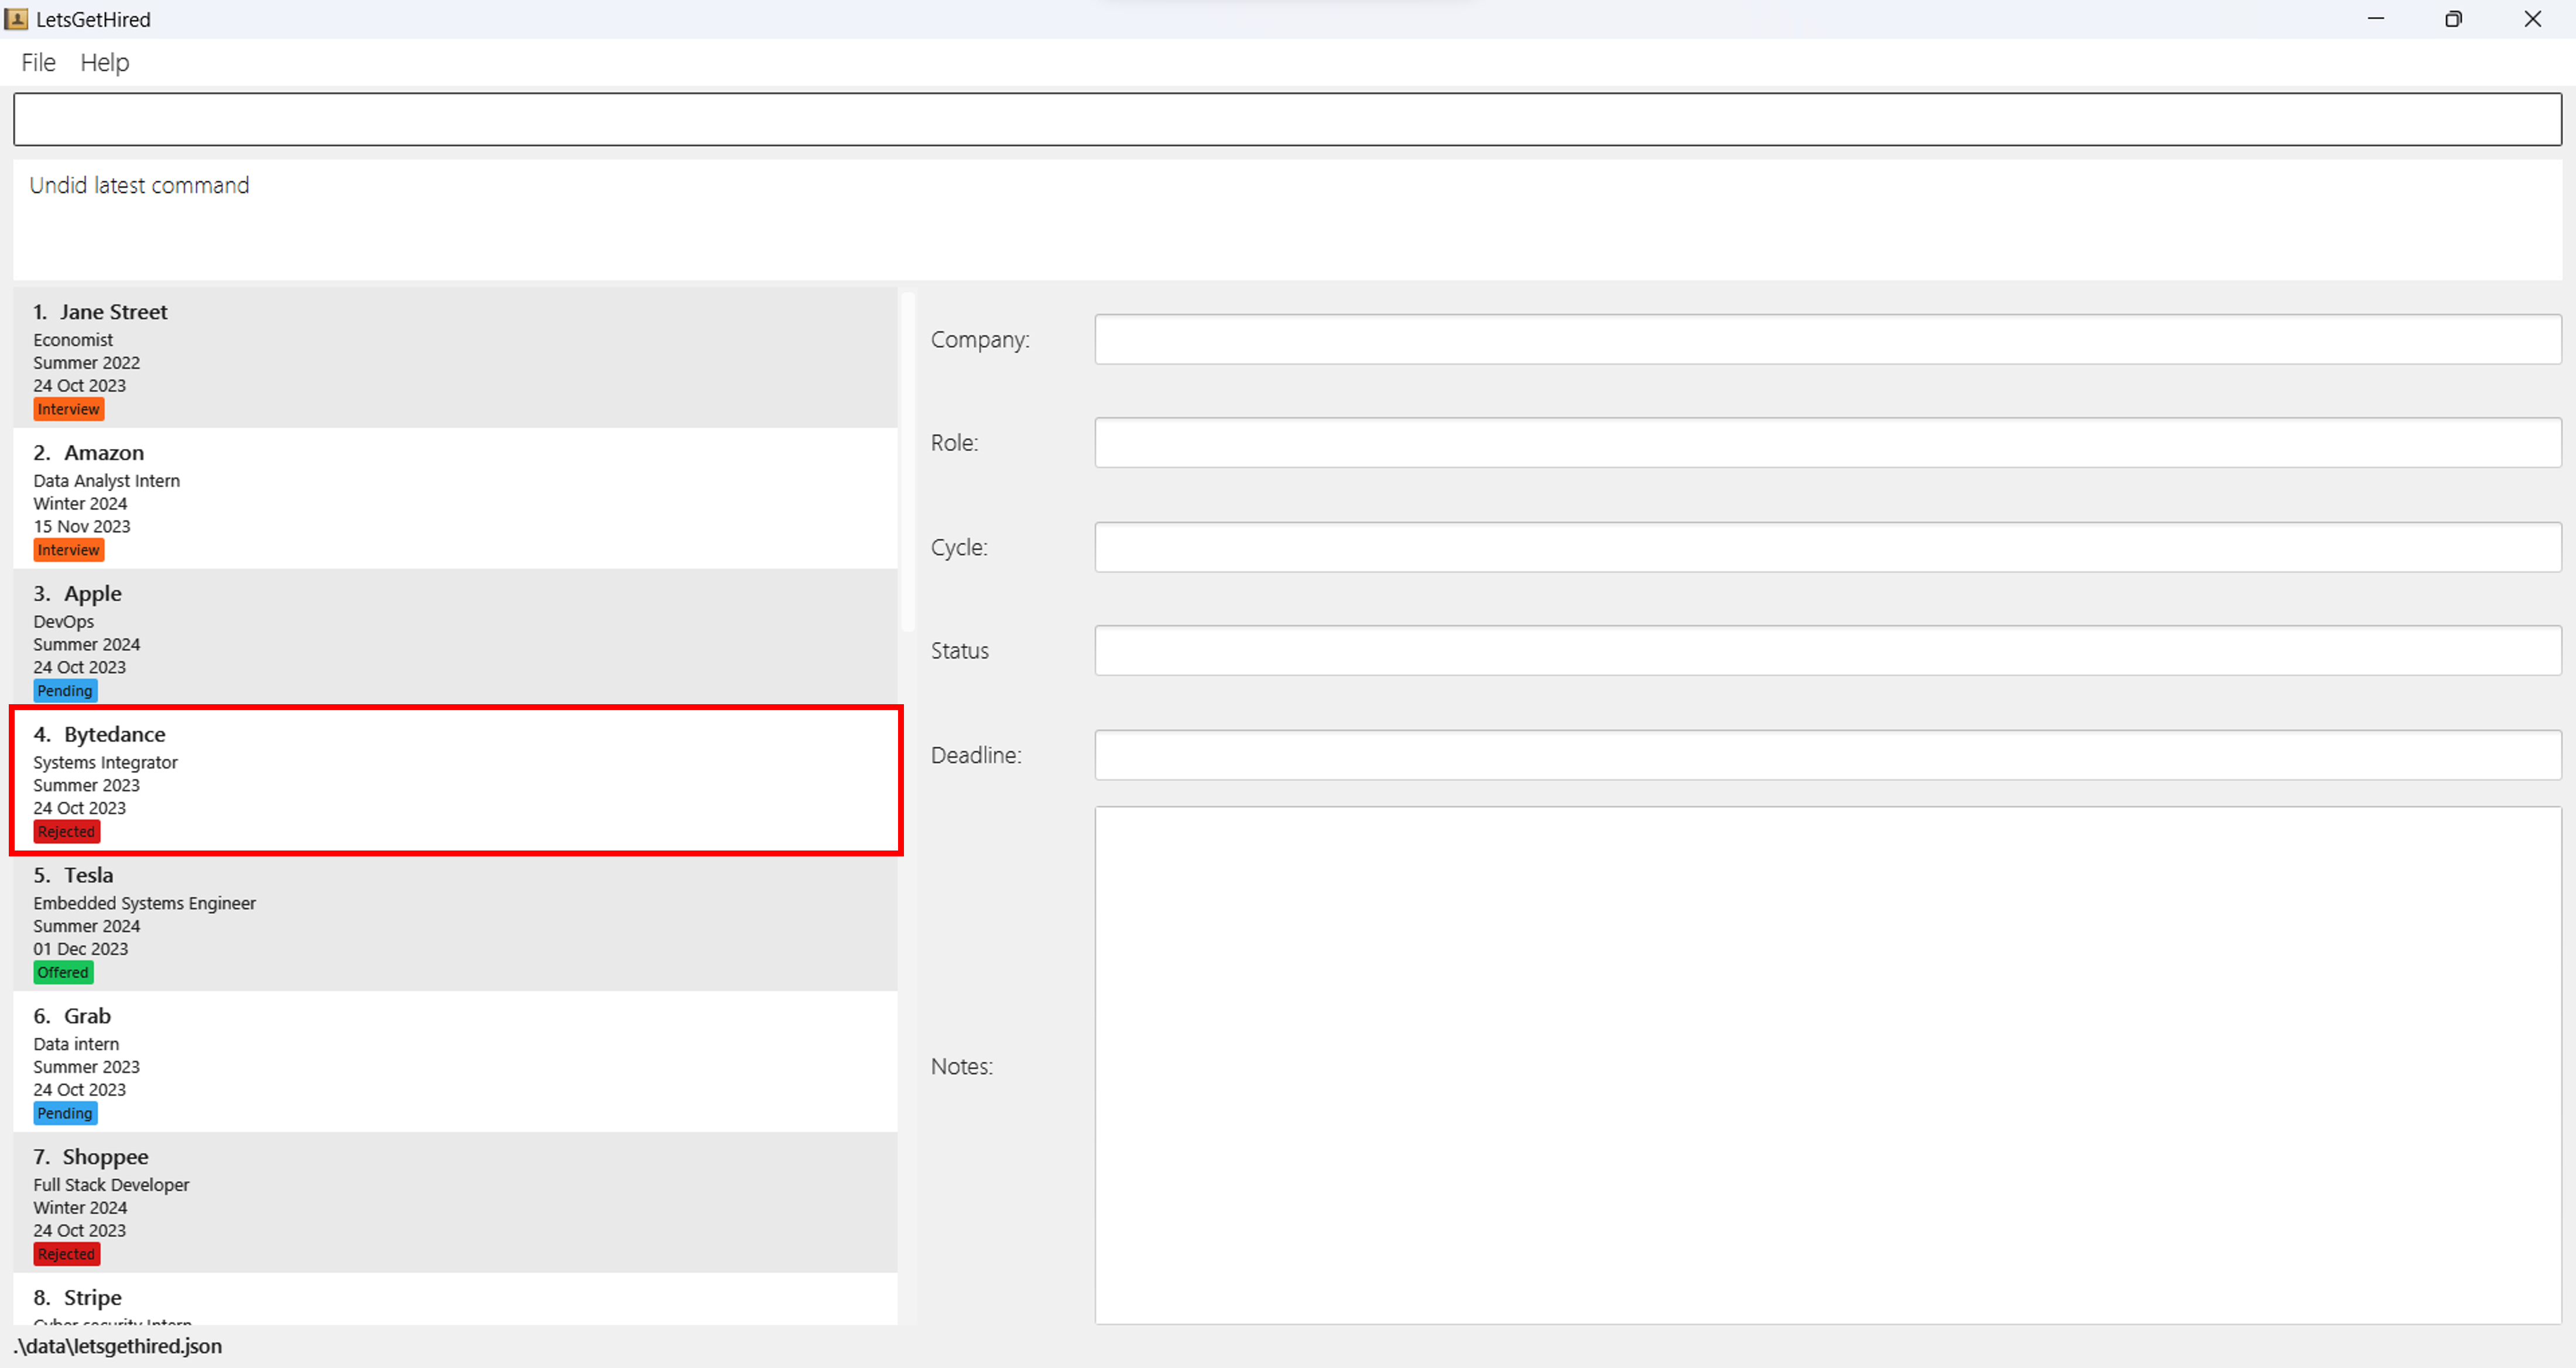
Once you are at the latest state, LetsGetHired will let you know that there are no changes to be undone.
Viewing Your Internship Application: view
The view command is designed to offer a detailed insight into your
individual internship applications.
While a summarized list gives you an overview of all your applications,
the view command provides an in-depth look
at each application, showcasing the specifics and any attached notes. This
ensures you have comprehensive access to the
data when preparing for interviews, follow-ups, or making decisions.
Command Usage
Command:
view INDEX
Parameters:
INDEX: Represents the position of the internship application in your list that you wish to view in detail.
The
INDEXshould be a positive integer. For example:1,2,3, etc. This corresponds to the application's position in your list.
Example:
If you wish to view the details of the first internship application on your list, the command would be:
view 1
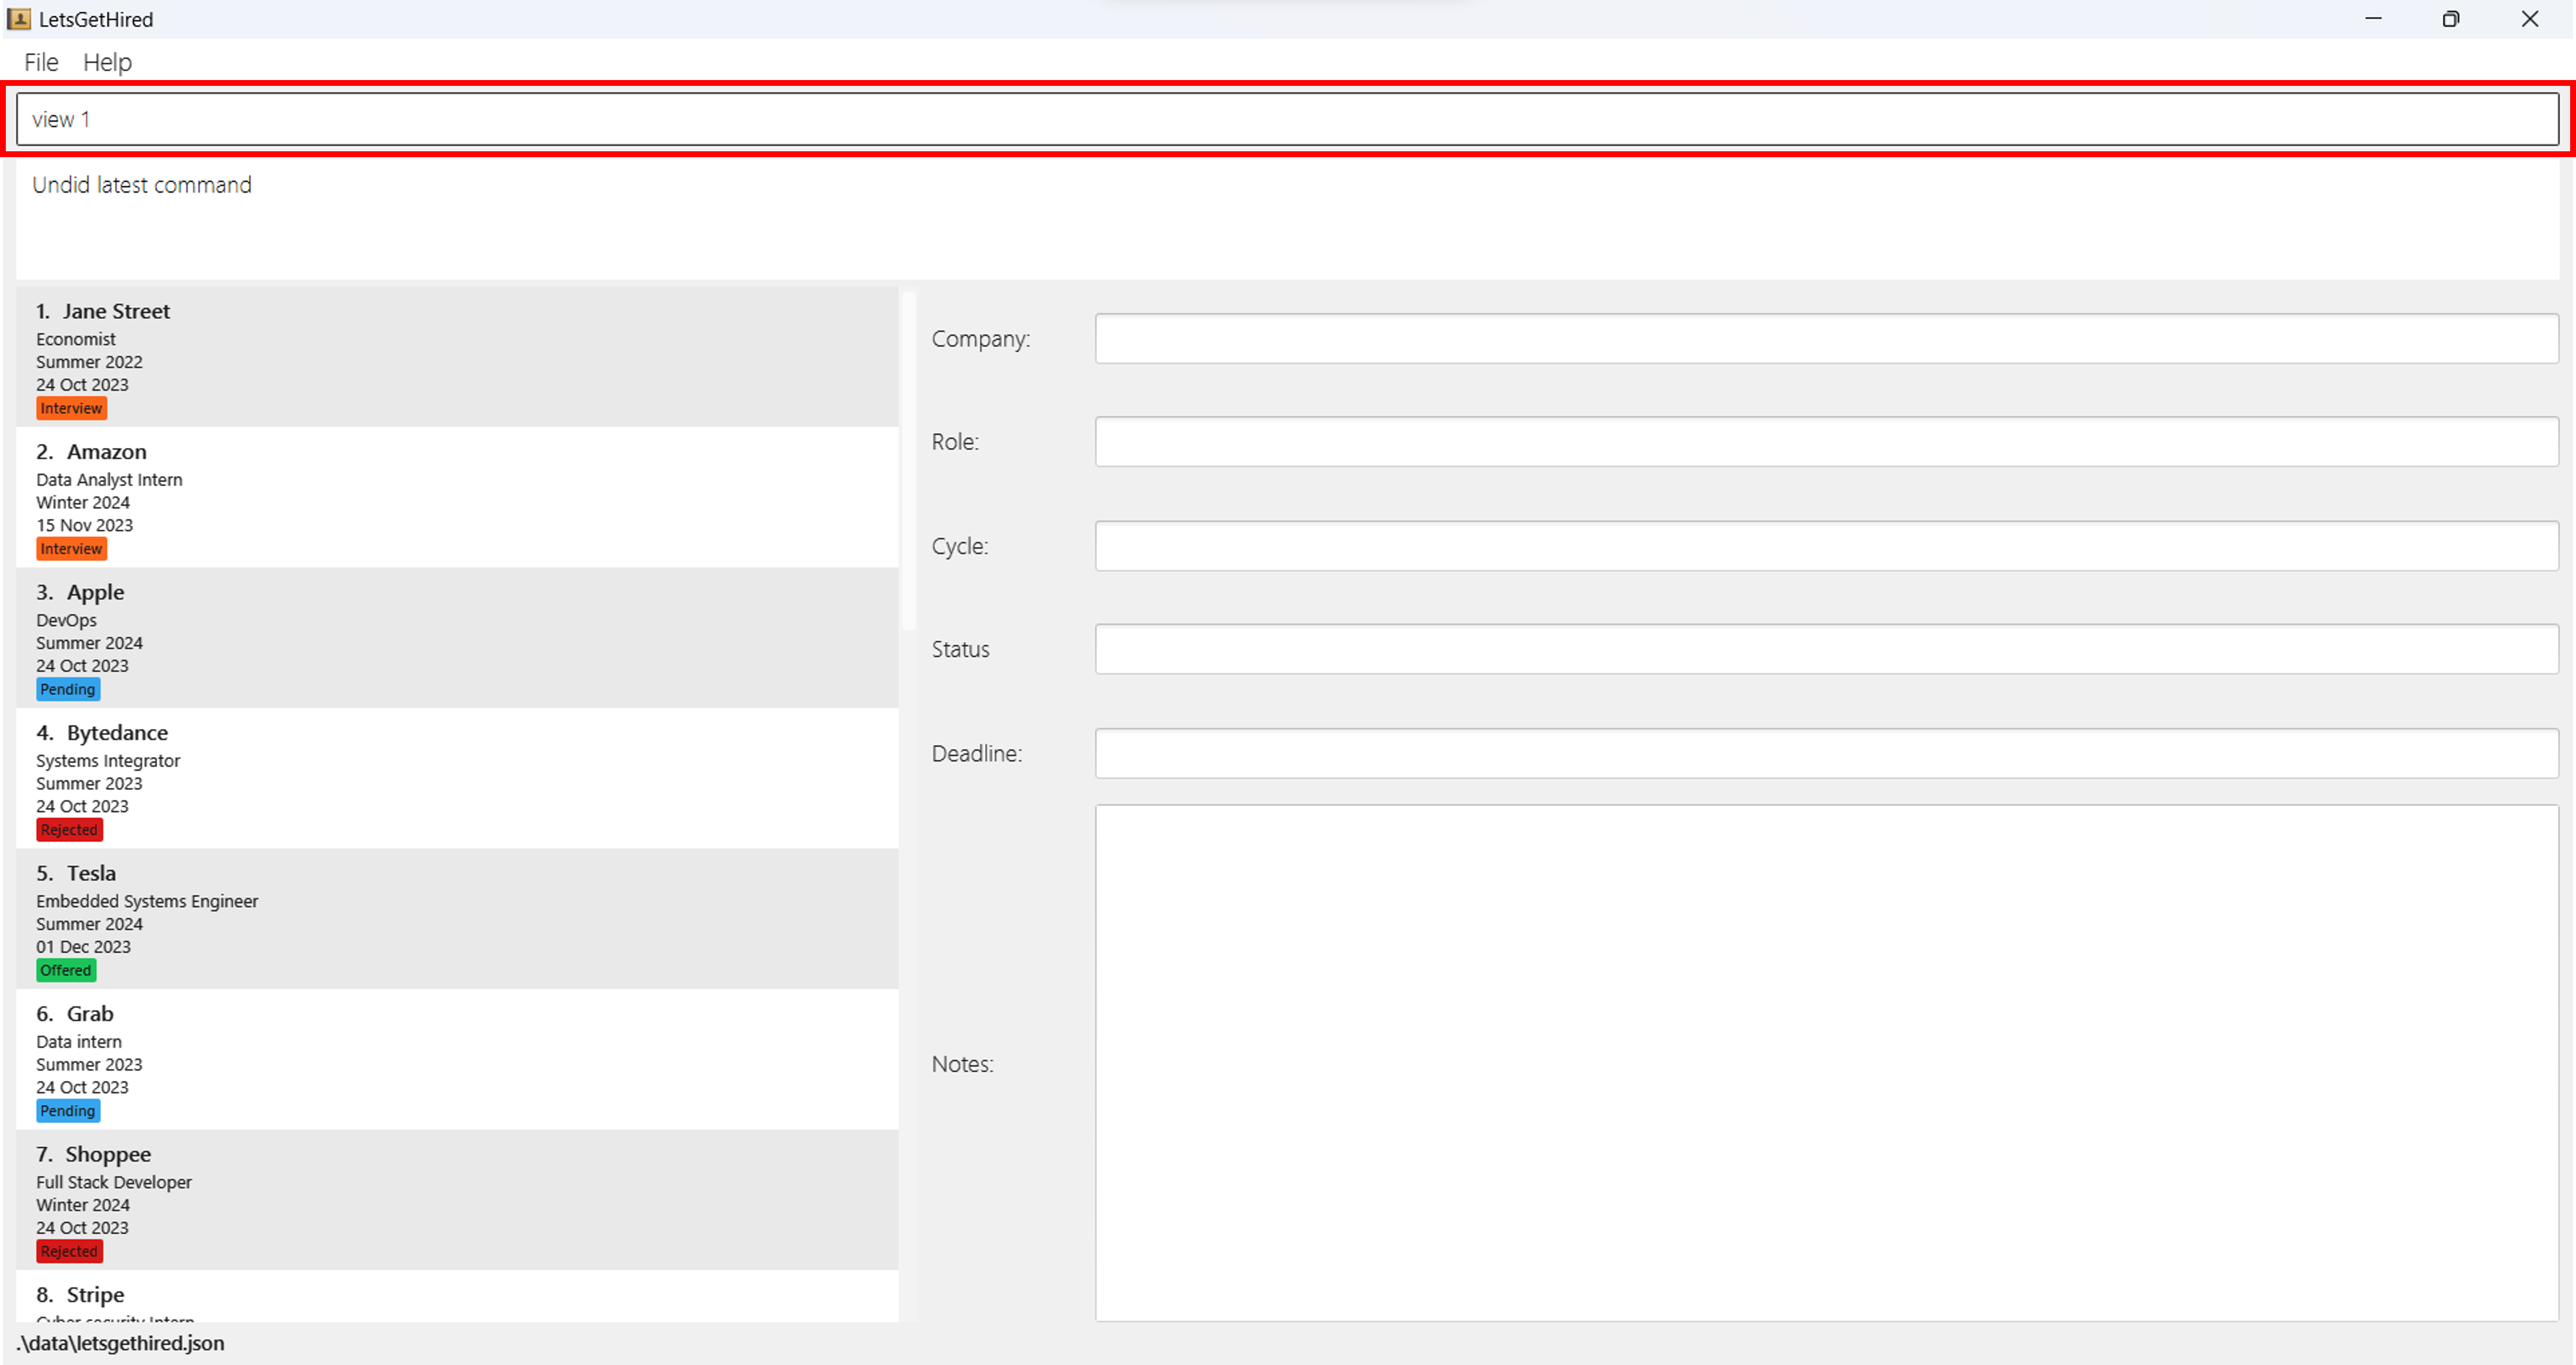
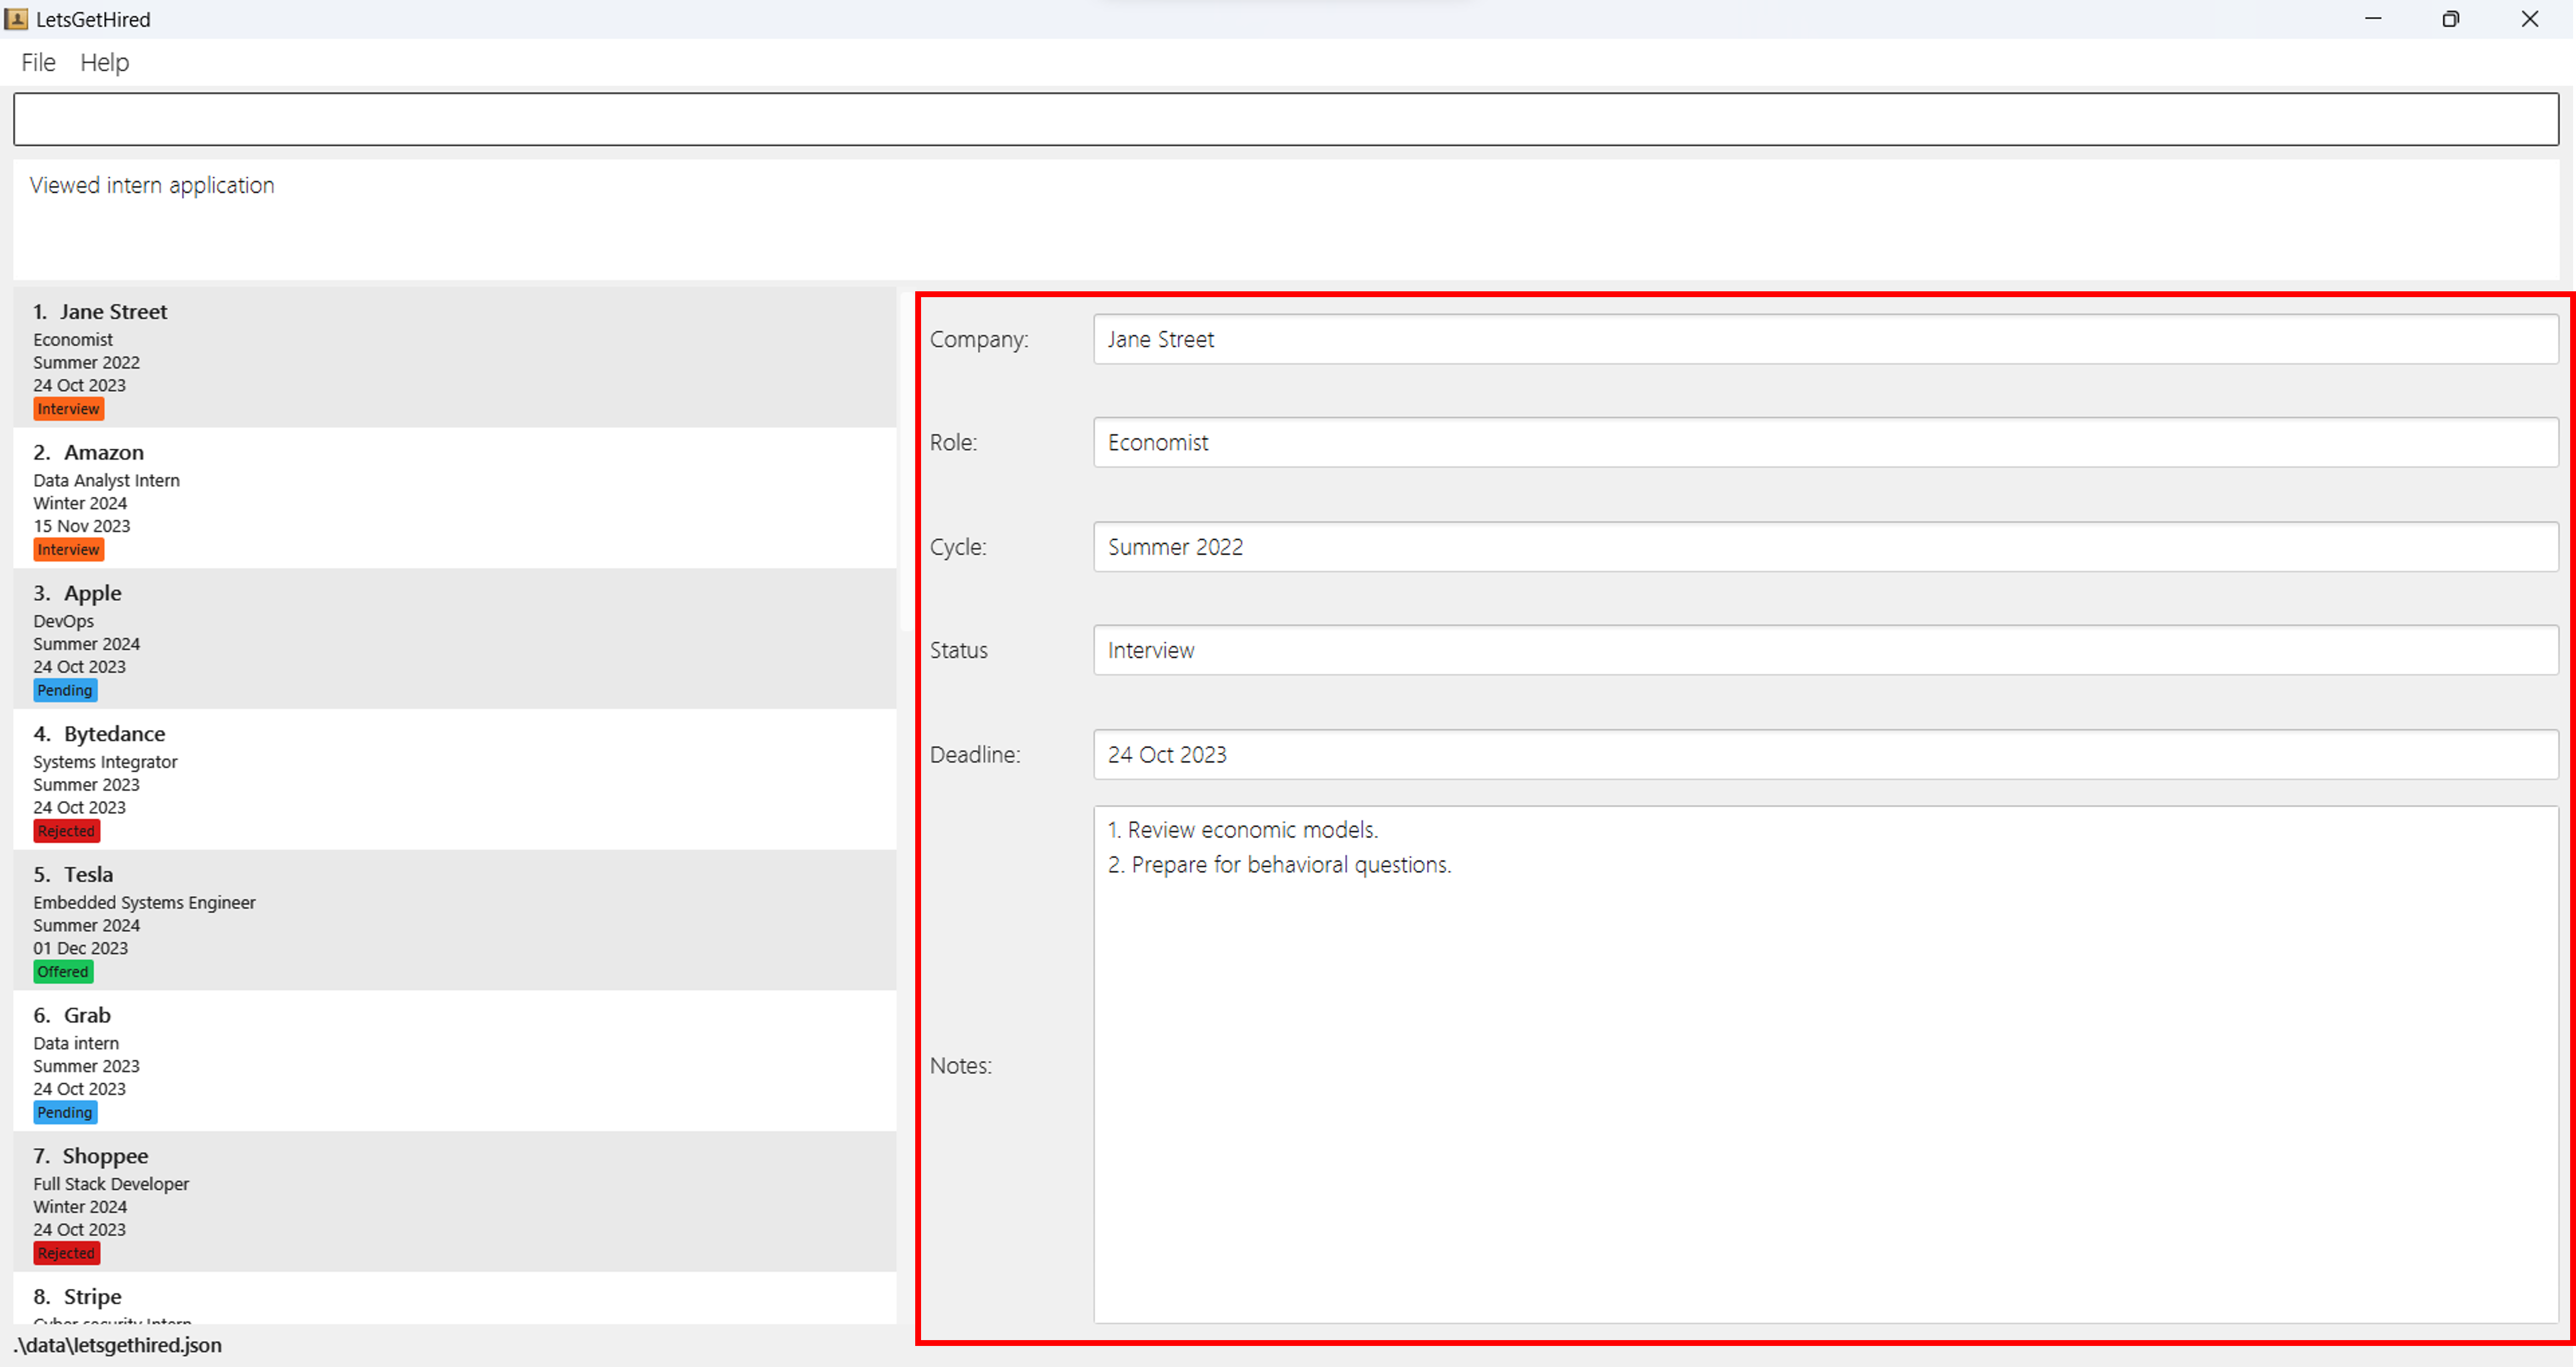
After hitting Enter, you can see that the first internship application details
is displayed on the Select View of the application.
Here, you can observe all the details of the application, including the
company's name, role, cycle, status, deadline,
and any attached notes. This meticulous breakdown ensures you're fully informed
and prepared for any next steps associated
with that particular application.
- Alternative: You may also click on a Internship Application Card to view the corresponding details.
- Utilize the
viewcommand prior to interviews or follow-ups to refresh your memory about the specifics of the application. - Regularly reviewing applications in detail can help you stay on top of any action items or next steps.
Searching Your Internship Application: find
The find command is a powerful tool designed to help you quickly search and
locate specific internship applications
based on various criteria.
Whether you're trying to find all applications for a specific company or filter
applications by their status, the find
command ensures you can effortlessly pinpoint the relevant records.
Command Usage
Command:
find [n/COMPANY_NAME] [r/ROLE] [c/CYCLE] [s/STATUS] [d/DEADLINE] [i/NOTE]
Parameters:
At least one of the optional parameters must be provided.
- n/COMPANY_NAME (Optional): Represents the company's name you're trying to search for.
- r/ROLE (Optional): Refers to the specific internship role you wish to locate.
- c/CYCLE (Optional): Identifies the internship cycle (
e.g.,
Summer,Winter) you want to search for. - s/STATUS (Optional): Helps filter applications based on their current status.
- d/DEADLINE (Optional): Locates applications by their deadline.
- i/NOTE (Optional): Searches applications based on specific notes attached to them.
Example:
Suppose you want to quickly locate all your applications for the company Google. Your command would be:
find n/Google
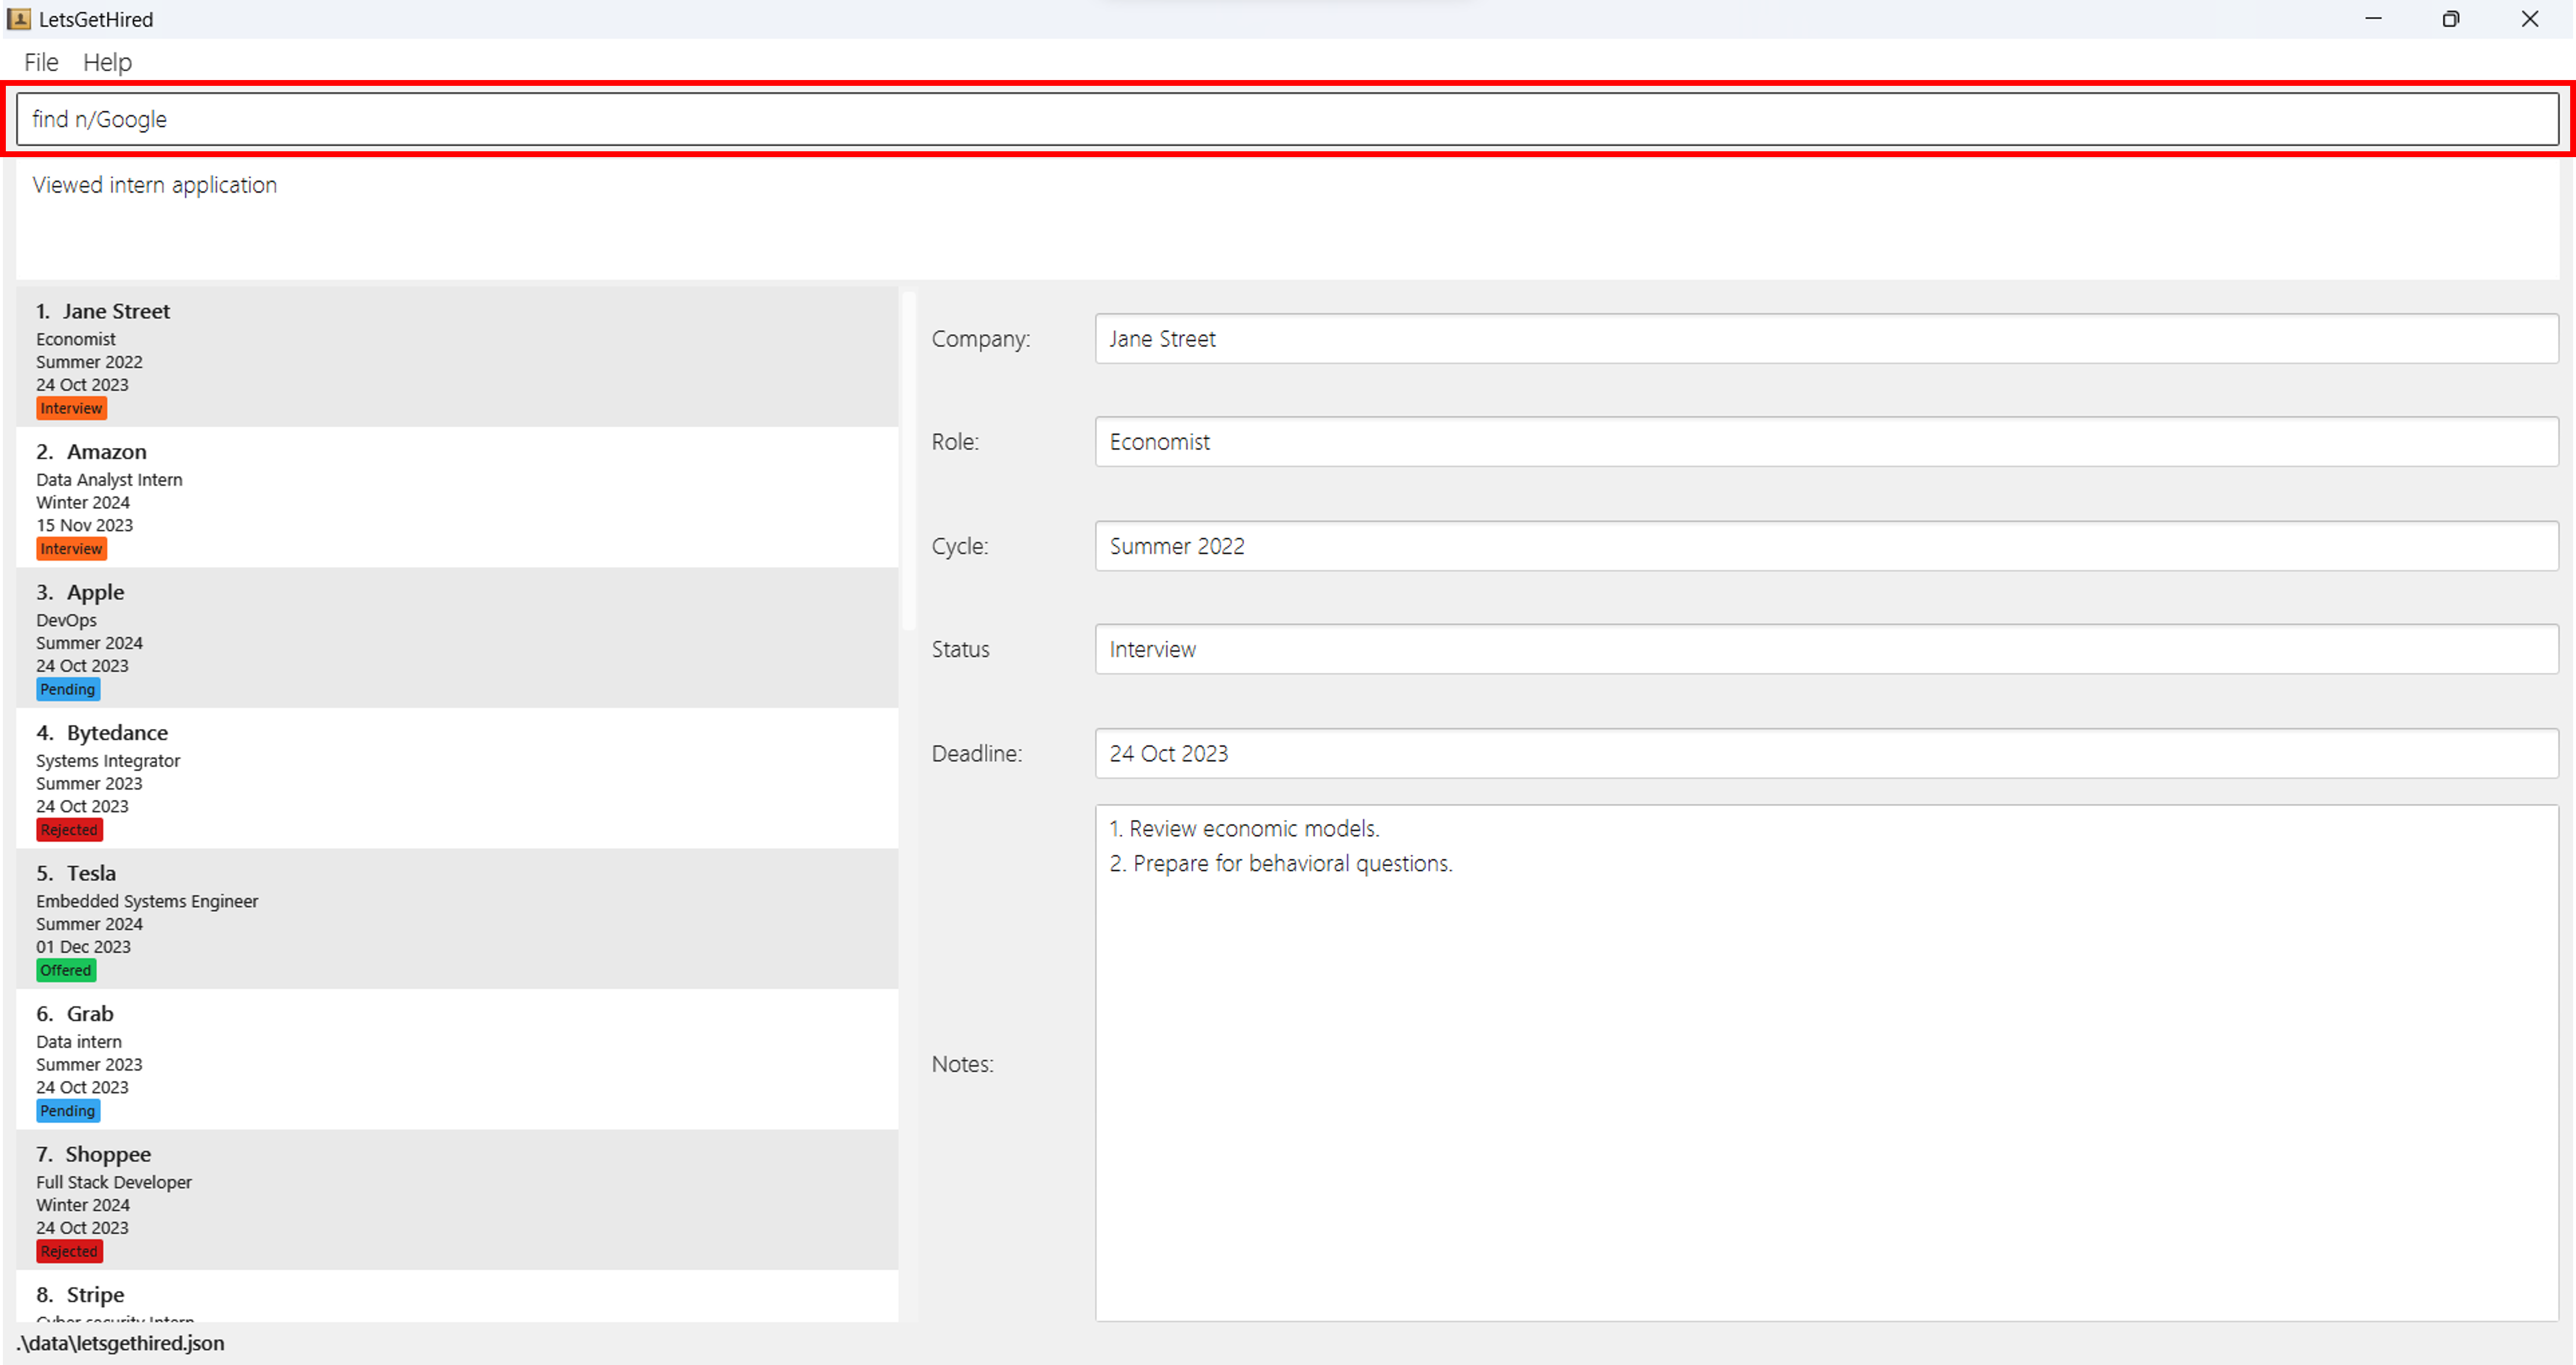
After hitting Enter, you can see that all the applications where the company
name matches or contains the keyword Google.
Note about find command:
Partial Matches: The
findcommand is robust and recognizes partial matches. So, if you search forApl, it'll show applications forApple,apple, and evenAlphabet Limited.Exception: Partial Match does not work on
STATUSparameter. You need to specify the fullSTATUSto search for them.Multiple Criteria: By adding multiple parameters, you can refine your search further. For instance,
find n/Google c/Summer s/Pendingwould display applications that meet ALL the following criteria:- Company name contains
Google - Cycle contains
Summer - Status is
Pending
- Company name contains
This feature is particularly useful when you need a more refined list or when you're unsure about the exact details but remember a few keywords.
Sorting Your Internship Applications: sort
The sort command is designed to help you quickly and conveniently organize
your internship applications.
With this command, you can prioritize and manage your applications according to a variety of criteria.
Command Usage
Command:
sort [n/ORDER] [r/ORDER] [c/ORDER] [s/ORDER] [d/ORDER]
Parameters:
- Exactly one of the optional parameters must be provided.
- The
ORDERparameter must only be replaced by eithera(for ascending order) ord(for descending order).
- n/ORDER (Optional): Sorts applications by the company name.
- r/ORDER (Optional): Sorts applications by the role.
- c/ORDER (Optional): Sorts applications by the cycle.
- s/ORDER (Optional): Sorts applications by their status.
- d/ORDER (Optional): Sorts applications by their deadline.
Note about sorting by Deadline:
- The internship applications will be sorted in chronological order.
- In ascending order, applications with no deadline will be sorted to the end.
- In descending order, applications with no deadline will be sorted to the start.
Example:
Suppose you want to sort your internship applications by the company name, in ascending order. Your command would be:
sort n/a
After hitting Enter, you can see that your internship application list is
sorted in alphabetical order based on the company name.
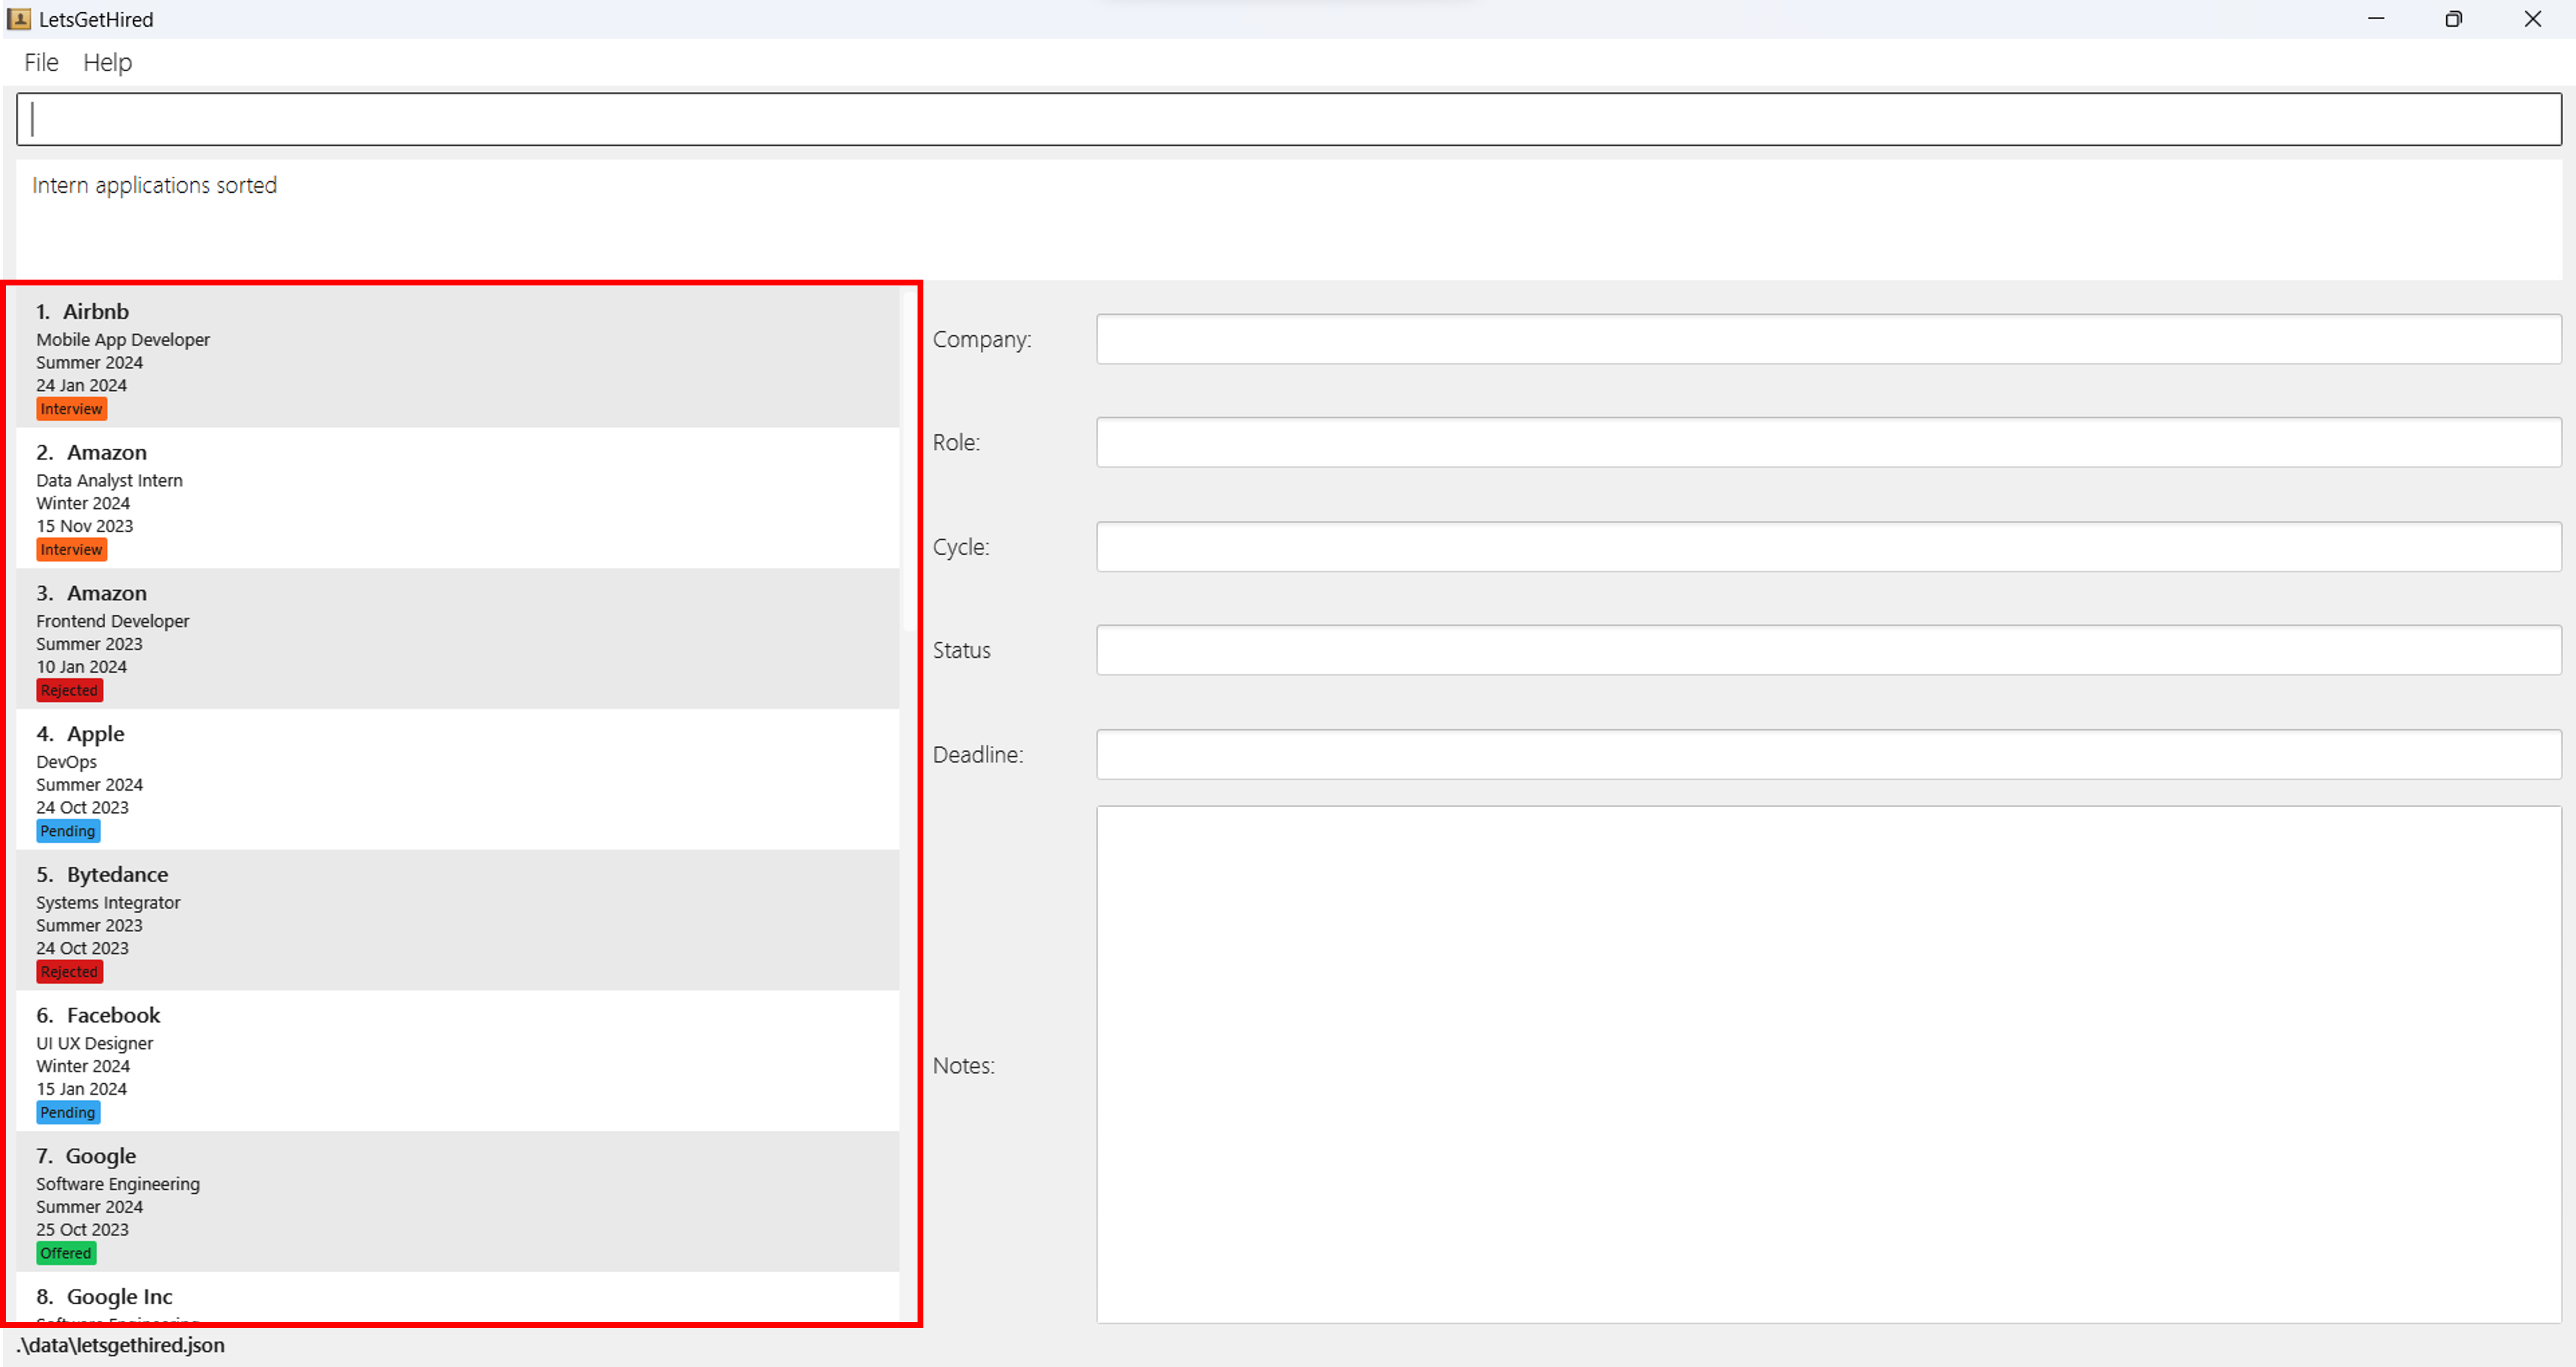
Regularly sorting and reviewing your applications can help you manage your applications better and not miss any important deadlines.
Clearing Your Internship Applications : clear
The clear command provides an efficient way to erase all internship
application records in your database.
It's a complete reset, ensuring you have a clean slate to work with. This command can be particularly useful if you've been experimenting with sample data or if you want to start fresh for a new application cycle.
Command Usage
Command:
clear
Parameters:
The clear command does not require any parameters.
Example:
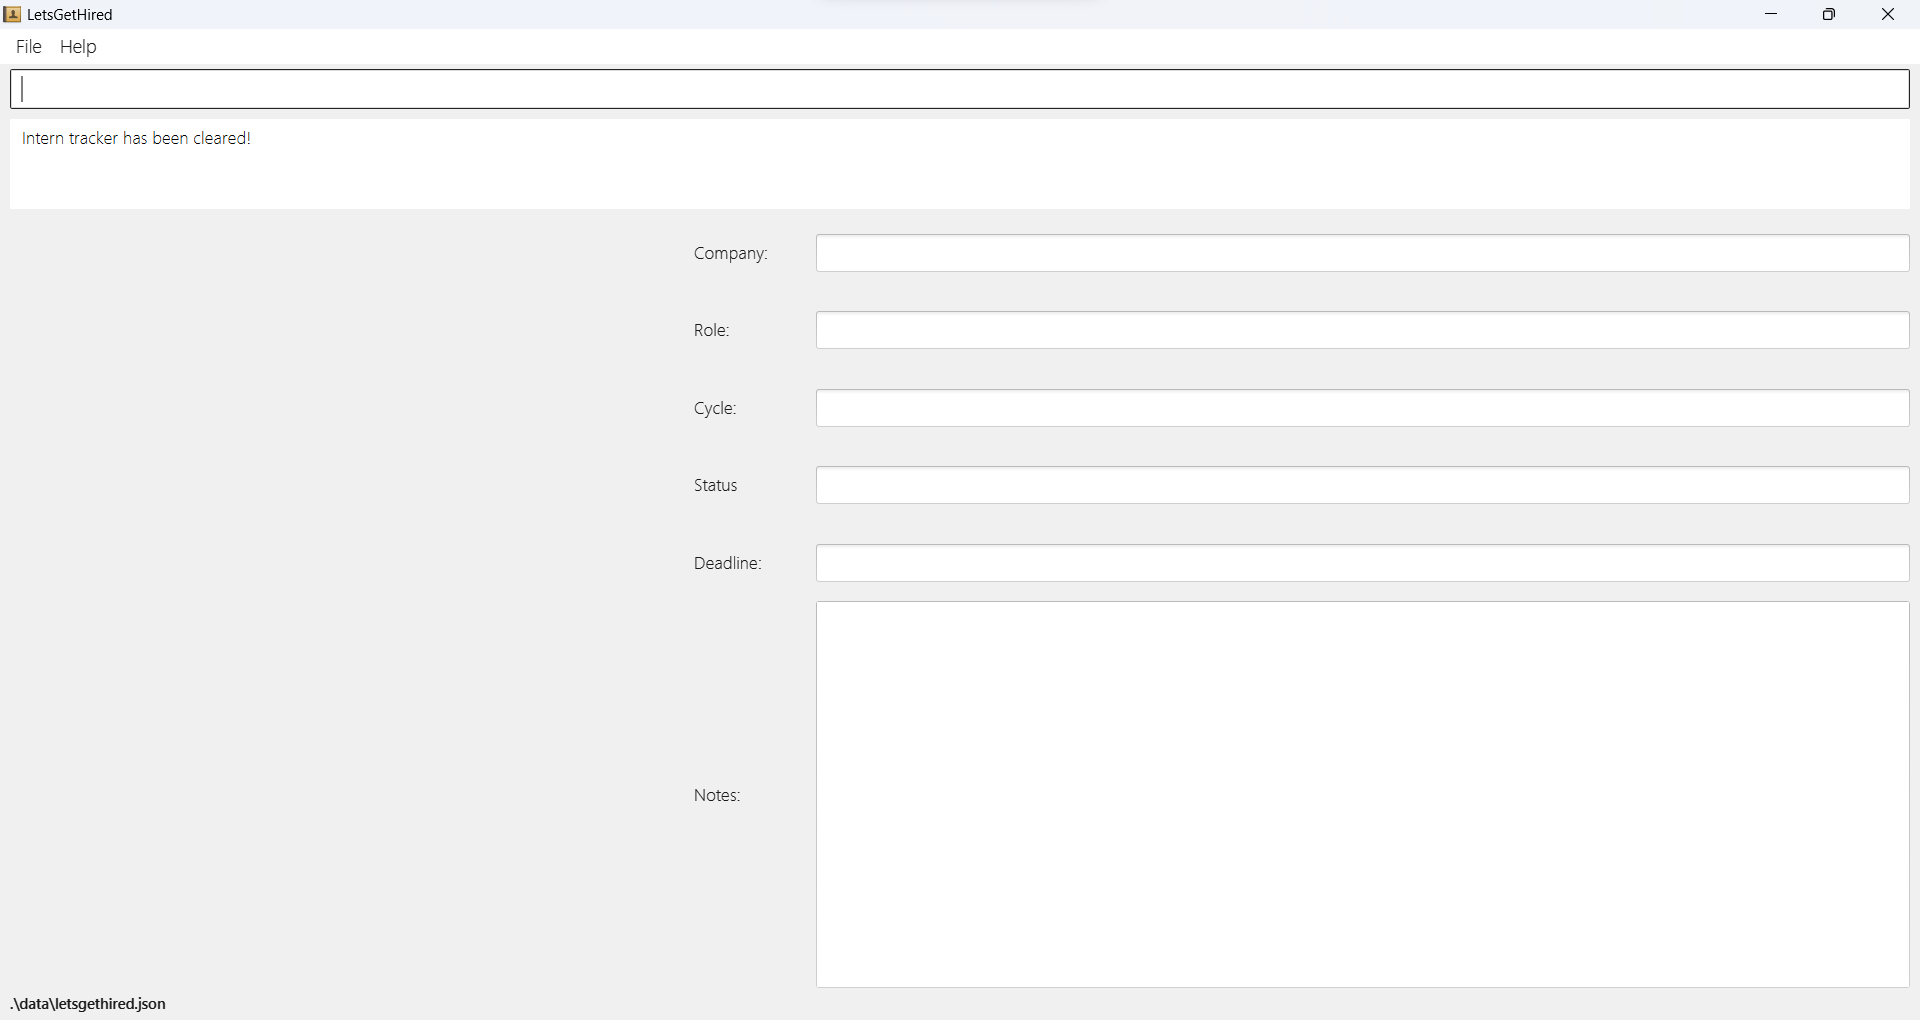
You are starting on a new internship application cycle, and you want to start from a clean state. You can simply type:
clear
After hitting Enter, you now have a fresh new empty list for you to fill up
with your new internship applications.
- Recommended Use: If you've been familiarizing yourself with LetsGetHired using sample data, consider using the
clearcommand to wipe the slate clean and input your genuine applications. - If you accidentally cleared your internship applications list, you can use the
undocommand to reverse this command.
Exiting LetsGetHired : exit
The exit command is designed to offer you a smooth and swift way to close
the LetsGetHired program.
With just a simple command, you can ensure that the application terminates gracefully, safeguarding all the data and changes you've made during your session.
Command Usage
Command:
exit
Parameters:
The exit command does not require any parameters.
How it Works:
Upon executing the exit command, LetsGetHired will initiate its shutdown
sequence.
This involves saving any changes you've made during your session and closing the
application window.
It ensures that all your data remains intact the next time you launch the
program.
Storage
This section will help you understand how your data is being stored in your computer.
Saving the data
LetsGetHired data are saved in the hard disk automatically after any command that changes the data. There is no need to save manually.
Editing the data file
LetsGetHired data are saved automatically as a JSON file [JAR file location]/data/letsgethired.json.
If you are an advanced user, you are welcome to update data directly by editing that data file.
Caution: If your changes to the data file makes its format invalid, LetsGetHired will discard all data and start with an empty data file at the next run. Hence, it is recommended to take a backup of the file before editing it.
Command Summary
| Command | Usage | Example |
|---|---|---|
| Help | help | help |
| List | list | list |
| Add | add n/COMPANY_NAME r/ROLE c/CYCLE [s/STATUS] [d/DEADLINE] | add n/Google r/Software Engineering c/Summer 2024 s/Offered d/25 Oct 2023 |
| Edit | edit INDEX [n/COMPANY_NAME] [r/ROLE] [c/CYCLE] [s/STATUS] [d/DEADLINE] | edit 1 n/Apple |
| Note | note INDEX [i/NOTE] (to add a note)note INDEX [o/NOTE_INDEX] (to delete a note) | note 1 i/Interview on 26 Octnote 1 o/1 |
| Delete | delete INDEX | delete 1 |
| Undo | undo | undo |
| View | view INDEX | view 1 |
| Find | find [n/COMPANY_NAME] [r/ROLE] [c/CYCLE] [s/STATUS] [d/DEADLINE] [i/NOTE] | find n/Google |
| Sort | sort [n/ORDER] [r/ORDER] [c/ORDER] [s/ORDER] [d/ORDER] | sort n/a |
| Clear | clear | clear |
| Exit | exit | exit |
This table provides a quick and clear reference to the commands available in LetsGetHired. You can use it to efficiently navigate through the program and manage your internship applications.
FAQ
Q: How do I know my Java version?
A: Open your command terminal and enter the following command:
java -version
Q: How do I transfer my data to another Computer?
A: Install LetsGetHired in the other computer and overwrite the empty data
file it creates with the file that
contains the data from your previous LetsGetHired home folder.
Known issues
- When using multiple screens, if you move the application to a secondary
screen, and later switch to using only the
primary screen, the GUI will open off-screen. The remedy is to delete
the
preferences.jsonfile created by the application before running the application again.
Glossary
Here are the definitions of some terms which is used throughout the User Guide and Developer Guide.
| Term | Definition |
|---|---|
| Command Line Interface (CLI) | A type of user interface in which the user interacts with a system by typing commands into a terminal or console. |
| Graphical User Interface (GUI) | A type of user interface that allows users to interact with a system through graphical icons and visual indicators. |
| Hyperlink (link) | A reference in the webpage that allows users to directly access another location or file within the same or a different webpage. |
| Command Terminal | A software-based interface that provides an environment for users to interact with a computer's operating system or software by typing textual commands and receiving text-based output. |
| Sample Data | Pre-populated data used for demonstration purposes, enabling new users to see how the application functions with realistic examples. |
| Workflow | A systematic and repeatable pattern of activity that a user follows to accomplish a specific task. |
| Command | An input from the user that tells LetsGetHired which action to perform. |
| Parameter | A placeholder used in a command to represent a piece of information that needs to be provided when that command is executed. |
| JSON (JavaScript Object Notation) | A lightweight data-interchange format that is easy for humans to read and write and easy for machines to parse and generate. |